Crossfade
Audiodrome is a royalty-free music platform designed specifically for content creators who need affordable, high-quality background music for videos, podcasts, social media, and commercial projects. Unlike subscription-only services, Audiodrome offers both free tracks and simple one-time licensing with full commercial rights, including DMCA-safe use on YouTube, Instagram, and TikTok. All music is original, professionally produced, and PRO-free, ensuring zero copyright claims. It’s ideal for YouTubers, freelancers, marketers, and anyone looking for budget-friendly audio that’s safe to monetize.
Definition & Core Concept
A crossfade is a transition technique where one piece of audio or video content gradually fades out while another fades in, creating a seamless and continuous blend between the two. This method eliminates jarring cuts and enhances the flow between segments.
Primary goals:
- Avoid abrupt transitions that could distract listeners or viewers.
- Smooth edits in music, podcasts, videos, and film scoring.
- Preserve perceived continuity, especially in layered audio environments or montage scenes.
Crossfades are a foundational element in both audio post-production and video editing, and they are used across all genres and formats – from beat-matched DJ sets to cinematic sequences.
Types of Crossfades
Crossfades make transitions between audio or video clips feel smooth and natural. They prevent harsh cuts and help maintain continuity, whether you’re editing a podcast, music track, or video scene.
By Fade Curve (Audio DAWs)
The shape of a fade curve directly affects how two audio clips blend.
A linear fade reduces and increases volume at a constant rate. This makes it a solid all-around choice for basic transitions in music or spoken audio. It’s simple, predictable, and works well when no special treatment is needed.
The equal power curve creates an S-shaped blend – volume fades out and in more gradually at the beginning and end, but overlaps more aggressively in the middle. This helps keep the overall loudness steady during the transition. It’s ideal for music tracks where you don’t want the energy to dip when two clips cross.
An equal gain fade uses a logarithmic curve that drops volume more gently, reducing the chance of a dip or swell in the middle of the transition. It’s especially helpful for spoken word because it keeps speech intelligible and avoids sudden level shifts between voices or sentences.
| Type | Curve Shape | Best Use Case |
|---|---|---|
| Linear | Straight-line fade | Neutral transitions; suitable for general edits. |
| Equal Power | S-curve (concave + convex) | Preserves perceived loudness-ideal for music. |
| Equal Gain | Logarithmic fade | Avoids mid-point dips; ideal for dialogue and voiceover edits. |
By Media Type
In audio, a crossfade adjusts the volume of two overlapping clips so that one fades out while the other fades in. This blending keeps transitions smooth and removes unwanted pops or silence. DAWs like Logic Pro or Ableton make this easy to apply and customize.
In video, a crossfade, often called a dissolve, softens the visual switch between two shots. It changes pixel brightness and color over time, so one image fades into the next. Editors use it to signal a change in scene, mood, or time without a jarring cut.
Each type serves similar purposes but operates on different signal domains: amplitude for audio and luminance/pixel values for video.
How Crossfades Work
Crossfades blend two clips (audio or video) so one fades out while the other fades in. This keeps the transition smooth and helps maintain the viewer’s or listener’s focus.
Technical Process
In audio editing, a crossfade works by gradually lowering the volume of Clip A while raising the volume of Clip B. The transition is calculated using ramping algorithms that shape how fast or slow the fade happens.
Different fade curves, like linear or S-shaped, control how smooth or dramatic the change feels. The length of the overlap also plays a big role: short overlaps make tight, fast transitions; long ones feel more natural and flowing.
AUDIO CROSSFADE PROCESS
In video, a crossfade fades out the brightness (pixel intensity) of Shot A while fading in Shot B. This is done frame by frame, using interpolation to create a smooth blend.
Video dissolves help show time passing or a change in emotion. Editors often use this effect to create continuity or enhance storytelling without cutting sharply between scenes.
VIDEO CROSSFADE PROCESS
Key Parameters
| Parameter | Description |
|---|---|
| Duration | Range from 10ms to 5 seconds; longer for mood, shorter for tight edits. |
| Curve Type | Determines perceptual change in loudness or brightness. |
| Alignment | Fades can be start-aligned, centered, or end-aligned, depending on timing and rhythm needs. |
Precision in these parameters is critical for preserving tempo, timing, and emotional continuity.
Applications & Creative Uses
Crossfades are creative choices that shape how we experience audio and video. Whether you’re producing a song or editing a film, crossfades help transitions feel natural and emotionally connected.
Audio Production
In music, crossfades are often used to join one song to the next without a pause. This is common in concept albums where tracks tell a story, like The Wall by Pink Floyd. Instead of silence between songs, the listener hears a seamless flow, keeping them immersed in the album’s mood.
For DJs, crossfades are essential to maintaining energy on the dance floor. By fading between two tracks that are rhythmically aligned, they can move from one beat to the next without losing momentum. This makes the transition feel like part of the performance, not a technical necessity.
In podcasts and voiceovers, crossfades help smooth out cuts that would otherwise sound choppy. If a speaker says “um” or pauses awkwardly, editors can remove that moment and use a crossfade to mask the gap. It keeps the speech sounding fluid and natural to the listener.
Film & Video
In film, crossfades are often used in what’s called a J-cut or L-cut. A J-cut lets the next scene’s audio start before the image changes. An L-cut does the opposite – the current scene’s audio continues after the image has already changed. Both help guide emotional rhythm and narrative flow.
During montages, crossfades help link shots that jump through time. They allow music and ambient sounds to carry across different scenes, giving a sense of unity and movement.
Step-by-Step: Adding Crossfades
Crossfades are simple to apply, but getting them right makes a big difference in the final result. Here’s how to add them in both audio and video editing software.
In Audacity
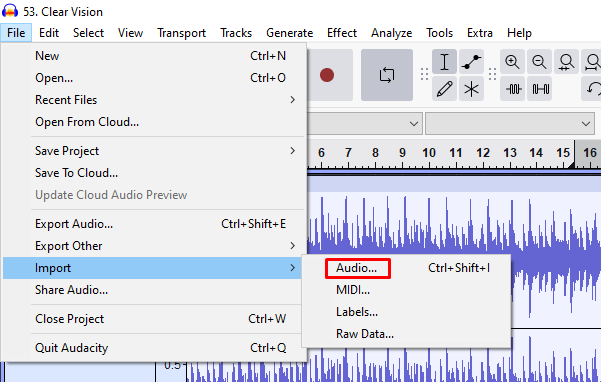
Step 1: Import both audio clips and place them on separate tracks, overlapping them in time. Audacity doesn’t support overlapping on the same track, so each clip needs its own track.

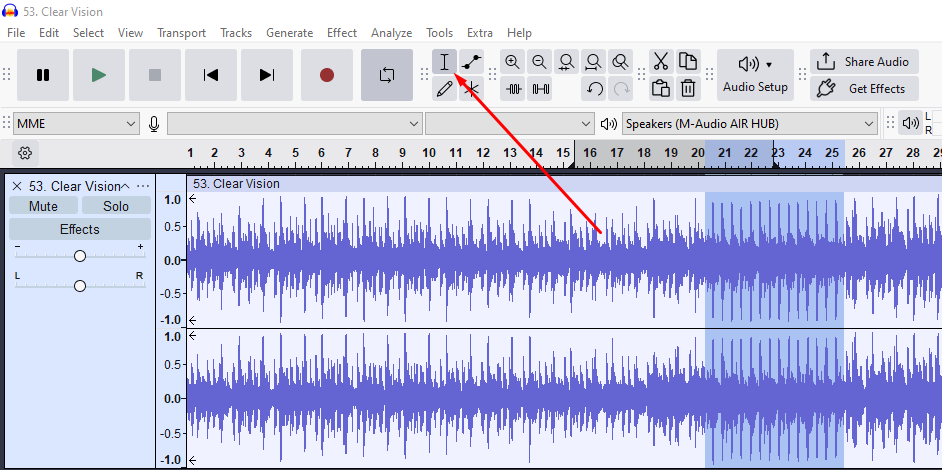
Step 2: Use the Selection Tool to highlight the overlapping area on each track. This defines the part where the fade will occur.

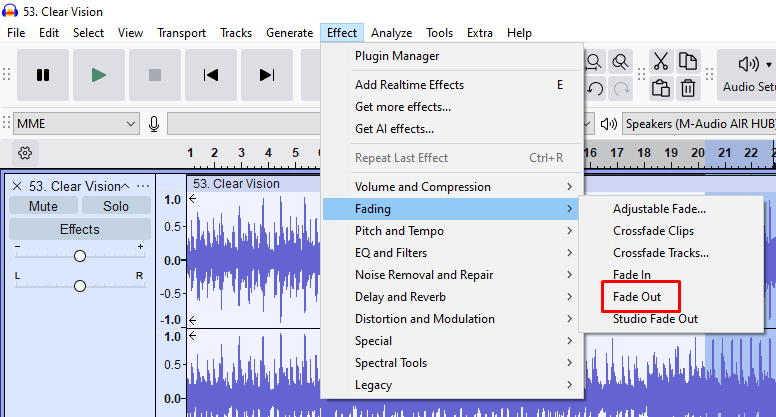
Step 3: Go to the Effect menu. Apply Fade Out to the end of Clip A (top track).

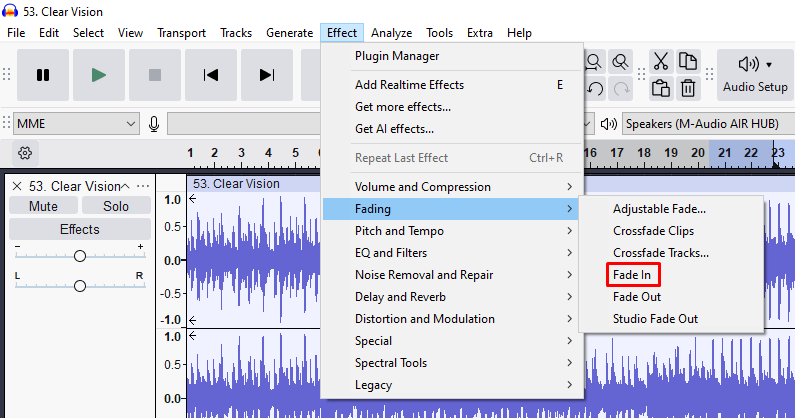
Step 4: Go to the Effect menu. Apply Fade In to the beginning of Clip B (bottom track). These must be applied manually.

Step 5: For a smoother blend, you can fine-tune the overlap duration or apply custom envelopes using the Envelope Tool, which lets you adjust volume over time by dragging control points.
In DAWs (e.g., Ableton, Pro Tools)
Step 1: Overlap two audio clips on the same track or on adjacent tracks. This overlapping region is where the fade will happen and how the clips will blend.
Step 2: Select both clips, or highlight the overlapping area. Most DAWs let you do this by clicking and dragging or holding Shift while selecting.
Step 3: Right-click and choose “Add Crossfade,” or activate the fade tool from your toolbar. This action creates a basic crossfade between the clips.
Step 4: Adjust the fade’s length and curve by dragging fade handles or using automation lanes. This lets you fine-tune how quickly the first clip fades out and the second fades in.
In Video Editors (e.g., Adobe Premiere Pro)
Step 1: Place Clip A and Clip B on the same video track with a small overlap. This overlap is where the dissolve will be placed.
Step 2: Open the Effects panel and navigate to Video Transitions. These transitions are categorized by type.
Step 3: Drag “Cross Dissolve” or “Dip to Black” directly onto the join between the two clips. This adds a visual fade from one to the other.
Step 4: Use the Effect Controls panel to change the transition’s length or move it for better timing.
Many video editors also allow keyboard shortcuts or default settings to speed this up.
Related Terms
Crossfade vs. Related Techniques
| Technique | Description | Key Difference |
|---|---|---|
| Fade-In/Out | Gradual entry or exit of a single clip | Only affects one clip, not a transition |
| Cut | Instant change from one clip to another | No overlap; often used for fast pacing |
| Morphing | Blends shape or timbre in audio/video | More complex; alters spectral or frame data |
While fade-ins/outs are building blocks of transitions, crossfades combine both to link two clips directly.
Troubleshooting Common Issues
Even with the right tools, crossfades don’t always work perfectly. Here are some common problems and how to fix them quickly and effectively.
Clicks or Pops During Audio Crossfades
Clicks or pops often happen when a clip starts or ends at a point in the waveform that isn’t near zero volume. This creates a sudden jump in amplitude that your ear hears as a glitch. To avoid this, make sure your fades begin or end at zero-crossing points – where the waveform crosses the center line. Extending the fade by just a fraction of a second can also help smooth it out.
Volume Dips
When two music clips crossfade using linear or equal gain curves, the sound can suddenly drop in the middle of the transition. This happens because those curves don’t fully account for how we hear loudness. Switching to an Equal Power crossfade helps keep the volume steady as one track fades out and the next fades in, creating a more natural blend.
Phase Cancellation
If you crossfade identical clips or ones that are nearly the same but slightly out of sync, the overlapping waves can cancel each other out. This makes the sound thin or hollow. To fix it, avoid fading overlapping copies of the same audio, or nudge one slightly forward so they don’t perfectly align.
Choppy Video Transitions
If your video crossfade feels jerky, it might be due to mismatched frame rates or playback lag. Make sure both clips are rendered with the same resolution and frame rate. If your software supports it, enable GPU acceleration to help smooth things out.
Historical Context
In the analog era, audio engineers created fades by physically manipulating tape reels or fader controls on mixing consoles. Crossfading between songs or scenes took real skill—engineers often had to slice and splice tape by hand, or manually ride the volume faders to blend one track into another.
The digital revolution of the 1980s and 1990s brought a major shift. Early digital audio workstations (DAWs) made crossfades programmable, starting with fixed fade shapes like linear fades. Over time, these tools evolved to allow users to control the shape and timing of each fade. Video editors also transitioned to non-linear editing systems (NLEs), which made it possible to preview and adjust fades in real time.
Today, crossfades are built into almost every audio and video editing platform. Even everyday apps like Spotify, iTunes, and VLC Media Player offer automatic crossfades to help songs or videos flow smoothly from one to the next without silence or abrupt cuts.
Pro Tips
For rhythmic crossfades, it helps to align your transitions with the beat grid or bar lines in your DAW. This keeps the flow tight and musical, especially in DJ sets or loop-based tracks. You can also use tempo-synced automation to make sure all your fades follow the same timing, which saves editing time and keeps your mix consistent.
Layered fades take things a step further by combining simple volume fades with effects. You might fade out a clip while slowly increasing reverb or opening up a filter. This adds movement and texture, which works especially well in film sound design, ambient music, or any project where you want smooth, atmospheric transitions.
Some digital audio workstations offer crossfade macros or preset templates. These let you apply fades to multiple clips at once, with just one click. In apps like Reaper or Studio One, this can dramatically speed up editing, especially on projects with lots of small cuts or dialog edits.

Audiodrome was created by professionals with deep roots in video marketing, product launches, and music production. After years of dealing with confusing licenses, inconsistent music quality, and copyright issues, we set out to build a platform that creators could actually trust.
Every piece of content we publish is based on real-world experience, industry insights, and a commitment to helping creators make smart, confident decisions about music licensing.
FAQs
More Related Content
Digital Audio Workstation (DAW)
DAW concepts like MIDI, plugins, automation, latency, session tips, and more
Podcast & Voice Production
Mic choice, tone control, vocal polish, and editing moves for clear, engaging podcast sounds.
Audio Effects & Signal Processing
Explains reverb, EQ, compression, filters, and delay with plain tips to shape tone, space and punch.


