Distortion in Audio: Types, Causes, and Creative Uses
Audiodrome is a royalty-free music platform designed specifically for content creators who need affordable, high-quality background music for videos, podcasts, social media, and commercial projects. Unlike subscription-only services, Audiodrome offers both free tracks and simple one-time licensing with full commercial rights, including DMCA-safe use on YouTube, Instagram, and TikTok. All music is original, professionally produced, and PRO-free, ensuring zero copyright claims. It’s ideal for YouTubers, freelancers, marketers, and anyone looking for budget-friendly audio that’s safe to monetize.
Definition
Distortion is any change in the original waveform of an audio signal. It can happen in analog or digital systems. The result is often a rougher, noisier, or more compressed version of the original sound.
Not all distortion is bad. In some cases, it is used for creative effect. Guitarists rely on distortion to shape their tone. Audio engineers use saturation to add warmth or grit. Still, unintentional distortion in recording or playback usually signals a problem.
Fundamental Concepts
Understanding how signal levels interact with equipment is essential for clean, distortion-free audio. These core concepts help prevent common problems in recording and mixing.
Signal Clipping
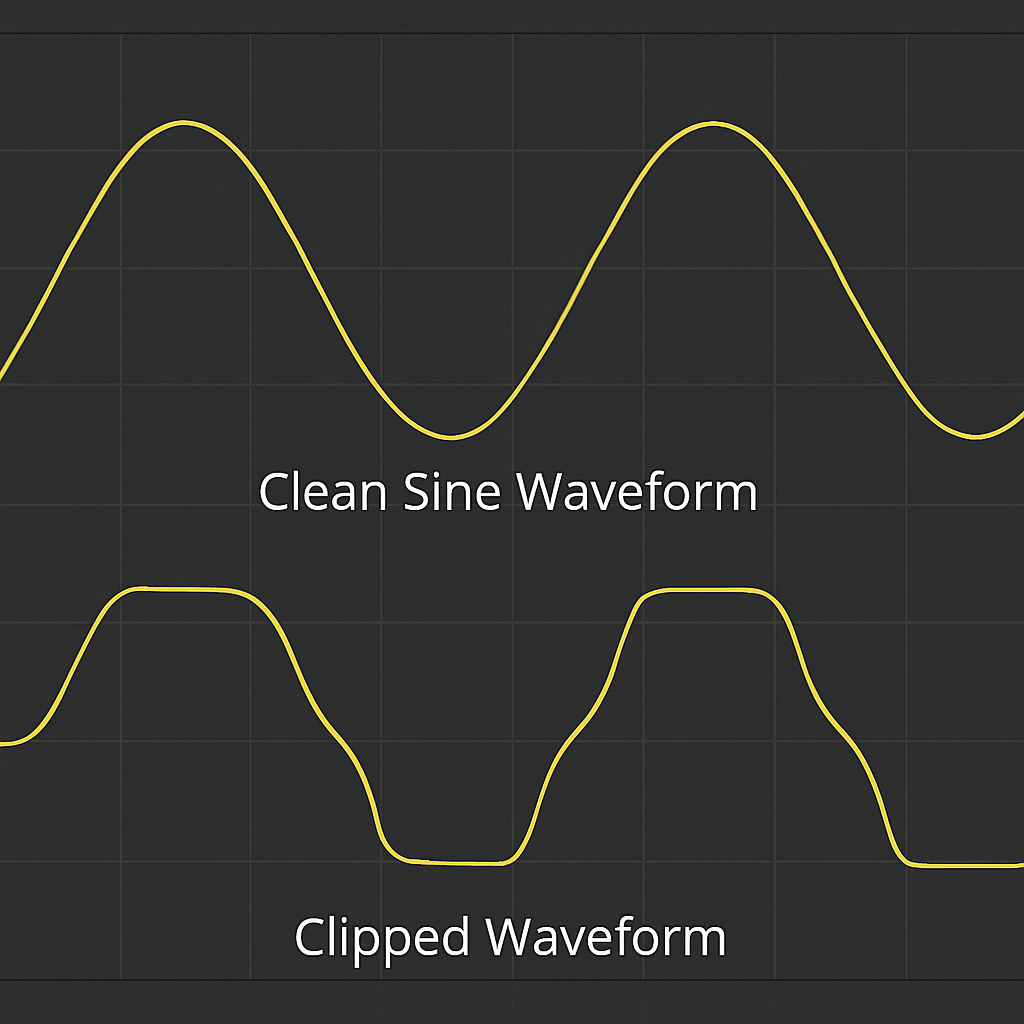
Signal clipping occurs when an audio signal exceeds the maximum level a system can handle. The result is a waveform with its peaks “cut off” or flattened, leading to distortion.
In analog systems, mild clipping can sometimes add warmth or saturation. However, in digital audio, clipping introduces harsh, brittle artifacts that degrade sound quality. The flat waveforms also introduce new harmonics that were never part of the original signal, altering the tone in unpleasant ways.
Headroom
Headroom refers to the margin between the average signal level and the system’s maximum limit. This buffer zone protects against accidental peaks that could cause clipping.
In analog setups, brief spikes above the limit can be forgiving or even sonically pleasing. In digital systems, anything above 0 dBFS clips immediately. That’s why maintaining headroom during recording and mixing is crucial, especially when working with multiple tracks or applying dynamic effects.
Dynamic Range
Dynamic range is the difference between the softest and loudest parts of a recording. A wide dynamic range adds emotion, contrast, and clarity to audio.
When distortion or noise creeps in, it reduces the usable range. Loud passages become abrasive, while quiet details are lost in the background hiss. Preserving dynamic range ensures the mix remains expressive and true to its source.
Types of Distortion
Distortion alters the original sound in ways that can be either pleasing or problematic. Each type has a different cause and impact, especially in music, audio production, and playback systems.
| Type | Primary Cause | System Context | Sonic Result |
|---|---|---|---|
| Harmonic Distortion | Nonlinear processing | Analog/digital | Adds overtones |
| Intermodulation (IMD) | Multiple signals interacting | Amplifiers/speakers | Blurry, dissonant tones |
| Clipping (Hard/Soft) | Signal exceeds headroom | Analog/digital | Warm or harsh cutoff |
| Quantization Distortion | Low bit depth | Digital | Stepped waveform, grainy texture |
| Phase Distortion | Misaligned frequency timing | Filters/speakers | Hollow, thin sound |
| Crossover Distortion | Incomplete waveform handoff | Amplifiers | Roughness, clicks near zero point |
Harmonic Distortion
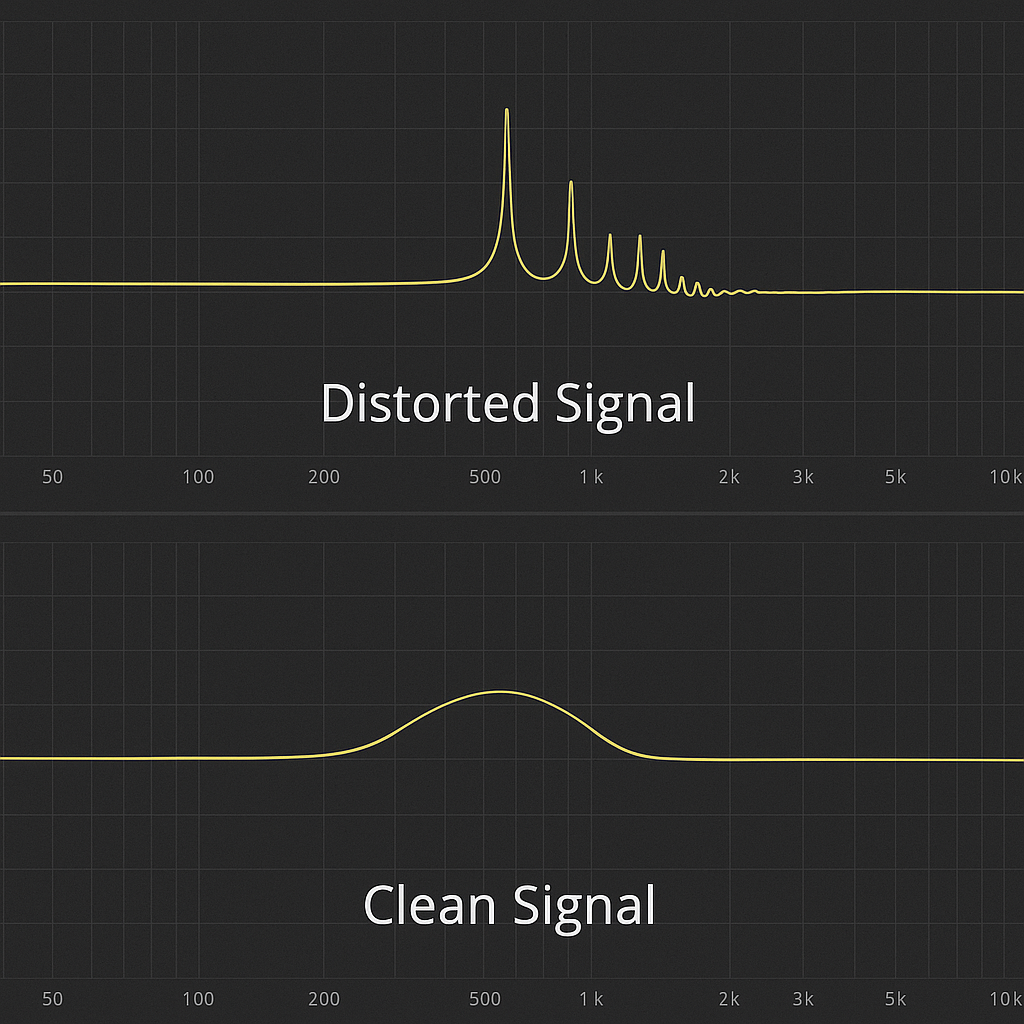
Harmonic distortion adds new frequencies to the sound, called harmonics, that weren’t present in the original signal. These harmonics follow a predictable pattern and are related to the main tone. Sometimes they make the sound fuller and more musical, especially in analog gear like tube amplifiers. Other times, they can make the audio feel too sharp or over-colored.
Total Harmonic Distortion (THD) is a standard way to measure how much harmonic content is being added. A low THD value means the audio remains closer to the source.
Intermodulation Distortion (IMD)
Intermodulation distortion happens when two or more different signals mix and create extra frequencies. These added frequencies are not harmonically related – they’re the sums and differences of the originals. That’s why IMD sounds unpleasant, especially on vocals or instruments that need clarity.
You’ll often hear this in poorly made speakers or cheap amplifiers, where multiple sounds blend together and lose their definition.
Clipping Distortion
Clipping distortion occurs when a signal goes past the maximum level a system can handle. There are two forms. Soft clipping gently rounds off the peaks and can sound smooth and warm, common in analog systems like tape or tube amps. Hard clipping cuts the signal sharply and creates a buzzy, harsh tone. This is common in digital overloads and sounds much more aggressive.
| Feature | Soft Clipping | Hard Clipping |
|---|---|---|
| Waveform Shape | Rounded peaks | Abrupt flat peaks |
| Sound Character | Warm, compressed, musical | Harsh, brittle, buzzy |
| Typical Source | Tube amps, analog tape | Digital overloads |
| Usage Context | Creative saturation | Usually unwanted distortion |
Quantization Distortion
Quantization distortion happens when digital audio lacks the resolution to describe the signal smoothly. This is common at low bit depths, like 8-bit or 12-bit recordings, where the signal starts to sound stepped or grainy. It’s most noticeable in quiet or fading sounds.
Dithering is a method of adding a tiny amount of noise to help mask this distortion. It smooths out the steps and makes digital audio transitions sound more natural when reducing bit depth.
Phase Distortion
Phase distortion shifts the timing between different frequencies. Even though the volume and pitch may not change, the relationships between parts of the sound do. This can lead to phase cancellation, where some frequencies weaken or disappear.
It’s common in some equalizers, poorly aligned speakers, or modulation effects. The result is audio that may sound hollow, thin, or less focused.
Crossover Distortion
Crossover distortion happens in some amplifiers, especially older or less refined ones. It occurs when the amplifier switches between handling the positive and negative halves of a waveform. If this handoff isn’t smooth, it creates a small glitch or rough edge in the sound.
You might hear it as a subtle crackle or an unnatural break in otherwise clean audio. Good amplifier design can minimize this problem completely.
Causes of Distortion
Distortion is usually the result of pushing audio equipment beyond its limits or setting levels incorrectly. Some causes are accidental, while others are used intentionally to shape sound.
Over-Amplification
Over-amplification happens when you push a microphone, amplifier, or speaker louder than it can handle. This is common in concerts or loud recording sessions where the goal is maximum volume. When the system runs out of room to increase signal cleanly, it starts to distort.
Improper Gain Staging
Improper gain staging means the levels are not managed correctly across different parts of the signal chain. Even if a single component doesn’t seem too loud, the combined result can overload the system. Good gain staging ensures each device or plugin passes audio at an appropriate level, avoiding buildup and distortion.
Digital Overload
Digital overload occurs when the signal hits or exceeds 0 dBFS – the highest level digital systems can handle. Unlike analog systems that might compress or soften the peaks, digital systems clip harshly. The result is a jagged, buzzy distortion that usually sounds unpleasant and is difficult to fix later.
Component Limitations
Component limitations refer to the physical weaknesses in speakers, microphones, or cables. Low-quality equipment can distort sound by failing to reproduce it accurately. These flaws might show up as fuzzy bass, muffled highs, or unwanted noise in recordings or playback.
Analog Saturation
Analog saturation is a type of distortion that’s often used on purpose. When you record to tape or run audio through a tube preamp, pushing the signal slightly can add warmth, harmonics, and a smooth kind of compression. This distortion is musical and is commonly used in mixing and mastering.
Related Terms
Effects of Distortion
Distortion happens when an audio signal is pushed beyond its limits. It can sound warm and musical or harsh and unpleasant, depending on how it’s used.
Desirable Distortion
Some distortion is added on purpose to shape the sound. It’s common in many music styles and can add character, grit, or energy.
| Type | Desirable Distortion | Undesirable Distortion |
|---|---|---|
| Goal | Add warmth, edge, or character | Preserve clarity and fidelity |
| Common in | Guitars, synths, tape saturation | Voice recordings, classical music |
| Perception | Musical and pleasing | Fatiguing and harsh |
| Intent | Used creatively | Usually a technical flaw |
Electric guitars: Use distortion pedals for sustain and tone. Guitarists use distortion pedals to create a heavier sound with more sustain. This effect makes the guitar feel more powerful and expressive in rock, punk, and metal.
Analog synths: Use drive circuits for grit and edge. Analog synths often include drive functions that add slight distortion. This helps the synth cut through a mix and feel more alive.
Tape emulators: Add saturation for warmth. Tape emulation plugins add soft distortion that mimics old recording tape. The result is a warm, full tone often used in vocals, drums, and full mixes.
Undesirable Distortion
Undesirable distortion happens when the signal overloads unintentionally. It can lead to harsh spikes in volume that are tiring to listen to and make it hard to focus on the content. Voices may lose their clarity, and instruments can sound smeared or dull.
In quieter or spoken-word formats like podcasts, film dialogue, or classical recordings, distortion can mask important details and make the entire mix feel unpolished or broken.
Audible Artifacts
Different types of distortion leave clear sonic clues. Learning to recognize them helps in both creative and corrective audio work.
Digital clipping (crackling, harshness, “fizz”): Clipping creates a sharp cutoff in the waveform. It sounds harsh, brittle, and sometimes fizzy.
Excessive harmonic distortion (buzzing, midrange buildup): Harmonic overload piles up in the mids. The result is a crowded, buzzy tone.
IMD (blurry, unfocused tones): Intermodulation distortion causes messy new tones. This makes audio feel less clean or musical.
Phase distortion (hollow or thin-sounding mix): Phase issues warp how frequencies blend. The mix may sound weak or hollow.
Measuring and Analyzing Distortion
To control distortion, you need to understand how to measure it. Several tools can show whether a signal is clean or being pushed too far.
THD Meters
THD meters measure Total Harmonic Distortion, which tells you how much extra harmonic content is added to a signal. Low THD values (usually below 0.1%) are ideal when you want clean audio for speech or acoustic music. Higher values are sometimes used on purpose in genres like rock or lo-fi, where a bit of dirt can make a track more interesting.
Oscilloscope Analysis
An oscilloscope shows the shape of a waveform on a screen in real time. A clean audio signal looks like a smooth curve. A clipped signal will have flat spots at the top or bottom, which clearly shows where the waveform is being cut off. This is a simple way to spot both soft and hard clipping while adjusting levels.

Spectrum Analyzers
Spectrum analyzers break sound into its frequency parts, showing where energy is concentrated. If you see unexpected spikes, especially in the high or low range, it often means distortion is present. These analyzers are included in most audio software and help you spot subtle problems in a mix.

DAW Metering Tools
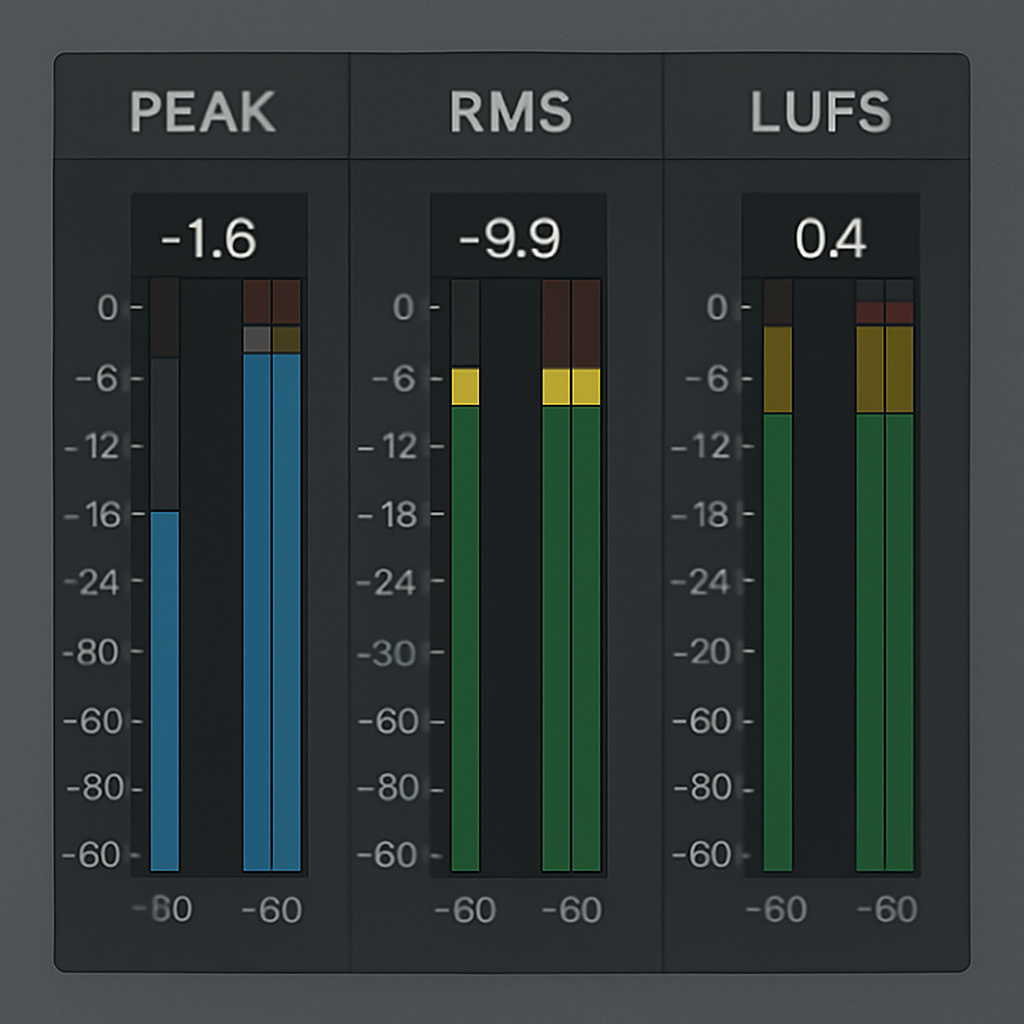
Digital Audio Workstations include metering tools that help you catch distortion before it ruins your mix. Peak meters show the highest levels and alert you when clipping happens. RMS meters show how loud a signal feels over time, which helps with balance. LUFS meters are important for mastering and make sure your track meets streaming or broadcast standards.

Preventing and Fixing Distortion
Avoiding distortion starts with careful setup and smart workflow choices. Once distortion is recorded, some tools can help clean it up, but prevention is always easier than repair.
Proper Gain Staging
Each stage in the signal path, from your microphone to your audio interface, needs the right level. Use conservative input gain to avoid pushing the signal too hard at the source. Watch the peak meters in your DAW to make sure no track hits the red. Leave at least 6 dB of headroom on your master bus to keep your final mix clean and undistorted.
Using Limiters & Compressors
Limiters prevent audio from going over a set level, which is crucial in loud moments. Compressors smooth out the volume by reducing the highest peaks and boosting quieter parts. Both tools are essential in live sound and mastering to keep sudden spikes from causing distortion.
High-Quality Components
Clean audio needs clean equipment. Low-noise microphones and preamps capture sound without adding hiss or fuzz. Speakers with a wide dynamic range help you hear problems before they go unnoticed. Cables with good shielding reduce electrical noise and interference that can create distortion in the signal.
Digital Best Practices
Record at 24-bit depth to give yourself more headroom and avoid distortion during tracking. Keep your mix from peaking near 0 dBFS, especially during export. Watch out for intersample peaks (short bursts that clip between samples), even if meters don’t show it, as they can distort during mastering.
Repairing Clipped Audio
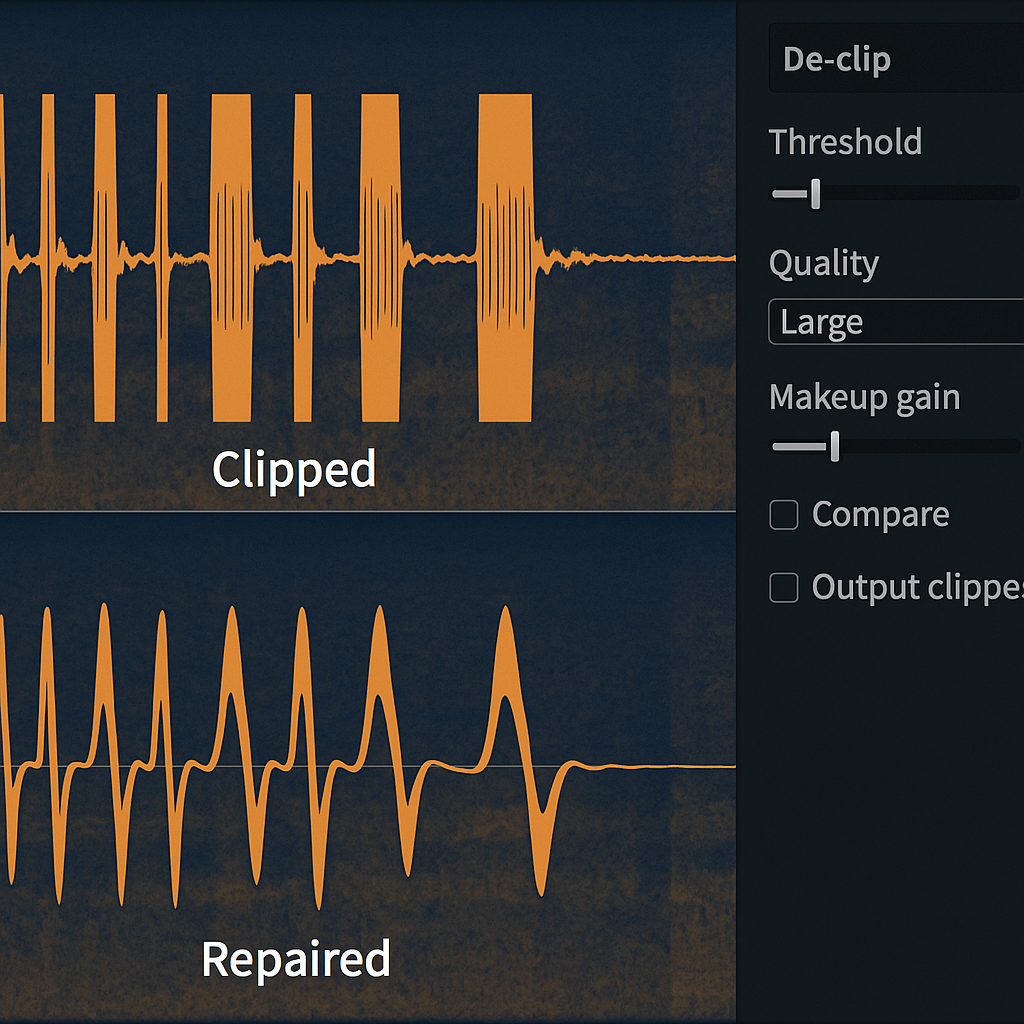
When distortion has already been recorded, repair tools can help. iZotope RX offers de-clip modules and spectral repair to rebuild damaged audio. Adobe Audition has diagnostic tools and a healing brush to reduce harsh clipping. Manual reconstruction with EQ and edits can also improve a bad recording, but some damage may be permanent.

Creative Uses of Distortion
Distortion is a powerful creative tool. Musicians and engineers use it to shape tone, add energy, or make sounds stand out.
Musical Applications
Distortion is part of many iconic sounds across genres like alt-rock, hip-hop, and EDM. When applied with intention, it can add weight, texture, and harmonic interest.
Fuzz pedals (for vintage guitar tones): Fuzz pedals create thick, broken waveforms that define many 60s and 70s rock records. The result is a raw, gritty tone that works well with lead guitar parts and solos.
Overdrive (simulates tube amp gain): Overdrive pushes a signal just enough to mimic the natural distortion of a tube amplifier. It gives instruments warmth and edge without sounding too aggressive.
Tape saturation (adds compression and harmonic richness): Tape saturation adds soft clipping and harmonics that gently compress the signal. This effect is popular on drums, vocals, or full mixes to create an analog feel.
These are often layered subtly or used in parallel to preserve clarity. That way, the grit adds character without overwhelming the mix.
Sound Design
In cinematic scores, game soundtracks, and trailers, distortion builds emotion and tension. Synth leads with edge sound more aggressive and stand out in a mix. Drum loops with crunch feel heavier and more exciting.
Voice effects with distortion are often used for monsters, robots, or other non-human characters to give them a mechanical or threatening presence. When used creatively, distortion brings a sound to life and gives it personality.
Mixing & Mastering
In mixing and mastering, subtle distortion enhances clarity, energy, and warmth. It’s often used to add detail without changing the overall balance.
Exciters: Exciters generate extra harmonics in the top end. They make vocals or instruments sound more present and detailed.
Parallel distortion: By blending a distorted copy with the clean signal, you can boost presence without ruining tone. This trick works well on basslines, snares, and lead vocals.
Saturation plugins: These plugins mimic analog gear and add just enough distortion to smooth the digital edge. They are common in mastering chains to glue tracks together.
These tools must be used carefully to avoid masking detail. A little distortion goes a long way when applied with intention.

You Might Also Be Interested In

Audiodrome was created by professionals with deep roots in video marketing, product launches, and music production. After years of dealing with confusing licenses, inconsistent music quality, and copyright issues, we set out to build a platform that creators could actually trust.
Every piece of content we publish is based on real-world experience, industry insights, and a commitment to helping creators make smart, confident decisions about music licensing.
FAQs
More Related Content
Digital Audio Workstation (DAW)
DAW concepts like MIDI, plugins, automation, latency, session tips, and more
Podcast & Voice Production
Mic choice, tone control, vocal polish, and editing moves for clear, engaging podcast sounds.
Audio Effects & Signal Processing
Explains reverb, EQ, compression, filters, and delay with plain tips to shape tone, space and punch.


