Clipping (Editing Action)
Audiodrome is a royalty-free music platform designed specifically for content creators who need affordable, high-quality background music for videos, podcasts, social media, and commercial projects. Unlike subscription-only services, Audiodrome offers both free tracks and simple one-time licensing with full commercial rights, including DMCA-safe use on YouTube, Instagram, and TikTok. All music is original, professionally produced, and PRO-free, ensuring zero copyright claims. It’s ideal for YouTubers, freelancers, marketers, and anyone looking for budget-friendly audio that’s safe to monetize.
Definition & Core Concept
Clipping, in the context of media editing, is the process of isolating, trimming, or removing sections from an audio, video, or image file. This basic editing function helps creators extract meaningful moments, eliminate unwanted material, and rearrange elements to suit a creative or technical goal.
One important distinction is between destructive and non-destructive clipping. Destructive clipping changes the original file permanently. Once you make the cut, the removed parts are gone unless you have a backup. Non-destructive clipping, on the other hand, keeps the full media file intact. The edits are applied as overlays or metadata, allowing you to undo or adjust them at any time.
Clipping is used to generate useful assets. These can include short video segments for trailers, vocal snippets for music production, or soundbites for social media. It’s also helpful for preparing content for publishing, remixing, or organized archiving.
It’s worth noting that this kind of clipping is different from signal clipping, which refers to audio distortion. In this case, clipping strictly means breaking media into editable parts.
Types of Clipping Actions
Clipping can be applied across different types of media. The technique remains conceptually the same, removing or extracting a portion, but implementation varies depending on the medium.
Audio Clipping
In audio editing, clipping is often used to remove silence at the beginning or end of a recording. This helps tighten pacing and makes the track sound more polished.
Producers also isolate specific vocal phrases or instrumental moments to use in samples, loops, or remixes.
In podcasts or interviews, editors clip out mistakes, awkward pauses, or off-topic comments to improve flow and listener engagement.
Video Clipping
Video editors use clipping to cut out scenes or moments for use in highlight reels, trailers, or short teasers.
It’s also helpful when repurposing long videos for platforms like Instagram or TikTok, where content length is limited.
Editors might also create alternate takes or blooper reels from the original footage, adding value without needing to record new material.
Image Clipping
For images, clipping often means cropping to focus on a subject or remove distractions.
Designers also use image clipping to isolate parts of a picture, like a product or person, using paths or masks in tools like Photoshop.
This makes it easier to create marketing materials, thumbnails, or layered visuals for websites and social media.
How Clipping Works in Practice
Clipping is executed through dedicated tools and standardized workflows in most digital editing environments. Though the interfaces differ by software type, the principles remain consistent.
Tools & Techniques
| Media Type | Common Software | Clipping Method |
|---|---|---|
| Audio | Audacity, Pro Tools, Logic | Razor tool, region splitting, cut/paste |
| Video | Premiere Pro, Final Cut Pro | Timeline trimming, in/out points |
| Image | Photoshop, GIMP | Crop, marquee, masking tools |
Typical Workflow Steps in Audacity
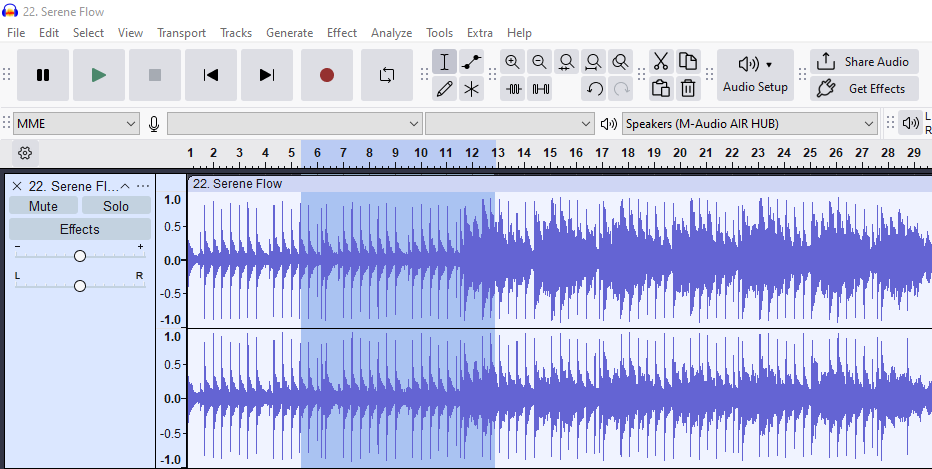
Step 1: Select
Click and drag across the waveform to highlight the portion of audio you want to isolate. You can also place the cursor using the playhead and then extend the selection manually.

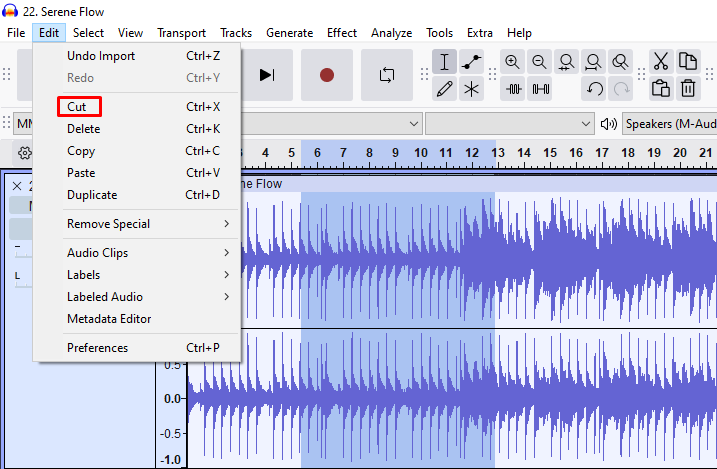
Step 2: Separate
With the desired section selected, press Ctrl+I (or Cmd+I on Mac) to split the clip at the selection boundaries. Alternatively, use Ctrl+X (Cmd+X) to cut the section if you’re planning to move or delete it.

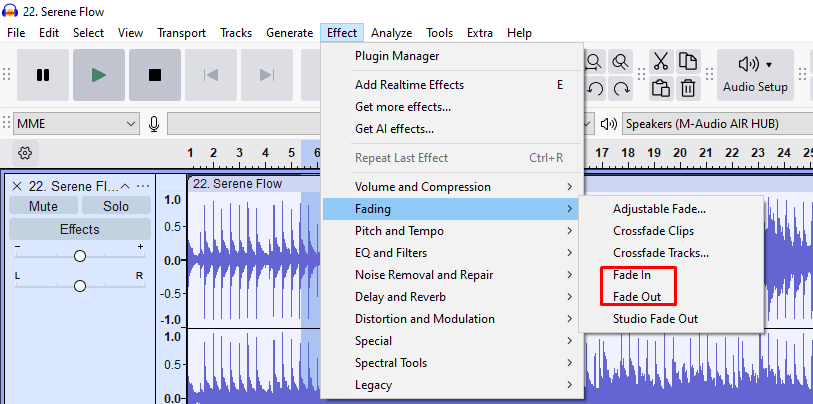
Step 3: Refine
Click the edges of the separated clip to apply fade-ins or fade-outs from the “Effect” menu. This smooths any abrupt transitions between clips.

Step 4: Align
Use the Selection Tool to move the clip along the timeline. Hover your cursor over the audio clip until a hand icon appears, then click and drag it to the left or right. You can align it manually or rely on snapping to the gridlines for more precise placement.
.png)
Common Applications
Clipping is a ubiquitous editing action that supports various production stages, from early assembly to final delivery.
Media Production
In film and television, clipping allows editors to isolate alternate takes, remove unwanted segments, and prepare B-roll footage for scene transitions. It’s especially useful during rough cuts when long recordings need to be broken down into usable parts. Clipping also supports multi-version workflows, such as creating theatrical and streaming cuts from the same source.
In music production, clipping is essential for extracting phrases from vocal recordings, cutting loops for beat creation, or slicing instrumental parts for sampling. It enables producers to rearrange, remix, and re-layer sounds quickly. Whether you’re preparing a hook, editing harmonies, or exporting stems, clipping helps organize the session and improve musical timing.
Content Creation
For social media creators, clipping transforms long-form videos into bite-sized content suitable for TikTok, Instagram Reels, or YouTube Shorts. This makes it easier to repurpose one core video into multiple platform-ready assets. The ability to extract a short, high-impact moment is key to capturing attention in fast-scrolling environments.
Vloggers and podcasters also rely on clipping to highlight interesting segments, creating previews or short teasers for promotion. These clips can be embedded in newsletters, used as thumbnails for web articles, or shared on social media to drive engagement back to the full version.
Archival & Restoration
During digitization projects, clipping is used to divide long analog recordings, like cassette tapes or VHS footage, into manageable parts. This makes storage and indexing easier while also reducing file sizes for efficient archiving. Without clipping, large files would be harder to back up or retrieve.
Archivists often apply tags or descriptions to each clip, allowing for quick searches in digital libraries. This metadata-driven approach is essential for cataloging historical footage, interviews, or audio archives. Whether you’re restoring old media or managing a growing library, clipping is the first step in making content accessible.
Consequences & Best Practices
Clipping offers efficiency but must be used thoughtfully to maintain coherence and data integrity.
Pros
Clipping helps streamline projects by cutting out parts you don’t need, which reduces file size and makes playback or export faster. It also speeds up your editing by letting you focus only on the useful parts – a vocal take, highlight reel, or key quote from an interview.
It also gives you creative freedom. When clips are isolated, they’re easier to move, remix, or test in different arrangements. You can explore new combinations or layouts without changing the original recording, making it great for drafts, remixes, and alternate edits.
Cons & Risks
When overused, clipping can create jarring transitions. For example, cutting audio mid-sentence can confuse the listener or break emotional flow. In video, a poorly timed cut can disrupt pacing or visual rhythm.
Clipping may also remove valuable metadata, like labels, timestamps, or track markers, especially if done in destructive environments. If no backup exists, trimmed material is often lost for good, along with context or quality that might be hard to recover later.
Best Practices
It’s best to use software that supports non-destructive editing, so any change can be undone. This keeps your full source intact while letting you experiment freely.
Also, always keep backups of raw media before you begin editing. As you create new clips, label them clearly and use markers or color codes to stay organized. This helps keep large projects manageable and reduces the chance of making mistakes later.
Related Terms
Clipping vs. Related Editing Terms
Understanding the difference between clipping and other editing actions helps clarify usage.
| Term | Description | Difference from Clipping |
|---|---|---|
| Trimming | Adjusting start or end points of a media clip. | Clipping may cut within a file; trimming doesn’t create new segments. |
| Splicing | Joining two or more clips together. | Opposite action; clipping removes, splicing combines. |
| Comping | Selecting the best sections from multiple takes. | Clipping is a tool used within the comping process. |
Clipping is a fundamental edit, while trimming, splicing, and comping often involve higher-level creative goals.
Technical Considerations
Clipping requires technical awareness to avoid quality loss or alignment issues. The choices you make during editing, such as file format and timeline snapping, can impact the final output significantly.
File Formats
When clipping audio or images, it’s best to work with lossless formats like WAV for audio or TIFF for images. These retain the full fidelity of your recordings or visuals, allowing you to edit freely without introducing artifacts from compression.
Compressed formats like MP3 or JPEG degrade in quality each time they’re saved, so they’re not ideal for editing. Always wait to compress your files until final export, after all your edits are complete. This helps preserve quality across remixing, repurposing, or archiving workflows.
Timeline Precision
Snap-to-grid ensures that your edits fall precisely on musical beats or film frames. This feature is ideal when editing music, looping sections, or synchronizing audio to visual cues, as it prevents timing drift.
Freehand editing gives you more flexibility to clip or move media where it feels natural, especially in spoken-word or ambient recordings. It may introduce small alignment issues, so cleanup or realignment might be needed before finalizing. Many DAWs and video editors let you switch between modes based on your creative goals.
Creative Techniques
Clipping is also a creative tool used to shape pacing, tone, and impact. By selecting and manipulating specific segments, editors and producers can achieve stylistic effects that enhance storytelling, rhythm, or emotion.
Audio Editing Techniques
In music production, stutter edits involve rapidly repeating small clipped audio segments to create rhythmic or glitchy textures. This technique is often used in electronic, pop, or hip-hop tracks to emphasize transitions or build tension before a drop. Precision clipping and careful timing are essential to make the effect feel intentional rather than jarring.
Another creative method is reversing clipped audio. A simple vocal or instrumental phrase, when flipped backward, can become a swelling buildup or eerie soundbed. Producers use this to create unexpected transitions or emotional cues, especially in film trailers, ambient tracks, or experimental compositions.
Video Editing Techniques
Jump cuts are a stylistic use of clipping in video, where you remove time or motion between similar shots. This gives the edit a jarring or humorous rhythm. You’ll often see this in vlogs, comedy, or high-energy montage sequences to accelerate pacing or add emphasis.
Smash cuts take the opposite approach by jumping abruptly from one scene to a contrasting one, often from calm to chaos or silence to sound. These hard cuts depend entirely on well-timed clipping and serve dramatic or comedic purposes.
Historical Context
Clipping began in the analog era, long before digital tools were available. Editors manually handled magnetic tape, physically cutting it with razor blades and taping it back together. This process, known as tape splicing, was essential for rearranging segments in music, film, and radio.
This method was widely used between the 1960s and 1980s. Despite its hands-on nature, it allowed precise edits when done carefully. A famous example is The Beatles’ Strawberry Fields Forever, where two different takes were merged by clipping and adjusting tape speed to match pitch and timing.
The arrival of digital tools completely changed the process. Non-linear editing systems (NLEs) and digital audio workstations (DAWs) made it possible to clip and reassemble media without physically altering the source. Editors could now experiment freely, with the safety of undo, redo, and non-destructive workflows.
As a result, clipping evolved into a faster, more precise digital operation. What once required physical effort now happens in real-time, enabling more creative control in music production, video editing, and content creation across every modern platform.

You Might Also Be Interested In

Audiodrome was created by professionals with deep roots in video marketing, product launches, and music production. After years of dealing with confusing licenses, inconsistent music quality, and copyright issues, we set out to build a platform that creators could actually trust.
Every piece of content we publish is based on real-world experience, industry insights, and a commitment to helping creators make smart, confident decisions about music licensing.
FAQs
More Related Content
Digital Audio Workstation (DAW)
DAW concepts like MIDI, plugins, automation, latency, session tips, and more
Podcast & Voice Production
Mic choice, tone control, vocal polish, and editing moves for clear, engaging podcast sounds.
Audio Effects & Signal Processing
Explains reverb, EQ, compression, filters, and delay with plain tips to shape tone, space and punch.


