Buffer Size (Adjustable Setting to Reduce Latency in Audio Processing)

Audiodrome is a royalty-free music platform designed specifically for content creators who need affordable, high-quality background music for videos, podcasts, social media, and commercial projects. Unlike subscription-only services, Audiodrome offers both free tracks and simple one-time licensing with full commercial rights, including DMCA-safe use on YouTube, Instagram, and TikTok. All music is original, professionally produced, and PRO-free, ensuring zero copyright claims. It’s ideal for YouTubers, freelancers, marketers, and anyone looking for budget-friendly audio that’s safe to monetize.
Definition
Buffer size is the amount of audio data your computer processes at once before it sends it to your audio interface or DAW. It’s measured in samples and directly affects how your system handles recording and playback.
A small buffer means your audio is processed faster, which lowers delay (latency), but it puts more strain on your CPU. A large buffer gives your computer more time, making playback smoother, but it also causes noticeable delay.
This setting is crucial when you’re recording live vocals, using virtual instruments in real time, or running complex sessions with many tracks and effects. Choosing the right buffer size helps you avoid crackling, lag, or dropped signals.
During recording, a smaller buffer keeps your timing tight. When mixing, a larger buffer keeps your system stable. You can usually change this setting in your audio preferences. Getting the balance right makes a big difference in how clean your audio sounds and how responsive your system feels during different parts of your workflow.

How Buffer Size Works
Understanding buffer size begins with your signal chain. Each audio input passes through several stages before reaching your headphones or speakers. The buffer is where your system temporarily holds data before processing.
BASIC SIGNAL PATH
The buffer acts like a holding zone. A smaller buffer moves data faster but must process it more frequently. A larger buffer slows delivery but reduces how often the system must process data.
To calculate buffer latency, divide the buffer size by the sample rate:
Latency (ms) = (Buffer Size / Sample Rate) × 1000
Example: 256-sample buffer at 44.1 kHz:
(256 / 44100) × 1000 ≈ 5.8 ms (one-way latency)
Multiply this by two to get round-trip latency – the time it takes for a signal to enter and exit the system.At 256 samples, round-trip latency is roughly 11.6 ms, which is borderline acceptable for live input monitoring. Lowering the buffer reduces delay, but increases the strain on your system.
When to Adjust Buffer Size
Buffer size isn’t a set-it-and-forget-it parameter. You should change it depending on what stage of production you’re in. The setting that works during tracking might not be suitable for mixing or mastering. Adjusting it at the right time helps avoid latency issues while maintaining system stability.
Low Buffer Sizes (64–128 samples)
Best for:
Use a low buffer size when recording vocals or instruments. It also works best when you’re performing with MIDI controllers and software instruments, where every millisecond of delay can throw off your timing.
Why:
Low latency keeps performers in sync with what they hear in their headphones or monitors. This is especially important during live takes or real-time performances. It prevents the distracting lag between playing a note and hearing it, helping you stay in rhythm.
Risk:
Running your system on a low buffer can strain the CPU. If your computer can’t keep up, you may hear clicks, pops, or experience audio dropouts – especially in sessions with multiple plugins or virtual instruments.
Solution:
To avoid overload, disable CPU-heavy plugins, freeze tracks you’re not actively recording, and enable direct monitoring if your interface supports it. These steps reduce the system load during sensitive recording sessions.
High Buffer Sizes (1024–2048 samples)
Best for:
High buffer sizes are ideal for mixing and mastering. They’re also useful when working on sessions with lots of tracks, plugins, and effects, where system performance becomes a priority.
Why:
In these cases, latency doesn’t matter because you’re not recording or monitoring live input. A larger buffer gives your CPU more time per processing cycle, reducing the risk of performance issues like freezing or crashes.
Drawback:
High buffer sizes introduce noticeable delay, making them unsuitable for live monitoring or tracking. You’ll hear a lag between what you play and what comes out of your speakers, which can disrupt the recording process.
Knowing when to switch between low and high buffer sizes gives you more control over your workflow and keeps your system running smoothly at every stage of production.
Buffer Size vs. Other Settings
Buffer size works in tandem with other audio parameters. Misunderstanding how they relate can lead to performance issues.
| Setting | Interaction with Buffer Size | Key Takeaways |
|---|---|---|
| Sample Rate |
Higher sample rates reduce latency for the same buffer size because more samples are processed per second.
Example: 256 samples @ 96 kHz = ~2.7 ms 256 samples @ 44.1 kHz = ~5.8 ms But they also demand more from your CPU and increase file sizes. | Use higher sample rates only if your system can handle them. Always test before committing to large sessions. |
| Audio Interface & Drivers |
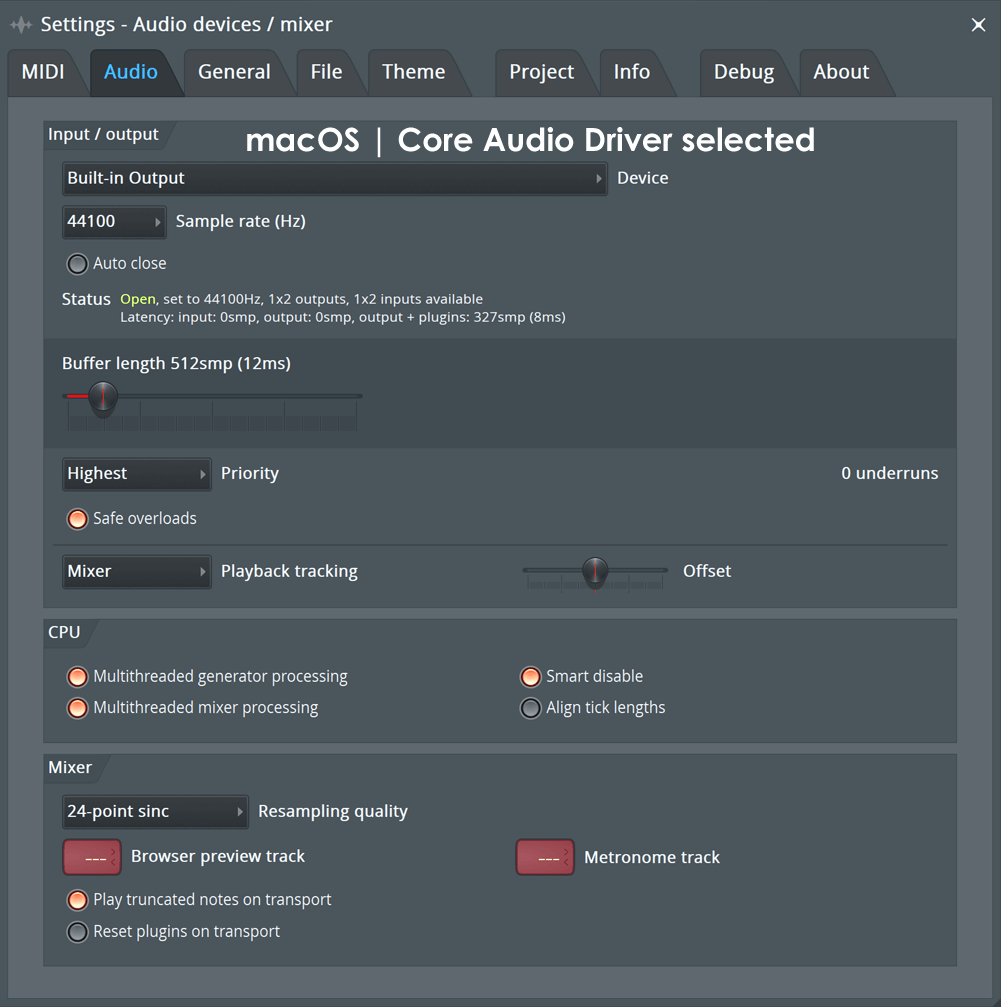
Quality interfaces and drivers (like ASIO for Windows or Core Audio for macOS) handle buffers more efficiently.
Good drivers support lower buffer settings without glitches. Poor drivers often cause dropouts or can’t process small buffers. | Upgrade your interface and use proper drivers to reduce latency and improve overall performance. |
| DAW Optimization | DAWs offer tools like track freezing, plugin disabling, and bouncing stems to reduce processing load. These let you use smaller buffer sizes during recording without risking performance drops. | Clean up your session and manage plugins smartly before adjusting buffer settings for real-time tasks. |
Buffer size works best when paired with smart session management.
Software-Specific Settings
Each DAW or audio tool offers a way to adjust buffer size. The terminology and location of the setting may differ, but the goal remains the same: to balance latency with system performance based on your current task.
Pro Tools
In Pro Tools, go to Setup > Playback Engine to find the H/W Buffer Size setting. You can choose from options ranging from 32 to 1024 samples, depending on your audio hardware. Lower values are best for tracking, while higher values are better for mixing. Pro Tools also lets you switch buffer sizes quickly between recording and playback workflows.
Ableton Live
To adjust buffer size in Ableton Live, go to Options > Preferences > Audio. You’ll see controls for buffer size or input/output latency. If your project is light on effects, a smaller buffer helps keep latency low. When your session grows more complex, increasing the buffer prevents dropouts and CPU spikes.
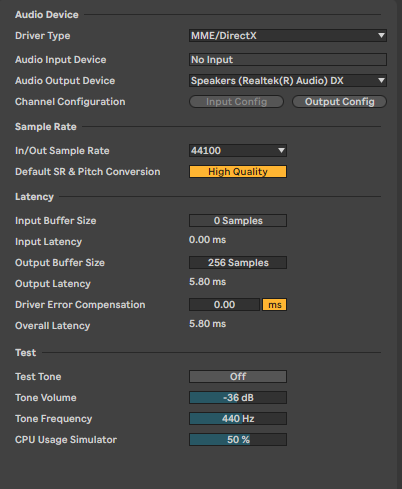
FL Studio
In FL Studio, open Options > Audio Settings and use the Buffer Length slider to adjust the setting. For best results, select an ASIO driver. This ensures smoother playback and lower latency, especially during live MIDI performance or audio recording.
Audacity
Audacity has fixed buffer sizes unless you’re using ASIO4All on Windows. To unlock full control, you’ll need to compile a custom version of Audacity with ASIO support. For basic tasks like trimming or noise reduction, the default settings are usually reliable.
Always match your buffer size to the task. Record at low latency, mix with more stability, and test before committing to final takes.
Related Terms
Advanced Considerations
As sessions grow in size or complexity, buffer settings may not be the only latency factor at play. Other systems and tools can also affect timing, performance, and the overall responsiveness of your audio setup. Understanding these can help you troubleshoot lag and optimize your workflow more effectively.
Plugin Latency
Certain plugins, such as linear-phase EQs, convolution reverbs, and look-ahead compressors, introduce extra latency because they require more processing time. This delay is added on top of your current buffer size.
Most DAWs can automatically align tracks to account for this delay, so your mix stays in sync. However, during live monitoring or when syncing to video, even small delays from these plugins can cause problems.
You can usually check plugin latency in your DAW’s plugin manager or directly on the track.
Multi-Core Processing
Modern DAWs support multi-core processing, which splits audio tasks across your CPU cores. This makes it easier to manage large sessions, even at lower buffer sizes.
Make sure multi-core support is turned on in your DAW’s preferences. If you’re using an older system, you may need to assign processing threads manually.
Proper use of this feature can prevent dropouts and keep sessions responsive.
Direct Monitoring
Direct monitoring is a hardware feature on many audio interfaces. It sends the input signal straight to your headphones or speakers without routing it through the DAW.
This completely avoids software latency and ensures what you hear is immediate. It’s especially useful when recording vocals or instruments at higher buffer sizes.
You can enable or adjust direct monitoring through your interface’s control panel.
Troubleshooting Common Issues
Buffer settings can cause a range of problems if mismatched to your system or project size. Here’s how to diagnose and fix typical issues:
| Issue | Cause | Fix |
|---|---|---|
| Clicks and Pops During Playback | Buffer size is too small, CPU is overloaded, or background apps are consuming resources. |
Increase the buffer size. Disable visual effects, Wi-Fi, and antivirus software temporarily. Freeze tracks or reduce the number of active plugins. |
| High Latency When Recording | Buffer is too large or the audio interface uses poor drivers. |
Lower the buffer to 64–128 samples. Use ASIO drivers on Windows or Core Audio on macOS. Consider upgrading to a low-latency audio interface. |
| Crashes or DAW Freezing | Audio driver instability or plugin conflicts. |
Update your audio interface drivers. Test the session with all plugins disabled. Reset DAW preferences and reconfigure buffer settings. |
Buffer settings are a common culprit for performance issues. Adjust methodically and retest.
Practical Tips
Here are real-world best practices for managing buffer size across the audio production process. Choosing the right setting at the right time helps you avoid glitches, improve performance, and keep your creative flow intact.
Recording
When you’re recording vocals or instruments, start with a buffer size of 128 samples. This keeps latency low so performers can hear themselves without delay.
If you hear clicks or dropouts, raise the buffer to 256 samples and freeze tracks that aren’t essential to lighten the CPU load.
Turn on direct monitoring if your audio interface offers it. This sends the sound straight to your headphones and avoids software delay entirely.
Mixing
When you move to mixing, raise the buffer to 512 or even 1024 samples. Latency doesn’t matter much at this stage since you’re no longer recording.
Higher buffer settings give your system more time to handle plugins and effects, improving stability. Only lower the buffer again if you’re doing live MIDI input or automation in real time.
Before Exporting
Before exporting your final mix, use the highest buffer size available. This reduces the risk of audio glitches caused by system strain. Close any background apps to make sure your export runs smoothly.
Interface Settings
Open your audio interface’s control panel and look for a setting like “Low Latency Mode.” Turn it on to improve response time during recording.
Avoid USB hubs or long cables, they can introduce timing issues that affect performance.

You Might Also Be Interested In

Audiodrome was created by professionals with deep roots in video marketing, product launches, and music production. After years of dealing with confusing licenses, inconsistent music quality, and copyright issues, we set out to build a platform that creators could actually trust.
Every piece of content we publish is based on real-world experience, industry insights, and a commitment to helping creators make smart, confident decisions about music licensing.


FAQs
More Related Content

Broadcast & Streaming
Core broadcast and streaming concepts: bitrates, encoders, latency, licenses, quality.
.png)
Digital Audio Workstation (DAW)
DAW concepts like MIDI, plugins, automation, latency, session tips, and more.

Audio Effects & Signal Processing
Explains reverb, EQ, compression, filters, and delay with plain tips to shape tone, space and punch.