Bounce Track (Rendered Mix of Combined Tracks)
Audiodrome is a royalty-free music platform designed specifically for content creators who need affordable, high-quality background music for videos, podcasts, social media, and commercial projects. Unlike subscription-only services, Audiodrome offers both free tracks and simple one-time licensing with full commercial rights, including DMCA-safe use on YouTube, Instagram, and TikTok. All music is original, professionally produced, and PRO-free, ensuring zero copyright claims. It’s ideal for YouTubers, freelancers, marketers, and anyone looking for budget-friendly audio that’s safe to monetize.
Definition
To “bounce a track” means to render one or more audio tracks into a single, consolidated audio file. This process includes all edits, effects, and automation applied during the mixing stage. Once bounced, the new file becomes a finalized version of that section, allowing for easier playback and resource management within a digital audio workstation (DAW).
Bounce tracks are typically used to reduce CPU load, simplify complex sessions, or prepare audio for mastering. For example, a producer might combine all backing vocals into one stereo track or layer a synth line with multiple effects. The resulting file is fixed, meaning any mix decisions made before the bounce are locked in unless the original tracks are preserved.
There are several practical uses. A full mix bounce produces a stereo file ready for mastering or final delivery. A stem bounce breaks out individual elements like drums, vocals, or instruments into separate files for mixing flexibility. In-place bouncing allows producers to flatten a heavily processed track into a new file while maintaining its original timeline position.
Why Bounce Track?
Producers and engineers bounce tracks for three main reasons: system efficiency, collaboration, and long-term archiving. Each reason supports a different part of the music production workflow and helps streamline both technical and creative decisions.
CPU Relief
Modern sessions can include dozens of tracks, effect chains, and real-time instruments that demand a lot from your computer. As sessions grow, your CPU might struggle to keep up, causing glitches, audio dropouts, or even crashes.
Bouncing lets you convert those heavy tracks into a simpler, single audio file. This frees up processing power so you can continue mixing without interruptions. A common practice is bouncing virtual instruments to audio before adding EQ, compression, or effects.
Collaboration
When collaborating with others, sharing a single bounced file is often much easier than sending an entire project session. Full sessions can be large, and different DAWs or plugin setups often create compatibility problems that slow down the process.
A bounced track gives your collaborators a stable, ready-to-use version. Mastering engineers, vocalists, or video editors can import the file into their workflow without needing your specific software setup. Always name your files clearly (something like “TrackName_Final_Bounce.wav”) so everyone knows they’re working with the correct version.
Archiving
As software and hardware evolve, some sessions may stop opening correctly years later. Bounced tracks give you a long-term audio record of your project. Even if the original session gets lost or corrupted, the bounce stays playable and ready for use. Always store your bounced files alongside your backup folders for safety.
Bounce Track Methods: Real-Time vs. Offline Export
Most DAWs offer multiple bounce options. Each method suits different production needs. Knowing which to choose saves time and avoids surprises.
| Type | Real-Time Bounce | Offline Bounce |
|---|---|---|
| Pros |
|
|
| Cons |
|
|
Real-Time Bounce
Real-time bounce means your DAW plays the project from start to finish during export. This process captures the audio exactly as you hear it during playback, including all effects, automation, and tempo-based elements. It’s especially useful when your session involves complex routing, sidechains, or MIDI triggers.
This method is the go-to choice when you’re using external hardware like compressors, synthesizers, or analog summing gear. Real-time bouncing captures the exact output from your setup, ensuring the recorded signal includes every nuance added by the outboard equipment.
The downside is speed. Real-time export takes as long as the track itself. A 10-minute song takes 10 minutes to bounce – longer if you’re rendering multiple stems. It’s not ideal for quick rough drafts, but it’s the safest method when quality and precision are priorities.
Offline Bounce
Offline bounce, sometimes called fast rendering, doesn’t play the audio in real time. Instead, it processes the mix in the background using CPU power. This makes it much faster, especially helpful when working with long sessions or tight deadlines.
It’s the preferred method for creating quick test mixes, reference tracks, or final versions when you know the plugins and automation are reliable. Most modern DAWs default to offline bounce because it saves time.
Still, offline bounce may miss certain details if a plugin requires real-time processing. For safety, many engineers listen back immediately after export to catch any surprises.
How to Bounce Track in Audacity, Abletone, Logic, and Other DAWs
The process of bouncing tracks depends on the DAW you’re using, but the goal remains the same – converting your full mix into a single, shareable audio file.
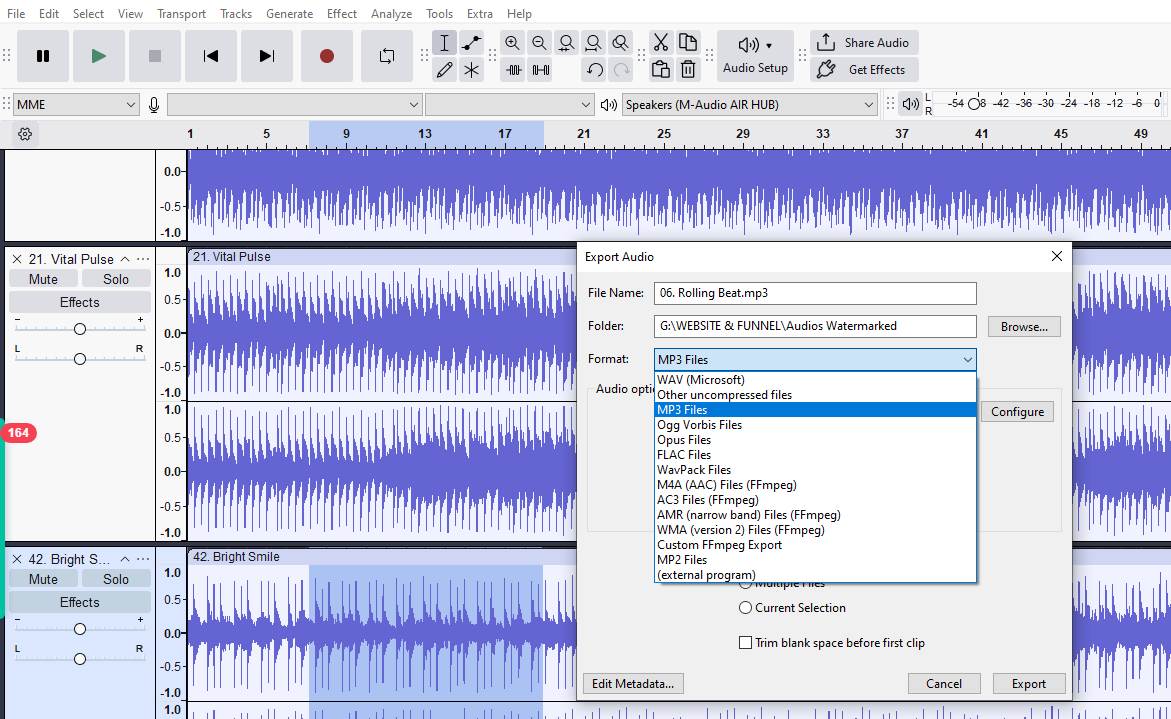
In Audacity, bouncing is achieved through exporting. After mixing your project, adjusting volume, panning, and applying effects, you can render the complete session. To do this, head to File > Export and choose either “Export as WAV” or “Export as MP3.” You can export all tracks together or only the selected ones.
Although Audacity doesn’t call this step “bouncing,” the effect is identical: it combines your active audio into one unified file. This is useful for sharing, archiving, or publishing. While Audacity lacks real-time rendering or advanced bounce options, it provides a simple and effective way to finalize your mix.

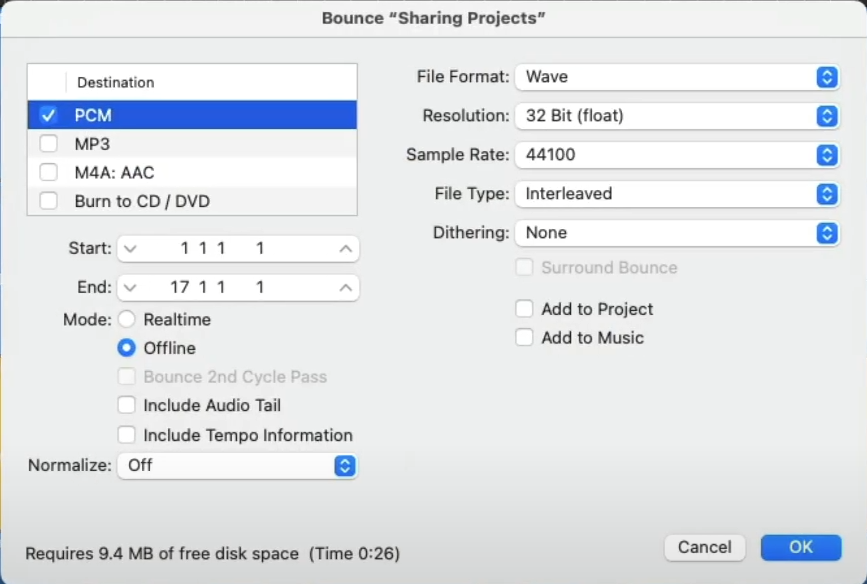
In Logic Pro, bouncing is more advanced and flexible. You can access the feature via File > Bounce > Project or Section. This opens a detailed dialog where you can set the export format (such as WAV, AIFF, or MP3), define bit depth and sample rate, and choose between offline or real-time rendering.
Logic also supports loudness metering and file normalization, which is helpful when preparing audio for streaming or mastering. Whether you’re exporting a rough mix or a final master, Logic gives you full control over the bounce process and output quality.

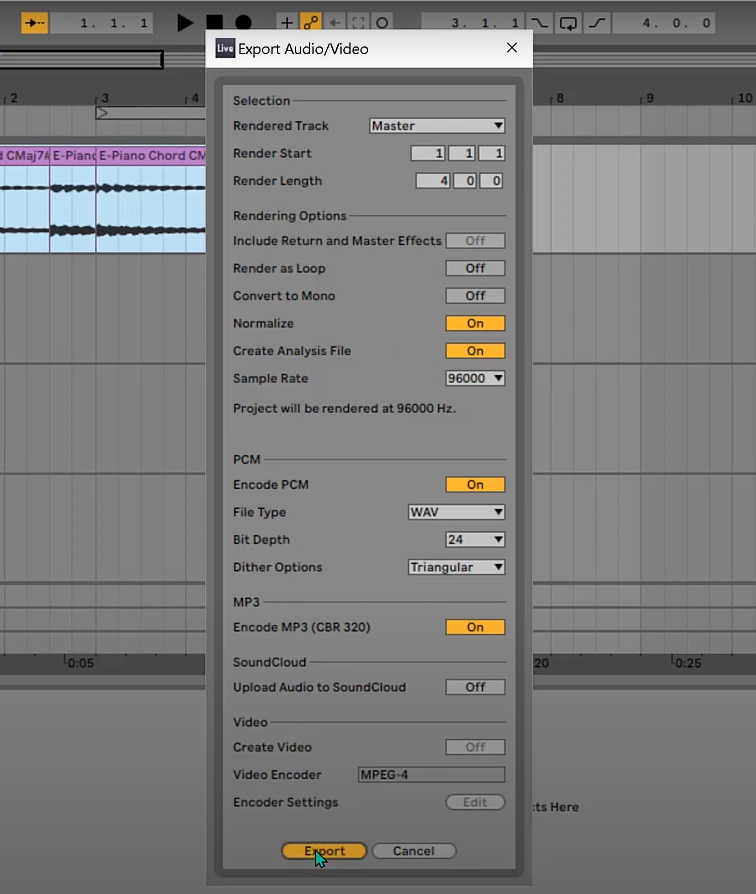
Ableton Live uses a streamlined approach suited for both studio production and live performance. Start by highlighting the timeline area you want to bounce. Then go to File > Export Audio/Video. You’ll be prompted to choose an output source like “Master” for the full mix or individual tracks for stems.
Once inside the export window, you can customize format, sample rate, bit depth, and rendering method. Ableton is especially flexible for exporting short loops, full arrangements, or DJ-style sets. It’s widely used by electronic artists who bounce tracks frequently for performance, remixing, or delivery.

Other DAWs such as Reaper, Studio One, and FL Studio offer similar workflows. While terms like “Render” or “Export Mixdown” may vary, the core idea remains: mix your session, select the desired output format and range, then create a consolidated file. Just be sure to double-check the master bus, solo/mute states, and export path before bouncing.
Related Terms
Key Settings
When bouncing, the file settings you choose affect how the final audio sounds and behaves in different environments. Make informed decisions based on your export purpose.
File Format
The file format you choose directly affects how your bounce will be used. WAV and AIFF are lossless and uncompressed, preserving every nuance in the audio. They’re ideal for mastering, archiving, or delivering tracks to collaborators who need full-quality audio.
On the other hand, MP3 and AAC are compressed formats that reduce file size, making them better for sharing quick demos or streaming online. Use WAV or AIFF when the audio is final and will be distributed or processed further. Use MP3 or AAC when sending previews or referencing tracks on mobile devices.
Bit Depth and Sample Rate
Bit depth and sample rate define the resolution of your audio. Higher settings like 24-bit/48kHz offer more dynamic range and frequency accuracy, making them standard for professional work or syncing to video. They capture audio in more detail, especially in complex mixes.
Lower settings like 16-bit/44.1kHz are commonly used for CD releases or casual streaming. Always match your export settings to your session to avoid conversion artifacts. If you’re reducing bit depth, enable dithering to soften the transition and avoid added distortion.
Normalization
Normalization boosts the volume of your final file to a specific peak level, typically 0 dB. This is helpful when creating a reference or preview that needs to sound loud and consistent across different systems. It saves time when quick loudness adjustments are needed.
However, avoid normalization when dynamics matter, such as during mastering. It can flatten the mix’s natural contrast, making the final product sound less musical. Use it only for temporary or non-critical bounces.
Dithering
Dithering is applied when reducing bit depth, such as exporting a 24-bit session to a 16-bit file. It adds a tiny amount of noise to prevent harsh digital artifacts during this conversion. This process improves the perceived audio quality, especially in quiet passages.
Dithering should only be used once, preferably during your final export. Avoid applying it to files that have already been dithered, as it can compound noise and degrade clarity. Keep it disabled unless you’re intentionally reducing bit depth.
Advanced Uses
Beyond final exports, bouncing has creative and technical uses during the production process.
One of the most common uses is making stems – separate audio files for each group of sounds. For example, all the drums might be bounced together into a single drum stem, while vocals go into a vocal stem. This makes it easy to send files to other musicians, producers, or engineers without needing to share the entire session.
Stems are especially useful for live shows or remix projects. A performer can play the backing stems on stage while singing or playing an instrument. Remixers can take just the vocals or drums and build a whole new version of the song around them. It also comes in handy for surround mixing, where engineers place each stem in a specific position in the room.
Bouncing is also helpful for parallel processing. This technique involves copying a track, adding strong effects, like heavy compression or distortion, to the bounced version, and then blending it back in with the original. It gives you the punch and energy of the effect without losing the natural feel of the recording.
Finally, bouncing a track can reduce the load on your computer. If a plugin is using too much power, you can bounce the track with the effect applied and turn off the plugin. This keeps your session running smoothly and gives you more flexibility when editing.
Bounce Track Mistakes to Avoid During Export
Bouncing can go wrong if you don’t double-check settings before export. These common errors are easy to avoid with a consistent process.
Exporting at Low Resolution
If your project was mixed at 24-bit/48kHz, exporting at 16-bit/44.1kHz can reduce the audio quality. Downsampling without dithering might cause audible artifacts like distortion or loss of clarity.
Always match your bounce settings to your session resolution unless you’re preparing for a specific output, like a CD. If you do need to lower the resolution, enable dithering in your export settings to preserve the sound as much as possible.
Including Unwanted Automation
Automation like volume fades, panning changes, or plugin bypasses can be easy to overlook, especially near the end of a song. These hidden moves might not be obvious during mixing but will show up clearly in the final export.
It’s a good idea to play through the last few bars and check the automation lanes before you bounce. This helps ensure you don’t unintentionally fade out or cut off important parts of the mix.
Wrong Output Bus Selection
Routing mistakes can lead to silent or incomplete bounces. If your mix isn’t routed to the correct output bus, like the main stereo output or master fader, you could end up exporting only part of the project, or even silence.
Double-check that your main mix output is assigned correctly before bouncing. Do a quick playback from that output path to confirm everything sounds the way you want.

You Might Also Be Interested In

Audiodrome was created by professionals with deep roots in video marketing, product launches, and music production. After years of dealing with confusing licenses, inconsistent music quality, and copyright issues, we set out to build a platform that creators could actually trust.
Every piece of content we publish is based on real-world experience, industry insights, and a commitment to helping creators make smart, confident decisions about music licensing.
FAQs
More Related Content
Audio Editing
Editing techniques, tools, and terms for podcasts, music, and voice work.
Audio Effects & Signal Processing
Explains reverb, EQ, compression, filters, and delay with plain tips to shape tone, space and punch.
Podcast & Voice Production
Mic choice, tone control, vocal polish, and editing moves for clear, engaging podcast sounds.


