Beat Finder (Rhythmic Peak Analyzer)
Audiodrome is a royalty-free music platform designed specifically for content creators who need affordable, high-quality background music for videos, podcasts, social media, and commercial projects. Unlike subscription-only services, Audiodrome offers both free tracks and simple one-time licensing with full commercial rights, including DMCA-safe use on YouTube, Instagram, and TikTok. All music is original, professionally produced, and PRO-free, ensuring zero copyright claims. It’s ideal for YouTubers, freelancers, marketers, and anyone looking for budget-friendly audio that’s safe to monetize.
Definition
A Beat Finder is an audio analysis tool designed to detect and mark rhythmic peaks within a sound file. These peaks often correspond to strong beats such as kick drums, snares, or other percussive hits. The tool scans audio, identifies transients (sharp volume increases), and adds markers or metadata labels at those moments.
Core Functions:
- Detection: Finds rhythmic transients or sudden energy spikes.
- Visualization : Marks beats with visual indicators in audio editors or DAWs.
- Synchronization: Helps align music with visuals, effects, or other tracks.
Primary Use Cases: Beat finders support tasks like tempo detection, loop alignment, syncing tracks for DJ sets, video editing, and rhythm-based gameplay. Whether adjusting a beat grid in Ableton Live or slicing samples, these tools simplify timing-related work.
How Beat Finders Work
Beat finders detect the timing of rhythmic events by analyzing the audio signal. Their goal is to pinpoint where the beats land so that the track can be synced, looped, or edited in time.
Most tools start with transient detection. Transients are sudden spikes in volume, like those caused by kick drums, snares, or claps. These moments stand out in the waveform and serve as reliable beat markers.
Some tools use spectral analysis to go beyond volume. By isolating specific frequency ranges, like the low thump of a bass drum or the shimmer of a hi-hat, they can better detect rhythm in dense or layered mixes.
There are different types of algorithms used. The simplest are threshold-based: if the volume crosses a set level, the software marks a beat. This works for strong rhythms but may miss quieter or off-beat hits.
More advanced tools rely on FFT (Fast Fourier Transform). This technique breaks the audio into frequency bands over time, allowing the system to spot energy bursts across the spectrum and map them to tempo.
Some beat finders use machine learning. These systems are trained on thousands of tracks and can identify complex patterns, making them more accurate with syncopation or less obvious beats.
Key Features of Beat Finders
Most beat finder tools offer more than just detection. They provide features that make the data usable for editing, production, or playback alignment. Typical Features Include:
Tempo (BPM) Detection: Estimates the overall pace of the song by analyzing time intervals between beats. Useful for setting grids or syncing multiple tracks.
Grid Alignment: Beats can snap to a musical time grid (such as 4/4 or 6/8), which helps in quantization, warping, or loop slicing.
Offset Adjustment: If the software detects the beats slightly late or early, you can shift all markers to better match the audio’s real feel.
Export Options: Most tools let you save beat markers as:
- MIDI files (to control synths or samplers)
- DAW session markers (e.g., in Ableton, Logic)
- Cue points for DJ software like Serato or Rekordbox
This feature set makes beat finders versatile – ideal for both musicians and non-musicians working with rhythm-driven media.
Common Applications
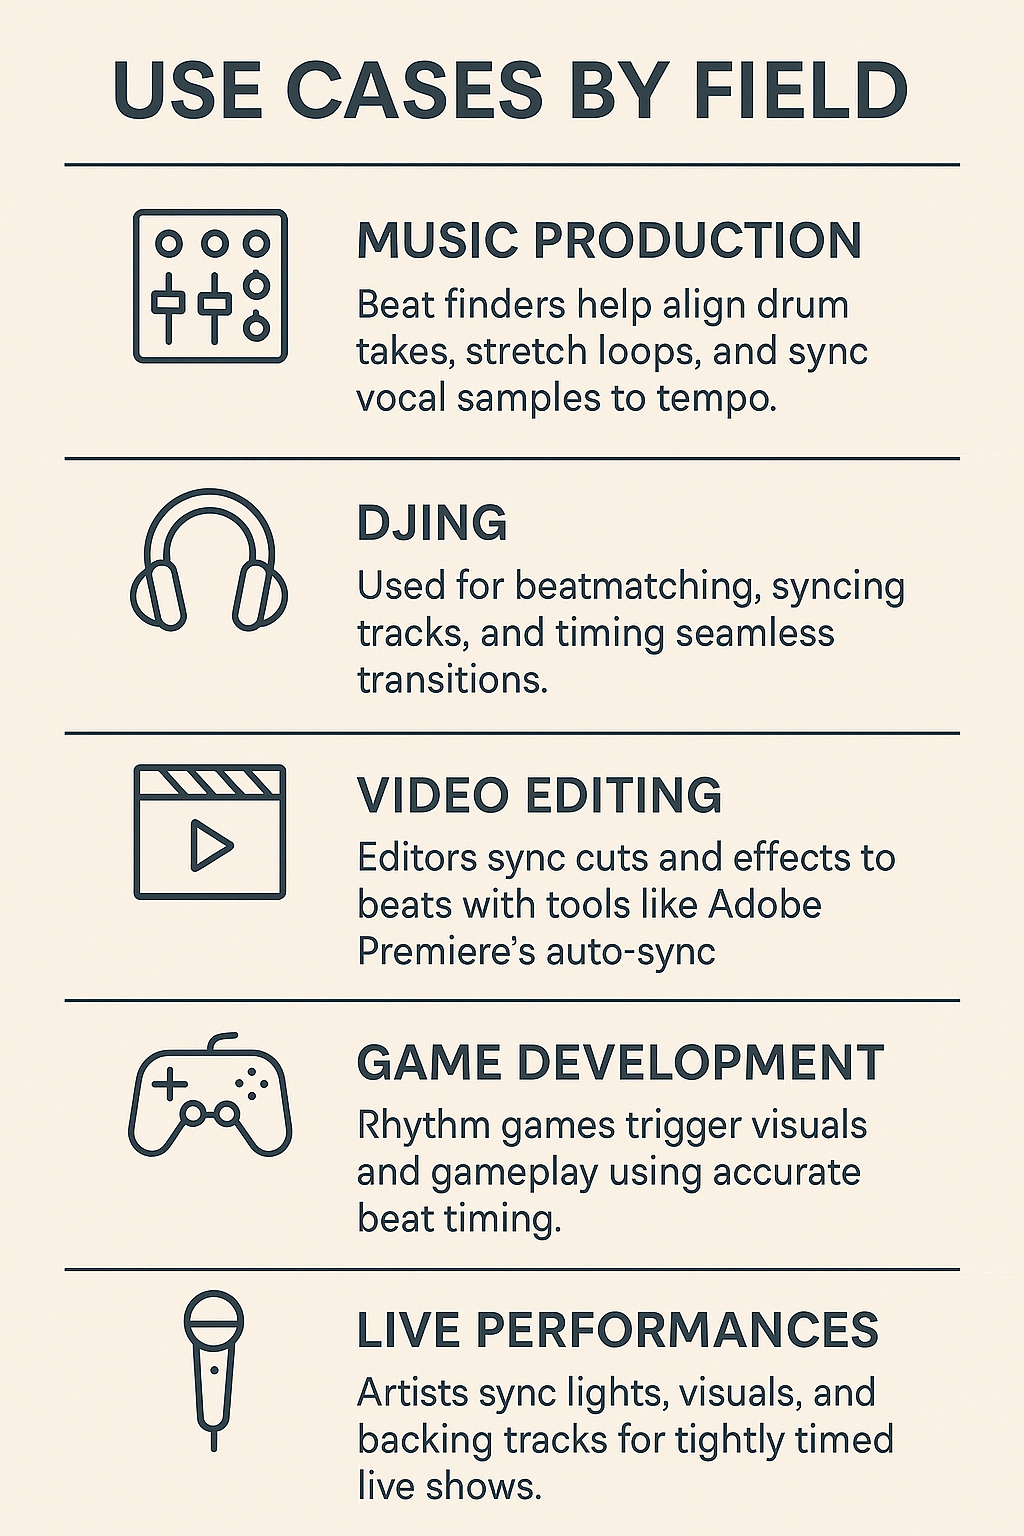
Beat detection helps professionals across several fields. While the use cases vary, they all benefit from precise rhythmic mapping.

Wherever rhythm matters, beat finders help automate alignment and structure.
Popular Beat Finder Tools
Beat detection is often built into larger audio and video production platforms. Others exist as standalone or web-based tools.
Integrated in Digital Audio Workstations (DAWs)
Ableton Live includes warp markers and automatic transient detection. Its “auto-warp” feature analyzes audio and lines it up with your session’s tempo grid. This makes it easy to time-stretch samples or align full tracks without manual editing.
Logic Pro X offers a feature called “Flex Time” that adjusts timing while preserving pitch. It automatically detects tempo and lets you edit the position of beats and notes, which is great for tightening live recordings or matching external loops to your project.
FL Studio provides beat detection tools inside Edison, its audio editor. You can analyze and mark transients, then drag that audio into the playlist with aligned timing. It also helps you fit acapellas, loops, or samples to your beat quickly.
Standalone Software
Mixed In Key is popular among DJs. It analyzes songs to find their tempo and key, then places beat markers that help align transitions. It’s not designed for full music production, but it’s excellent for live mixing and playlist prep.
BeatRoot is a simple open-source tool. It loads WAV or MP3 files and finds beats using a graphical timeline. It’s useful for educational purposes or rough tempo checks when you don’t need full DAW features.
Online Tools
Tunebat lets you upload tracks and instantly get BPM and key information. It’s helpful for quick reference without installing software.
Vocalremover.org includes a basic beat marker tool. While limited, it offers fast visual feedback when you just need to spot where the beats fall.
Limitations & Challenges
Despite modern improvements, beat detection is not perfect. Several factors reduce its reliability:
Irregular Rhythms: Songs with tempo drift (common in live recordings) or freeform timing (like rubato in classical music) often confuse automatic systems.
False Positives: The tool may mistake loud non-rhythmic sounds, like vocal plosives or guitar strums, as beats.
Low Percussion Presence: Acoustic songs or ambient music may lack distinct transients, making detection harder.
Latency or Offset Errors: Beat markers may be slightly ahead or behind actual hits, especially if the track begins with silence or fade-ins.
Overreliance on Automation: Blindly trusting beat markers can lead to misaligned edits. Always verify visually and aurally.
To get the best results, users often combine automated detection with manual refinement.
Related Terms
Step-by-Step Usage in Audacity
Step 1: Import Audio
Open Audacity and drag in your target audio file. The waveform will appear in the timeline.
Step 2: Run Beat Finder
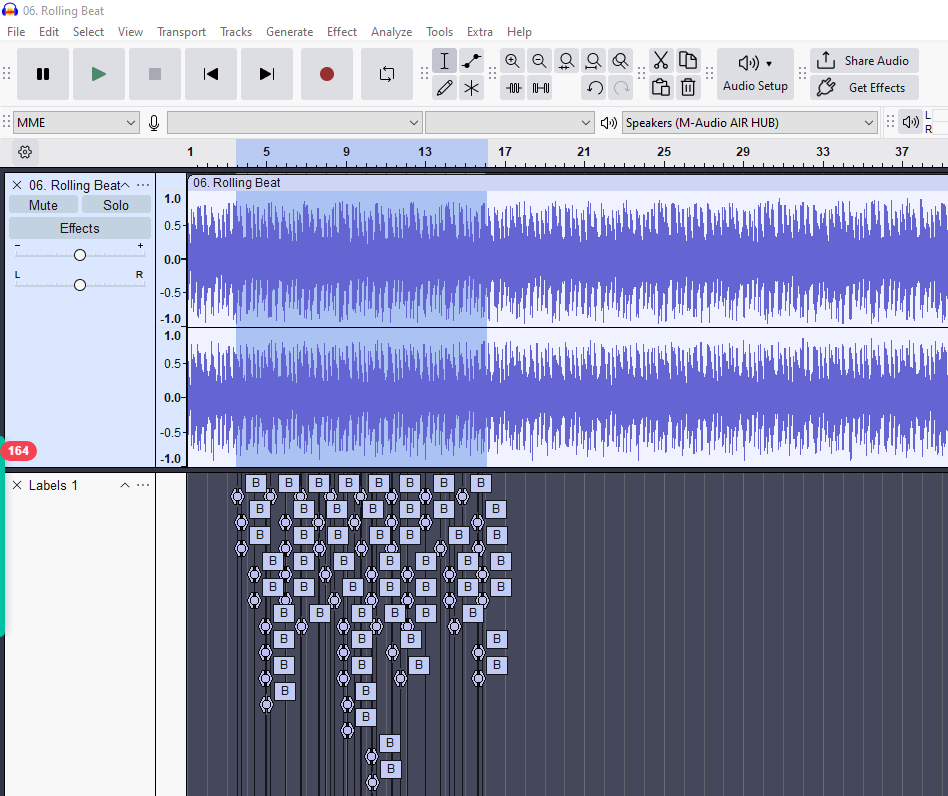
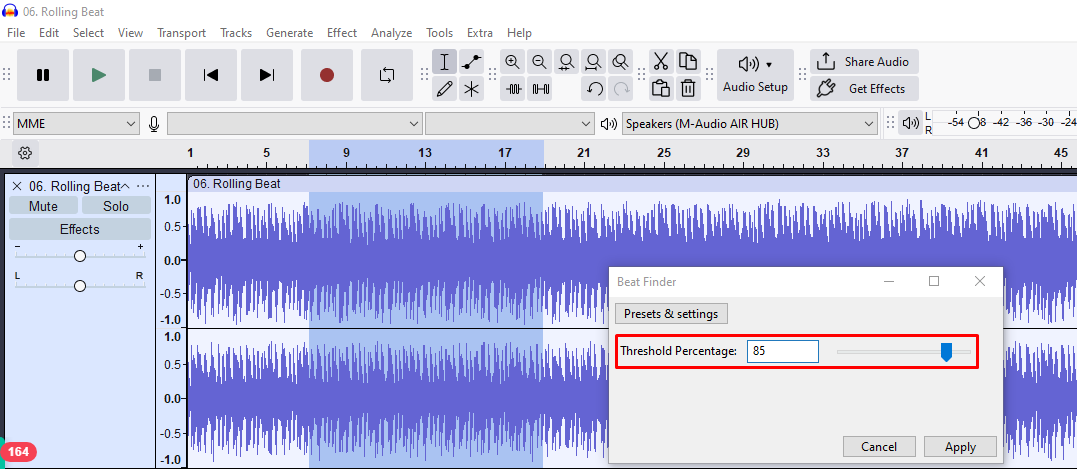
Go to Analyze > Beat Finder. You’ll be asked to set a threshold (default is 65%). Audacity will mark beats with labeled tags (like B0, B1, etc.) at points where the amplitude spikes.

Step 3: Adjust Sensitivity
To refine results, undo the analysis, then re-run Beat Finder with a higher or lower threshold. There’s no real-time preview or transient slider – just trial and error.

Step 4: Review and Tweak
Scroll through the track to check if beat labels match visible transients. There’s no grid or metronome, so you’ll have to rely on visual alignment.
Step 5: Export or Use
You can use the beat markers to guide manual slicing or copy/paste sections. Audacity doesn’t support MIDI export or warp-based grid alignment.
Advanced Techniques
For users with more technical needs or custom requirements, beat detection can be extended beyond simple presets. Advanced Techniques Include:
Hybrid Workflows: Combine automatic beat finding with manual quantization for better groove control. Useful in genres like funk or jazz.
Custom Scripts: Use Python libraries like librosa to run beat detection in offline workflows or automated batch systems. This is helpful for building educational tools, audio visualizers, or rhythm games.
Phase Alignment: When producing tightly synced multi-track sessions, align beat markers not just to transients but also phase peaks to preserve tight timing.
Spectral Layering: Run beat detection on frequency-isolated versions of a track (e.g., bass-only or drums-only) for improved accuracy in complex mixes.
These techniques are often used in commercial post-production or academic research.
Practical Tips
To get the most from beat finders, follow these best practices:
Use High-Quality Audio
The accuracy of beat detection depends heavily on audio quality. Low-bitrate MP3s can blur transients, especially in the low-end, where most rhythmic information lives. Always work with uncompressed formats like WAV or FLAC when possible. These formats preserve sharp peaks and clear frequency details, which help detection tools identify beats more precisely.
Clean the Input
Before running analysis, trim any silence, ambient noise, or irrelevant audio at the beginning of the track. Long fade-ins or non-musical intros can confuse the beat finder, causing it to place markers too early or miss the downbeat. Cleaning the file ensures the algorithm focuses only on useful rhythmic content.
Layer Analyses
Some software allows you to run beat detection multiple times at different sensitivity levels. Try this if you’re working with dynamic tracks that shift between soft and loud sections. Overlaying results helps you identify consistent beat positions and spot false positives.
Verify Manually
Even advanced tools make mistakes. Always review beat markers against the waveform and listen with a metronome. Pay special attention to tempo shifts, breakdowns, or sections with syncopation, where algorithms often drift.
Save Presets
If your software supports it, save detection settings that work well with specific genres or recording styles. This saves time and provides consistency when working on albums, podcasts, or recurring projects.
These habits help you get cleaner results and avoid common time-wasting mistakes in post-production.

You Might Also Be Interested In

Audiodrome was created by professionals with deep roots in video marketing, product launches, and music production. After years of dealing with confusing licenses, inconsistent music quality, and copyright issues, we set out to build a platform that creators could actually trust.
Every piece of content we publish is based on real-world experience, industry insights, and a commitment to helping creators make smart, confident decisions about music licensing.
FAQs
More Related Content
Digital Audio Workstation (DAW)
DAW concepts like MIDI, plugins, automation, latency, session tips, and more
Podcast & Voice Production
Mic choice, tone control, vocal polish, and editing moves for clear, engaging podcast sounds.
Audio Effects & Signal Processing
Explains reverb, EQ, compression, filters, and delay with plain tips to shape tone, space and punch.


