How to Remove Copyright Claim on Instagram (Step By Step)

Audiodrome is a royalty-free music platform designed specifically for content creators who need affordable, high-quality background music for videos, podcasts, social media, and commercial projects. Unlike subscription-only services, Audiodrome offers both free tracks and simple one-time licensing with full commercial rights, including DMCA-safe use on YouTube, Instagram, and TikTok. All music is original, professionally produced, and PRO-free, ensuring zero copyright claims. It’s ideal for YouTubers, freelancers, marketers, and anyone looking for budget-friendly audio that’s safe to monetize.
Got hit with an Instagram copyright claim? Don’t panic. This guide shows the exact screens, steps, and scripts to appeal correctly, prove your rights, and get posts unmuted fast without guesswork or shortcuts. Keep your reach, revenue, and credibility fully intact.


How to Get “Claim Accepted” on Instagram (Fast Path)
A copyright claim means Instagram detected content you don’t control, which often comes down to how Instagram interprets music use across surfaces and account types. A mute keeps the post up and silences the sound, while a block limits where people can watch it. A removal deletes the post, so confirm your status first because each outcome changes the appeal steps and proof you need.

If you’re trying to reach the “Claim accepted” outcome, your job is simple: submit the appeal through the correct channel, then back it up with proof that a reviewer can verify quickly.
Start by confirming what actually happened to your post: muted audio, blocked in some regions, or removed. The right appeal path and proof depend on that status, so don’t skip this check.
Then choose your route:
- Use the in-app appeal if you can see the case in Account status / Removed content. It’s the fastest path because it’s tied to the exact post and notice.
- Use the web copyright appeal form if you can’t access the account, you don’t see the case in Account status, or you need a more explicit submission with links and documentation.
Finally, include proof that matches the exact audio/video in the flagged post (license ID, invoice, terms link, track name/ID, and any relevant screenshots). “Claim accepted” is much more likely when your proof is specific, consistent, and easy to verify.
Appeals fail when rights don’t exist. Consumer-library music placed in ads or business posts needs different clearance, so change the soundtrack. When you can’t show permission, don’t sign the declaration. Replace or mute the audio to avoid additional flags.
What to Submit to Get a Claim Accepted (Proof Checklist)
To get an Instagram claim accepted, your proof has to match the exact post that was flagged. Use this checklist before you submit anything.
Include the post URL, upload date, and (if available) the report/reference number from Instagram’s email or notice screen. Then add proof tied to the audio or video itself: license or invoice ID, the track name and track ID, and a link to the license terms that show what your agreement covers for Instagram use and paid promotion.

If you’re using a cleared library (like Meta Sound Collection), include a screenshot that shows the track and the terms context. If you own the work, include a link to the original publication page or portfolio page that you control, plus any documentation that shows authorship.
Keep the explanation short and verifiable. Reviewers move faster when they can click one terms link, match one ID, and confirm the content in seconds.

Claim Accepted Proof Checklist
- Post/Reel/Story URL (the exact piece that was flagged).
- Upload date (and approximate time, if you have it).
- Report/reference number from the notice screen or takedown email (if provided).
- License or invoice ID (or order/receipt number) tied to the exact track/video.
- Track name and track ID (or catalog ID), exactly as shown by the source.
- Link to the license terms page (showing Instagram is covered, and paid use if relevant).
- If using a cleared library (e.g., Meta Sound Collection): screenshot showing the track and the terms context.
- If you own the work: link to your original publication/portfolio page + any documentation showing authorship.
- One short explanation (2–4 sentences): what was flagged, what rights you have, and where the proof is.
Option A: Appeal directly inside the Instagram app
Use the in-app path when you can access your account; it walks you from Account status to a signed declaration in minutes.
Open Profile ▸ tap the ☰ menu ▸ Account status
Open Instagram and tap your profile picture at the bottom right to reach your profile. This screen anchors all tools, including settings and status. Confirm you’re on the correct one if you manage multiple profiles before continuing with the flow.
.jpg)
From your profile, tap the three-line menu at the top right. The drawer reveals shortcuts to Settings, Archive, and Account status. If the menu fails to open, update the app, restart your phone, or log out and back in later.
.jpg)
Choose Account status to see impacts on your posts. This page lists removed items and restrictions that affect reach or monetization. Use it as your starting point for appeals because it links directly to each case and displays the notice.
.jpg)
Tap Removed content
Tap Removed content to view posts, reels, and stories that Instagram restricted or took down for copyright. The list shows item’s date and the reason. Open the entry to read the notice and access the path that begins your appeal.
.jpg)
Select the affected post/story/reel
Select the affected post, story, or reel from the list. Confirm thumbnail and caption match the upload you intend to restore. Scroll to the bottom of the notice for options. If items exist, handle appeals one case at a time.
On the Notice screen, tap Appeal
On the Notice screen, review the country list, reason, and instructions. Scroll until you see the Appeal option. Tap it to start the affirmation flow. Keep your documents nearby, because the next screens require declarations and a signature to proceed.
.jpg)
Tick I agree (rights declaration)
Tick I agree to confirm you hold necessary rights for audio and video. Only proceed when you own the work, licensed it for Instagram, or qualify under terms. If you cannot prove permission, stop here and replace the audio immediately.
.jpg)
Type your Electronic Signature (full legal name)
Type your legal name in the Electronic Signature field exactly as it appears on your account or license. The button remains disabled until you enter text. Use the same name across invoices and contracts to help reviewers match documents quickly.
.jpg)
Tap Appeal to submit
Tap Appeal to send the declaration and trigger review. Watch the email linked to your account for confirmations or additional questions. Save any case number provided. If the appeal fails, revisit your proof, replace audio, or secure a proper license.
.jpg)
Keep your proof handy for any follow-up
Keep your license PDFs, receipts, links, and screenshots ready. If support asks for documents, reply from the same email address linked to your Instagram account. Attach files, restate your case number, and reference the post URL so reviewers verify everything.
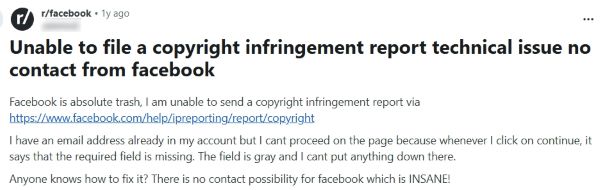
Option B: Appeal with the Instagram Copyright Appeal Form (web)
Use the web appeal form when you can’t access the app, you don’t see your case in Account status, or the in-app flow doesn’t show an Appeal button. This route works best when you can provide clear links (post URL, license terms page) and attach proof that supports your rights.
%201.jpg)
Before you submit, prepare three things so you can finish in one pass:
- the URL of the affected post/reel (and the upload date),
- any report/reference number from a takedown email (if you received one), and
- your proof of rights (license/invoice, terms link, track ID/name, and screenshots).
In the explanation box, write a short, factual claim that a reviewer can verify quickly: what content was flagged, what rights you have (owner or licensee), and where the proof lives (license ID, link to terms, attachment). Keep it specific and consistent with the name/email on your documentation.
%202.jpg)
After submitting, screenshot the confirmation screen and save any case number. If support replies asking for more information, respond from the same email address you submitted, and include the case number plus the post URL in the first line.
What to write in your appeal (short templates you can adapt)
If you own the music/video
“I am the copyright owner of [work]. I composed/recorded/filmed it on [date]. Here is a link to my original publication/registration: [link]. The claimant’s report is in error.”
If you licensed the music/video
“I licensed [track/work] from [licensor] on [date]. License ID/Invoice: [#]. Scope covers [platforms/territories/durations], including Instagram. License/terms: [link or PDF]. Please reinstate.”
If it’s public domain or under a permissive license
“The work is in the public domain / under [license type] permitting this use. Proof/terms: [link]. My video uses only the permitted portion.”
If it’s from Meta Sound Collection or another rights-cleared library
“Audio sourced from [library] under terms allowing Instagram use for [type of account/use]. Track: [name/ID], proof: [screenshot/link].”
When you should not appeal (and what to do instead)
If you added a commercial song without a license, don’t appeal. Swap the track for licensed music, use Instagram’s replace-audio tool or mute the segment, or delete and reupload with cleared audio. Document changes and keep proof to prevent flags.
If you used Instagram’s consumer music library in a business post, boosted reel, or ad, the license doesn’t cover that use. Replace the track with Meta Sound Collection or licensed royalty-free music, then republish after checking the track against Instagram’s risk signals. Keep receipts and links in a folder.
If you can’t supply proof of rights, stop the appeal. Don’t sign the declaration. Remove the post or replace the audio with a licensed track, gather documentation, and repost. Appeals without evidence waste time and may harm credibility in future reviews.
.jpg)
After you submit: outcomes & next steps
If Instagram reinstates or unmutes your post, save the confirmation email and screenshot notice in Account status. Archive proof pack with case number, post link, and upload date. Add a note describing what worked so you can reuse it later.
If support asks for more information, reply from the same email tied to your account and attach the requested documents. Restate the case number, post URL, and track or license ID. Keep answers short, factual, and verifiable to speed review.
If Instagram denies appeal, don’t refile immediately. Replace audio with Meta Sound Collection or licensed royalty-free music, or edit out the claimed section. Confirm the new upload processes cleanly, then document changes and keep receipts for future brand safety checks.
If you keep getting claims, audit sourcing workflow. Stop using consumer music for business or ads, centralize licenses in a shared folder, and keep proof packs per project. Train your team, and test private uploads before campaigns to avoid flags.
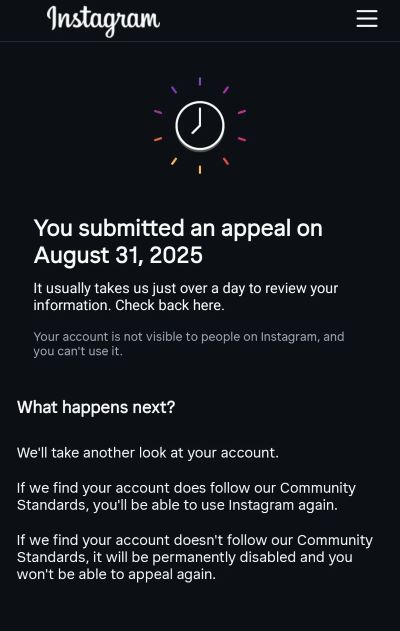
“Your Video Is No Longer Blocked” – What It Means (And What to Do Next)
When Instagram shows “your video is no longer blocked,” it means the restriction that prevented viewing in some or all regions has been lifted for that content. Your post may return to normal distribution, but you should still document the result.
Immediately save a screenshot of the notice and keep the email/confirmation (if any) in your Proof Pack folder. Then re-check the post: confirm audio plays, availability looks normal, and there are no new restrictions in Account status.
If you plan to boost the post or reuse the same audio again, keep the same proof ready. Repeat claims often happen when content is reused without the proof being easy to produce again.
Prevention checklist for future uploads
Use rights-cleared audio and visuals. Record your own, license royalty-free tracks from libraries, or pull from Meta Sound Collection when the use fits. Check each license for platform, duration, territory, edits, and paid promotion. Keep download pages and track IDs.
Build a Proof Pack for every upload. Include the license, receipt, terms PDF, track ID, supplier URL, and purchase email. Add the project link, filename, and edit notes. Store everything in a dated folder so you can attach during appeals.
Before you boost or promote, capture on-screen notices and usage prompts. Screenshot the license callouts, restrictions, and eligibility badges. Save files alongside the post link and upload date. These records help you prove intent and compliance if reviewers ask questions.
Skip consumer-catalog tracks for content you monetize or advertise. Business posts, sponsored reels, and paid campaigns need rights. Choose Meta Sound Collection or a licensed royalty-free track with coverage. Keep proof with the invoice and terms so ad reviewers clear.
When uncertain, test with a short private upload. Post a thirty-second cut to a limited audience or a hidden page and check for flags. If the audio passes, move forward. If it triggers notices, switch tracks before investing in edits.
Maintain a spreadsheet that tracks each asset’s license scope, territory, start and end dates, allowed platforms, and edit limits. Add invoice numbers, supplier contacts, and links to terms. Share the sheet with your team so everyone checks coverage before publishing.
Prevention Checklist
- Pick rights-cleared audio for the post type, including paid promotion when relevant.
- Save a Proof Pack for the upload: license/receipt, terms link or PDF, track name/ID, post URL, upload date.
- Screenshot any on-screen music notices or restrictions before publishing or boosting.
- Run a short private test upload when you feel unsure, then switch audio if flags appear.
- Track licenses in one spreadsheet with scope fields like platform, territory, term, edits, and promotion use.
FAQs
These quick answers cover the most common “claim accepted” and appeal-form confusion points, so you can choose the right next step fast.
I got an “Appeal accepted” email, but I never appealed. What happened?

Start by checking the sender domain, then confirm the same status inside the Instagram app in Account Status or Support Inbox. Some messages relate to an older report, a linked account, or a review triggered through another flow, so the email can appear even when you did not submit a form yourself. If any link opens a broken page or asks you to log in again, ignore it and only navigate through the Instagram app to verify what changed.
What should I paste when the appeal form asks to “identify the removed content”?
Paste the direct URL to the exact post, reel, or story that got flagged, then add the upload date and your username. If you received an email notice, include the report or reference number because it helps support locate the exact case faster. Add one line that identifies the audio used, such as the track name and track ID, so the reviewer can match your proof to the same asset.
What does “Your content has copyright actions to review” mean, and what should I do first?

Instagram flagged one or more older posts for a copyright review and wants you to choose an action for each item. Open the notice, check whether the item shows muted audio, blocked access, or removal, then decide based on rights and proof. If you have rights, submit an appeal with matching documentation, and if you lack rights, replace the audio and re-upload to stop repeat actions.
What happens if I do nothing after an Instagram copyright claim?

Instagram can keep the restriction in place, and the post can stay muted, blocked, or removed until you choose an action or the window expires. Multiple unresolved actions can stack up and create account risk in Account Status, especially if the same sourcing problem repeats across posts. If you have proof, appeal once with clear documentation, and if you lack proof, replace the audio and move forward with a clean upload.
Do copyright strikes expire on Instagram, and can I recover account status?

Instagram can show past copyright removals in Account Status for a period of time, and repeated issues can affect reach and monetization signals. The fastest path to recovery comes from stopping new violations and clearing any open actions with either a rights-based appeal or a compliant re-upload. Keep a Proof Pack per post so you can respond quickly if the same track triggers another review later.
My removed content shows “In Review.” How long does review usually take?

Review times vary, so the safest move is to avoid duplicate submissions and track the case inside Support Inbox or Account Status. Save your proof pack and keep your explanation consistent, because follow-up requests often ask for the same license details again. If you see no update after a reasonable wait, use the same thread or case reference and resend the key identifiers, including post URL, upload date, and license ID.

Audiodrome was created by professionals with deep roots in video marketing, product launches, and music production. After years of dealing with confusing licenses, inconsistent music quality, and copyright issues, we set out to build a platform that creators could actually trust.
Every piece of content we publish is based on real-world experience, industry insights, and a commitment to helping creators make smart, confident decisions about music licensing.