Clipping Indicator in Audio and Video: Meaning, Usage, and Types

Audiodrome is a royalty-free music platform designed specifically for content creators who need affordable, high-quality background music for videos, podcasts, social media, and commercial projects. Unlike subscription-only services, Audiodrome offers both free tracks and simple one-time licensing with full commercial rights, including DMCA-safe use on YouTube, Instagram, and TikTok. All music is original, professionally produced, and PRO-free, ensuring zero copyright claims. It’s ideal for YouTubers, freelancers, marketers, and anyone looking for budget-friendly audio that’s safe to monetize.
Definition & Core Purpose
A clipping indicator is a real-time visual or auditory alert that notifies users when an audio or video signal exceeds the maximum allowable level for a given system. Its main function is to prevent distortion, signal degradation, or data loss by drawing immediate attention to overloads.
Primary Functions:
- In audio: Warns when a signal reaches or exceeds 0 dBFS (digital full scale), preventing harsh distortion.
- In video/imaging: Flags overexposed pixels or brightness levels exceeding display or encoding limits, preserving dynamic range and detail.
Clipping indicators are present in both hardware devices (mixers, recorders, interfaces) and software applications (DAWs, video editors, digital cameras).

Types of Clipping Indicators
Clipping indicators vary depending on the medium (audio, video, or photo) and the type of system in use.
Audio Clipping Indicators
These indicators monitor digital or analog levels and provide instant feedback when a signal approaches or surpasses peak amplitude. Examples:
DAWs: Pro Tools, Logic Pro, Ableton Live use red peak lights in channel meters to denote clipping.

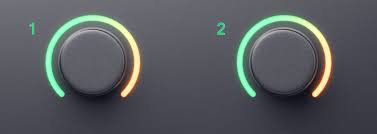
Audio Interfaces: Devices like the Focusrite Scarlett series feature ring LEDs (green/yellow/red) around gain knobs to visually indicate input clipping.
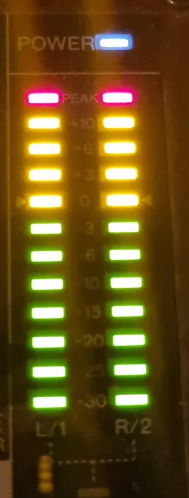
Mixing Consoles: Analog and digital mixers often have LED ladders, with the topmost red segment signaling clipping.
Video Clipping Indicators
Video systems use various visual overlays or metrics to flag areas of luminance or color saturation that exceed defined thresholds. Examples:
Zebra Stripes: These patterned overlays, found in cameras and monitors, show when brightness exceeds a set IRE level (typically 100+).
Waveform Monitors: Tools used in broadcast and film post-production to visualize luma clipping.
Software Alerts: Programs like Adobe Premiere Pro and DaVinci Resolve offer overexposure warnings via highlight alerts or false-color displays.
Photography Applications: Photoshop and Lightroom feature “clipping warnings” that highlight pure white (255) or black (0) pixels.
Clipping indicators are essential for identifying exposure issues before they become permanent in the final output.
How Clipping Indicators Work
Clipping indicators rely on predefined thresholds for each system type. When a signal exceeds these thresholds, the indicator is triggered to alert the user.
Technical Thresholds
| Medium | Threshold Description |
|---|---|
| Audio (Digital) | 0 dBFS = maximum digital amplitude (clipping occurs at or above this value) |
| Audio (Analog) | +18 dBu to +24 dBu depending on gear’s headroom |
| Video (Luma) | 100–109 IRE (broadcast-safe range is typically 0–100 IRE) |
| Video (RGB) | RGB 255 (full white) in 8-bit space triggers clipping |
Feedback Mechanisms
Clipping indicators can function in two ways:
Momentary: Lights or alerts only when the clip is occurring. Used for live feedback but may be easy to miss.
Persistent (Latched): Remains lit or flagged until reset or acknowledged. Ideal for post-analysis or mastering.
Advanced tools also include true-peak meters, which interpolate between digital samples to detect intersample clipping that may not be visible on basic peak meters.
Where Clipping Indicators Appear
Clipping indicators are embedded across a wide variety of tools and workflows, from hardware interfaces to editing software and measurement plugins.
Audio Contexts
| Tool/Platform | Clipping Indicator Use Case |
|---|---|
| DAWs (Ableton, Logic) | Shows red peak lights during real-time monitoring |
| Audio Interfaces | Input gain rings or LEDs (e.g., Scarlett, PreSonus) |
| Plugins (iZotope, FabFilter) | Mastering meters detect clipping and true-peak levels |
| Live Sound Mixers | Analog/digital LEDs indicate overload at channel or main output |
Video & Photo Tools
| Tool/Platform | Clipping Indicator Use Case |
|---|---|
| Cameras (DSLR/Mirrorless) | Zebra patterns or blinking highlights warn of overexposure |
| Video Editors (Premiere, Resolve) | Highlighted waveform or color-based alerts for clipped regions |
| Photo Editors (Photoshop, Lightroom) | Clipping warning overlays on histogram or preview windows |
Real-time monitoring is especially important during recording, live streaming, and broadcast situations.
How to Respond to Clipping Indicators
Clipping indicators show you when audio or video levels are too high and could get distorted. They’re warnings, not automatic corrections, so it’s up to you to fix the problem right away.
In audio, the first step is to reduce the gain. That means turning down the volume at the source, like your microphone or instrument, before it reaches your recording software. This helps prevent overload at the input stage.
If the signal still spikes too high, add a limiter. A limiter works like a ceiling – it catches sudden volume jumps and keeps them from going over the limit. It’s especially useful during mixing or mastering to prevent accidental peaks.
But if your audio is already distorted in the recording, the best solution is to record it again using better levels. Once clipping is baked into the waveform, no effect can fully clean it up.
For video, the fix usually starts with lowering the exposure. You can do this by adjusting the aperture, ISO, or shutter speed on your camera.
If lights are too bright, you might need to soften them or use diffusion to reduce glare. Later, if you shot in RAW or HDR, you can try recovering details in editing. But this only works if the data wasn’t fully lost during recording.
Fixing clipping early keeps your project clean and avoids problems later in the edit or mix.
Related Terms
Importance in Professional Workflows
Clipping indicators are essential in production pipelines where signal integrity, quality assurance, and compliance are critical.
Audio Engineering
In audio work, clipping indicators help engineers catch problems before they ruin a recording. During tracking, they show when a microphone or preamp is being pushed too hard. If levels go over 0 dBFS in a digital system, distortion can happen instantly.
During mixing and mastering, indicators are used to make sure final tracks don’t peak above safe levels. Most streaming platforms require a maximum of −1 dBTP (decibels True Peak) to avoid distortion after file conversion. Mastering engineers rely on true-peak meters to stay within those limits.
In broadcast audio, clipping indicators are part of loudness management. Laws like the CALM Act in the U.S. or EBU R128 in Europe require consistent loudness. If a mix clips or violates these rules, it can be rejected or flagged.
Video & Photography
In visual production, clipping indicators help protect image detail. If parts of the shot are too bright or too dark, detail can be lost permanently. Tools like zebra stripes, histogram warnings, or RGB clipping alerts tell creators when exposure is off.
Cinematographers use these tools to adjust lighting and camera settings on the spot. For photographers, they’re a guide for choosing the right balance between highlight and shadow retention.
In HDR workflows, where brightness ranges are wider, clipping control becomes even more important. Without it, highlight detail may be lost beyond recovery. Ignoring these warnings can mean hours of lost work.
Limitations & False Alarms
While clipping indicators are helpful, they aren’t perfect. Sometimes they miss certain types of distortion, especially in digital audio and compressed formats.
Intersample peaks happen between digital samples. These can slip past regular peak meters in your DAW because they don’t appear until the signal is converted back to analog. That means your track might sound clean in the software but still distort on speakers or streaming platforms. To avoid this, use true-peak meters or enable oversampling, especially when preparing a master.
Some clipping issues only show up after export. This is called metadata blindness. For example, when exporting to MP3 or another compressed format, new peaks can appear due to the way the file is encoded.
Some DAWs don’t warn you about these changes. Also, streaming platforms like Spotify or YouTube may change your track’s loudness using normalization. This won’t always trigger clipping alerts, but it can still affect sound quality.
To stay safe, always check the final version of your file. Use more than one metering tool when working on critical projects. This gives you a full picture of how your mix or video will behave after it’s published.
Clipping Indicator vs. Related Tools
Clipping indicators often coexist with other monitoring tools. Understanding their distinct roles helps avoid confusion.
| Tool | Primary Function | Difference from Clipping Indicator |
|---|---|---|
| VU Meter | Measures average loudness (volume units) | Doesn’t show peaks-responds slowly to transients |
| Loudness Meter | Tracks perceived loudness in LUFS | Doesn’t indicate actual clipping or overload |
| Histogram (Photo) | Displays tonal range distribution | Highlights clipped areas, but not in real-time |
| True-Peak Meter | Detects peaks between samples | More precise than basic clipping indicators |
Each meter type has a specific application. Clipping indicators serve as the first line of defense in protecting signal integrity.
Historical Evolution
Clipping indicators have changed a lot as audio and video technology moved from analog to digital. In the analog era, most equipment used VU meters with moving needles to show average loudness. These meters were slow and couldn’t catch fast peaks, so engineers had to use their ears and leave extra headroom to avoid distortion.
When digital recording became standard, new tools were needed to handle the tighter limits of digital audio. Peak-reading LED meters began to appear on mixers, interfaces, and software. These meters gave immediate feedback, so engineers could catch overloads in real time. A common color system was introduced: green for safe levels, yellow for caution, and red for clipping.
Today’s systems are far more advanced. Most DAWs and professional gear now include true-peak meters that can detect intersample peaks—distortion that happens between digital points. Some also have latched indicators that stay red until reset, making it easier to catch issues later.
Many modern setups include automatic gain control, which adjusts levels on the fly to prevent clipping. This evolution reflects the industry’s need for cleaner sound, better visuals, and consistent compliance.

You Might Also Be Interested In

Audiodrome was created by professionals with deep roots in video marketing, product launches, and music production. After years of dealing with confusing licenses, inconsistent music quality, and copyright issues, we set out to build a platform that creators could actually trust.
Every piece of content we publish is based on real-world experience, industry insights, and a commitment to helping creators make smart, confident decisions about music licensing.


FAQs
More Related Content

AV Formats & Technical Standards
Maps codecs, containers, and specs to help you pick the right format for video and audio tasks fast.

Monetization & Platform Policy
Ad rules, strikes, royalties, and compliance steps across major platforms.

Music Licensing
Licensing rules and rights for creators, brands, and filmmakers using music.