Amplify in Audio Editing: How It Works and When to Use It
Audiodrome is a royalty-free music platform designed specifically for content creators who need affordable, high-quality background music for videos, podcasts, social media, and commercial projects. Unlike subscription-only services, Audiodrome offers both free tracks and simple one-time licensing with full commercial rights, including DMCA-safe use on YouTube, Instagram, and TikTok. All music is original, professionally produced, and PRO-free, ensuring zero copyright claims. It’s ideal for YouTubers, freelancers, marketers, and anyone looking for budget-friendly audio that’s safe to monetize.
What is Amplify in Audio Editing?
Amplify is a core audio effect used to increase or decrease the overall volume of a selected waveform. It applies a consistent gain adjustment – measured in decibels (dB) – across the entire signal, without altering its tonal characteristics or dynamics.
The effect is primarily used to:
- Raise quiet recordings to a usable level.
- Lower overly loud clips to prevent distortion.
- Match volume across multiple tracks for consistency.
It is often the first step in a processing chain during editing or mastering.
Key Features
Amplify is a basic but essential tool in audio editing. It lets you raise or lower the overall volume of a track without changing its sound quality.
Linear Gain Adjustment: Amplify changes the volume evenly across the whole recording. Whether you boost or reduce the signal, all parts of the waveform are affected in the same way. This keeps the tone and balance of the original mix intact.
Clipping Prevention: Most audio editors, like Audacity, warn you if amplification would push the audio over 0 dB. That’s important because going past 0 dB causes clipping, which distorts your sound. These warnings help you avoid accidental damage to your audio.
Presets and Auto Modes: Many programs make amplifying easier to use with built-in settings.
For example, “Normalize to 0 dB” automatically suggests the maximum safe boost without clipping. Auto-gain features go further by scanning the track and setting a level that fits most listening environments.
These presets save time and help beginners get professional-sounding results without needing to understand every technical detail.
How Amplify Works
The Amplify effect works by increasing or decreasing the strength of an audio signal using a specific decibel (dB) value. When you apply positive gain, like +3 dB, the entire track gets louder. A +6 dB boost will nearly double how loud the sound feels to most listeners, even though our ears don’t hear volume changes in a perfectly linear way.
Negative gain does the opposite. If a track is too loud or if you want to leave space for effects like compression or EQ, reducing the level by -6 dB brings the signal down without changing its tone.
To prevent distortion, many programs, like Audacity, automatically measure how loud your audio is and show you the maximum amount you can safely amplify before clipping happens. This is called peak detection. It checks the loudest point in your track and makes sure that any changes stay within the safe 0 dB limit.
Behind the scenes, the math is simple. The gain is calculated using the formula:
dB = 20 × log₁₀(new amplitude ÷ original amplitude)
A 6 dB increase doubles the signal’s strength, while a -6 dB cut cuts it in half. This clean, consistent control is why Amplify is such a useful tool.
Amplify Common Uses
Amplify is one of the most frequently used audio effects because it’s simple and versatile. Whether you’re working on voice, music, or video, it’s often the first step to getting clear, balanced sound.
Podcasts and Voiceovers
In podcast editing or voiceover work, Amplify helps balance volume levels between different speakers. If one person’s mic was too quiet, you can raise it without changing how the background noise behaves. It’s especially helpful when working with remote guests or different recording setups.
Music Production
Producers often apply Amplify early in the mixing process to match loudness between instruments or vocals. Getting the levels closer before adding EQ or compression makes it easier to blend everything together. Later in the session, Amplify can also make small adjustments to recordings before final processing.
Audio Restoration
When restoring audio from old formats like cassette tapes or vinyl, Amplify is used to bring quiet tracks up to modern listening levels. This helps make faded audio clearer, making it easier to apply cleanup tools like noise reduction or click removal afterward.
Video Soundtracks
In video editing, Amplify adjusts audio so it fits the visual pacing of a scene. For example, if a dialogue section is too quiet after a loud action scene, you can raise it to keep everything balanced. This ensures that speech is always easy to hear before you move into final mastering.
Related Terms
Amplify vs. Similar Effects
| Effect | Function | Use Case |
|---|---|---|
| Amplify | Uniformly changes volume (up or down) | Quick gain adjustments |
| Normalize | Raises peak to a set target (e.g., -1 dB) | Maximizing loudness while avoiding clip |
| Compressor | Lowers loud parts, raises quiet ones | Evening out volume fluctuations |
| Limiter | Sets a ceiling to block peaks over threshold | Final peak control to avoid clipping |
Amplify is straightforward and linear. It does not analyze the content or alter the dynamic range, unlike compression. Normalization is a related but smarter variant – it analyzes peak amplitude and adjusts accordingly.
Best Practices
To get clean, professional results when using the Amplify effect, follow a few simple guidelines that help you avoid distortion and keep your audio sounding great.
Avoid Clipping
Always keep your peaks below 0 dB. If you amplify a track past that limit, you’ll get digital distortion, which sounds harsh and can ruin your mix. If you need to push a track louder, apply a limiter to prevent clipping.
Leave Headroom
Leaving a bit of space under 0 dB gives you room for further editing. If you’re preparing a final master, aim to stay around -3 dB. For tracks that still need EQ or compression, keep peaks around -6 dB. This helps prevent overload as effects stack up.
Incremental Adjustments
Instead of applying a big volume boost all at once, increase gain in smaller steps. This keeps the signal cleaner and gives you more control as you go. You can fine-tune each stage of your mix and avoid unwanted artifacts.
Monitor with Meters
Keep an eye on your levels using both peak and RMS meters. Peak meters show the loudest part of your track, while RMS meters reflect the overall perceived volume. Together, they help you strike a balance between loudness and clarity.
Software Examples
The Amplify effect is available in most audio editors, but how you access and control it can vary. Here’s how it works in popular software tools.
Audacity
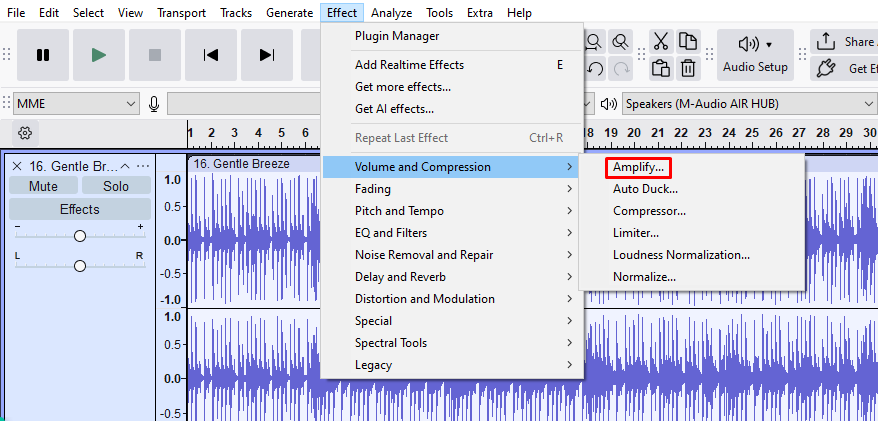
In Audacity, you can find the Amplify effect under the Effect menu. When you open it, the software automatically suggests the highest safe amplification without causing clipping. There’s also an option to allow clipping, but that’s usually best left off unless you want a distorted effect on purpose.

Adobe Audition
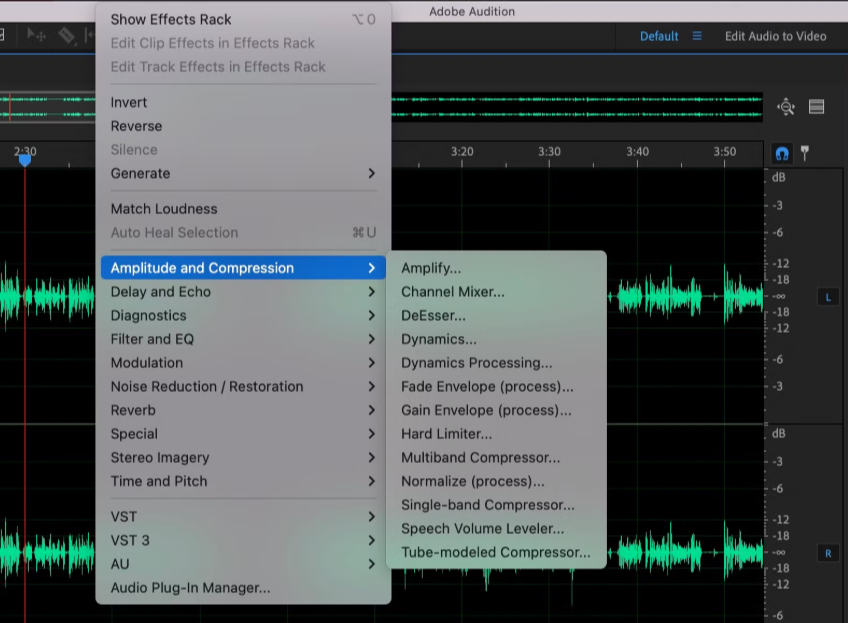
Adobe Audition offers more control with its Amplify effect, which is located under Effects > Amplitude and Compression > Amplify. You can enter a specific dB value, run batch processes, and use amplitude statistics to make precise adjustments. It’s ideal for both casual users and professionals.

Reaper (DAW)
Reaper doesn’t have a dedicated Amplify effect but gives you several ways to control volume. You can use track faders, insert JS Volume plugins, or apply clip-based gain to individual audio items. This makes it flexible for both subtle tweaks and detailed automation.
Logic Pro X
In Logic Pro X, use the Gain plugin found in the Utility section. It provides clear stereo or mono controls and includes metering so you can watch your levels in real time.
FL Studio
FL Studio users can adjust volume directly in the Channel Rack or apply the Fruity Balance plugin for more visual control.
Other Tools
MP3Gain lets you adjust MP3 loudness without re-encoding. OcenAudio is a simple editor with a fast and easy-to-use Amplify option.

You Might Also Be Interested In

Audiodrome was created by professionals with deep roots in video marketing, product launches, and music production. After years of dealing with confusing licenses, inconsistent music quality, and copyright issues, we set out to build a platform that creators could actually trust.
Every piece of content we publish is based on real-world experience, industry insights, and a commitment to helping creators make smart, confident decisions about music licensing.
FAQs
More Related Content
Digital Audio Workstation (DAW)
DAW concepts like MIDI, plugins, automation, latency, session tips, and more
Podcast & Voice Production
Mic choice, tone control, vocal polish, and editing moves for clear, engaging podcast sounds.
Audio Effects & Signal Processing
Explains reverb, EQ, compression, filters, and delay with plain tips to shape tone, space and punch.


