How to Edit Audio for Free: Beginner’s Step-by-Step Guide (with Videos)

Audiodrome is a royalty-free music platform designed specifically for content creators who need affordable, high-quality background music for videos, podcasts, social media, and commercial projects. Unlike subscription-only services, Audiodrome offers both free tracks and simple one-time licensing with full commercial rights, including DMCA-safe use on YouTube, Instagram, and TikTok. All music is original, professionally produced, and PRO-free, ensuring zero copyright claims. It’s ideal for YouTubers, freelancers, marketers, and anyone looking for budget-friendly audio that’s safe to monetize.
Audio editing turns raw recordings into polished stories that inform, entertain, and persuade. From podcasts to film scores, the goal is always the same: capture clear sound, remove distractions, balance levels, and shape a mix that plays well on any device.
Good software makes those steps possible on a home computer, yet many newcomers hesitate because paid editors feel complex or expensive. That’s where Audacity shines. This veteran, open-source program delivers studio-grade capability without the price tag, making it a favourite in classrooms, newsrooms, and bedroom studios alike.
Audacity installs in minutes on Windows, macOS, and Linux and stays light on system resources. Behind its straightforward layout you’ll find multi-track recording, precise waveform tools, real-time level monitoring, noise reduction, batch processing, and support for an ever-growing library of plug-ins.
Most important, it’s completely free. No subscriptions, no hidden costs – just reliable updates from a global community of volunteers and users who rely on it every day.
The guide that follows shows you how to download, install, and master Audacity’s core tools. With step-by-step instructions, you’ll learn to record, edit, and export broadcast-ready audio so your projects sound their best from the first take to the final mix.
Version Notice (Audacity 2.x vs 3.x+)
These videos were originally recorded using Audacity 2.x, which featured a different interface and tool layout.
If you’re using Audacity 3.4 or later, you’ll notice several changes: the .aup project format has been replaced with .aup3, the Time Shift Tool icon has been removed (you now drag clips with the Selection Tool), and many effects have been reorganized into categorized menus.
All editing steps shown in the videos still apply. Additional notes and updated screenshots are included throughout the page to support users on Audacity 3.4–3.7+.

Download and Install Audacity
Installing Audacity is quick and straightforward. Use the official download page to grab the correct build for your system and the plug-ins that unlock extra formats.
Step 1: Visit the Official Audacity Website Open your preferred search engine and type “Audacity download.” Look for the result from the Audacity Team, which should be the official website. Click on the link to navigate to the download page.

Step 2: Select Your Operating System On the download page, locate and choose the version of Audacity that matches your operating system (Windows, macOS, or Linux).
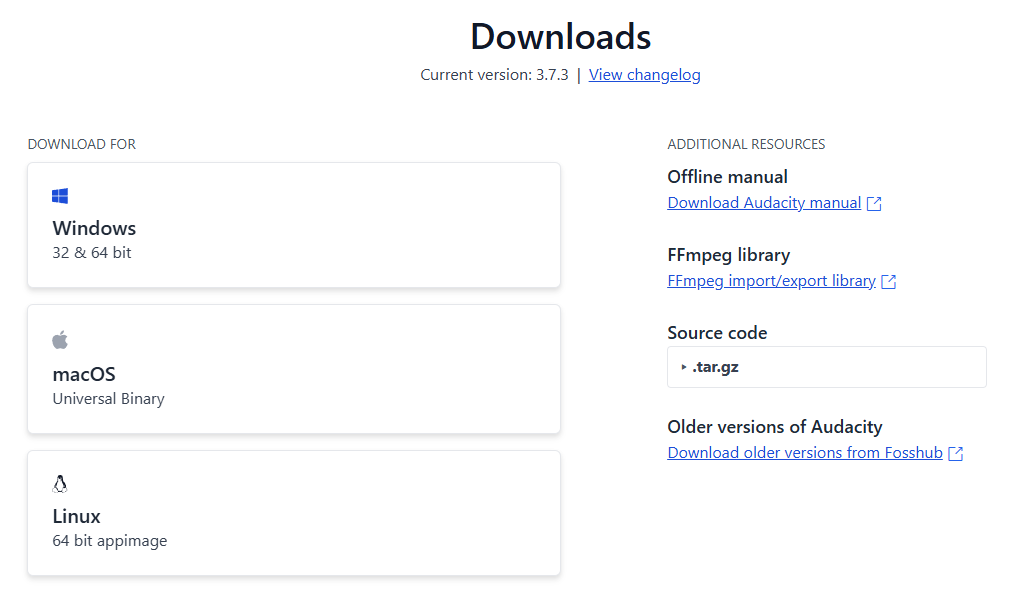
Step 3: Download the Installer Click the appropriate download button to obtain the installer. The download will include optional plugins and libraries that you may need for enhanced functionality.
Step 4: Download and Install Plugin Locate FFmpeg Library, go to the external download page and choose either the executable or zip file to download.
Step 5: Start the Installation Process Run the downloaded Audacity installer file. If your antivirus software or Windows Defender prompts you, proceed by selecting “Run.” Follow the on-screen instructions to complete the installation process.
Step 6: Install Additional Plugins Launch Audacity and follow the dialog boxes and prompts to install any additional plugins required for your audio work.
Step 7: Final Steps Once you have completed the installation of Audacity and the necessary plugins, Audacity will be ready to use. You can now begin exploring its powerful audio editing features to create, edit, and manage your audio projects.
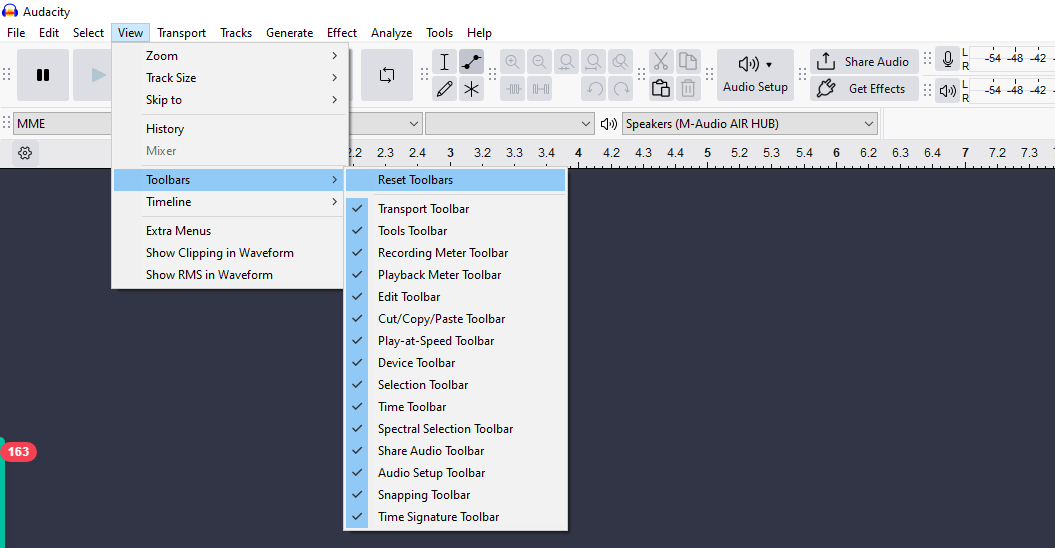
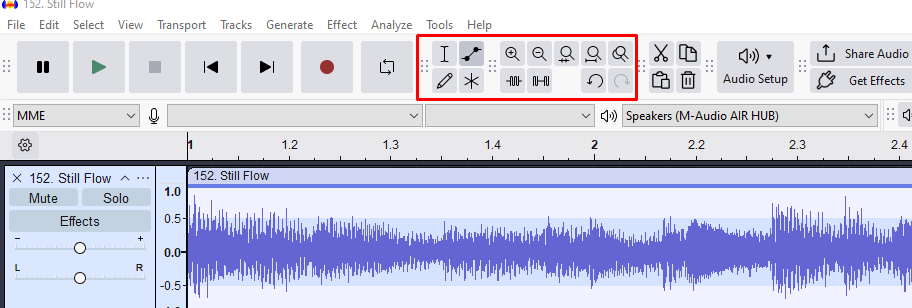
Audacity Toolbar – Part One
The main toolbar houses the controls you’ll touch most often when recording and playback. Getting comfortable with these buttons and meters lays the foundation for smooth editing sessions.
Key Components of the Audacity Toolbar:
First, enable all the options on the toolbar.
Microphone Input
Located at the front of the toolbar, this shows the mic being used as the input source for recording audio. If you have multiple microphones or input sources, you’ll see them listed and can select the one you want.

Playback Output
The column with the speaker icon indicates where the playback sound will be output. You can adjust the playback volume from this column to control how loud the audio plays back.

Input Level Control
This bar allows you to control the input level for the microphone. For optimal recording, adjust the mic level to avoid distortion or low volume.

Basic Editing Commands
Copy and paste functions work similarly to other programs, allowing you to copy and paste audio sections using the toolbar or keyboard shortcuts like Ctrl+C and Ctrl+V. The undo and redo options, represented by arrow icons, help you revert changes or reapply edits quickly.

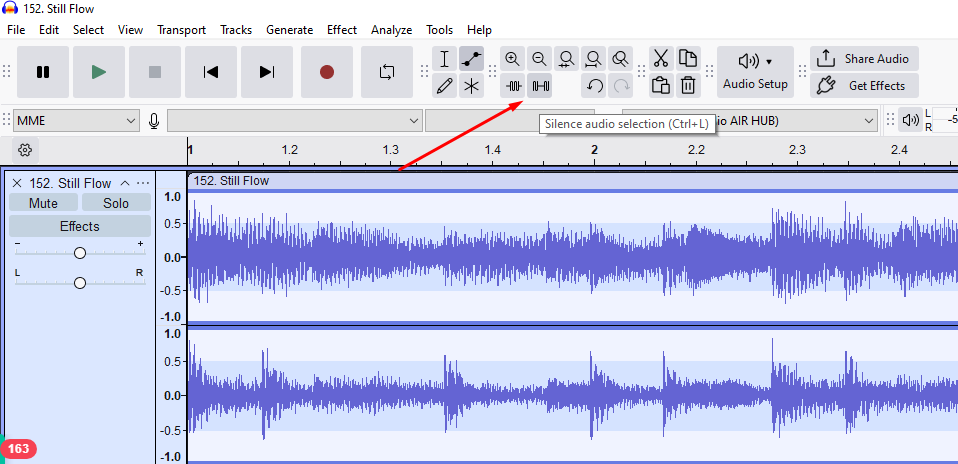
Silencing Audio
To mute a portion of the audio, select the desired section and click the “Silence Audio Selection” button. If you need to restore the original audio, simply use the undo button.
Getting Started:
With these basic toolbar controls, you can start recording and editing audio right away. The familiar copy-paste and undo-redo functions make it easy to manage your audio files as you would in other Windows or macOS programs. Explore these tools to create and edit your audio projects efficiently. Mastering these fundamental features will set the stage for more advanced techniques.
Audacity Toolbar – Part Two
Beyond basic record and playback, Audacity’s toolbar gives you precise control over editing with tools like Zoom, Selection Tool, Envelope, and Draw.
Key Controls on the Toolbar:
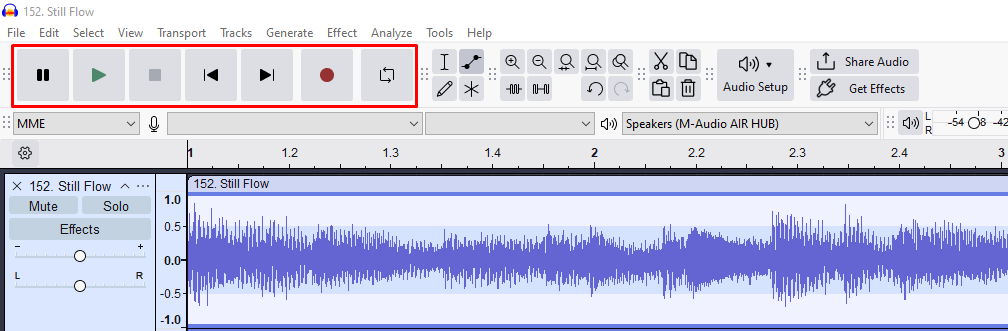
Playback and Recording Buttons
The record button (red) starts recording. The play button (green) plays back your audio. Additionally, there are pause, stop, and fast forward buttons that provide standard controls for managing audio playback and navigation.
Playback Speed Control
This control adjusts the speed of playback using the speed slider button, allowing you to review audio at different rates.
Essential Editing Tools
- Zoom Tool (Magnifying Glass): Left-clicking zooms in on the selected portion of the track for detailed editing. Right-clicking zooms out to provide a broader view of the audio track.
- Selection Tool (Audacity 3.4 and later): Hover your mouse over the waveform until a hand icon appears, then click and drag the clip left or right to reposition it on the timeline. This allows you to adjust timing or create overlaps without switching tools. The Time Shift Tool icon (↔) has been removed in newer versions, but its functionality is now built into clip handling directly.
- Selection Tool: Used to highlight and select specific portions of your audio track for focused editing.
- Envelope Tool: This tool helps establish and adjust the volume range within a segment of your audio. You can narrow or widen the range to control how the audio fades in and out.
- Draw Tool: Allows for precise editing by adjusting the volume of individual sound points when zoomed in to the maximum detail level. While it is rarely used, it is effective for fine-tuning specific sound details.
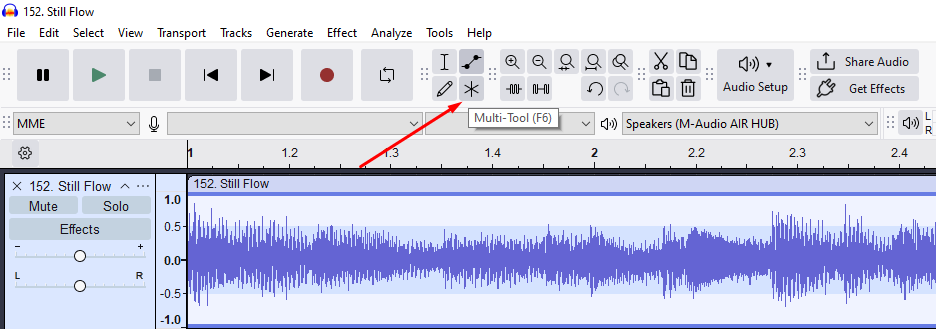
Multi-Tool Mode
This mode activates all five main tools, enabling seamless switching between them while working on your project for enhanced productivity.
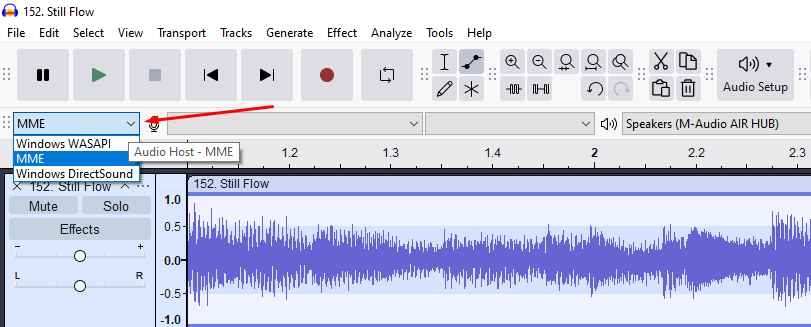
Audio Host Setting (MME Tool)
By default, Audacity uses MME as the audio host, which controls how it interacts with your sound card. You can change this to Windows Direct Source or Windows WASAPI to use different audio configurations and enhance compatibility with various audio setups.
Final Tips:
Remember, you can always use the Undo button to revert any changes you make. The Zoom Tool can be right-clicked to quickly return your track to its standard view for easy navigation. These advanced tools and features will give you greater control over your audio editing projects, helping you produce high-quality results efficiently.
Importing Content into Audacity
Bringing existing audio into your project is usually the first production step. Audacity supports a wide range of formats and lets you organise multiple files on stacked tracks.
Steps to Import Audio:
Step 1: Open Audacity
Ensure that Audacity is running and ready for use.
Step 2: Delete Existing Tracks (Optional)
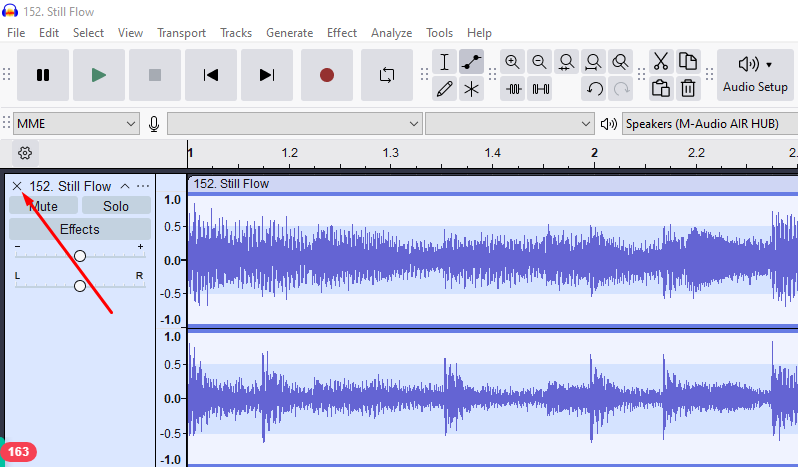
If there is a track already loaded, click the ‘X’ on the top left of the track panel to remove it.
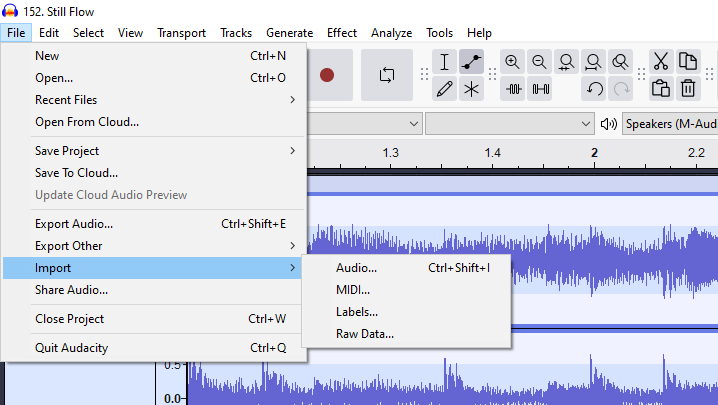
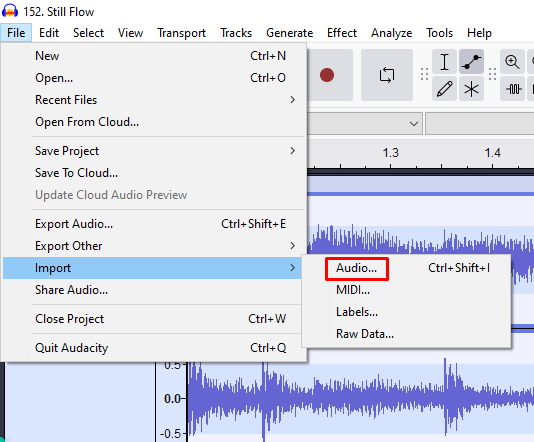
Step 3: Access the Import Command
Go to the File menu at the top. Select Import, and then choose Audio from the dropdown.
Step 4: Choose Your File
Navigate to the directory on your computer where your audio files are stored. Audacity supports importing various file formats such as WAV, AIFF, OGG, FLAC, MP3, and other MPEG-compatible files.
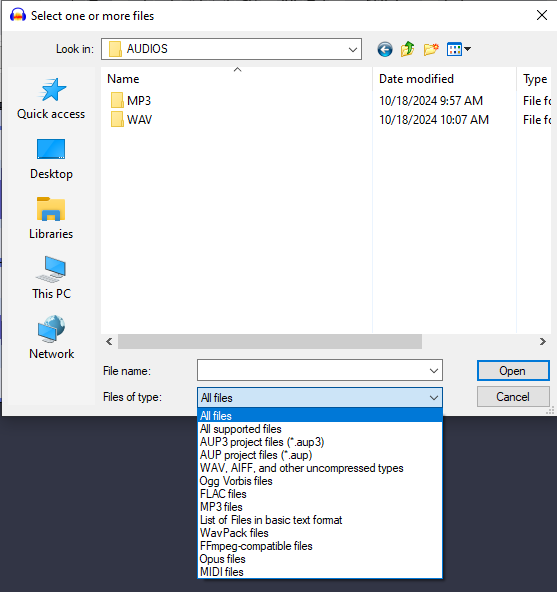
Step 5: Select and Open Your File
Highlight the desired audio file and click Open. The file will be loaded into the Audacity workspace for editing.
Step 6: Importing Multiple Files
Repeat the import process by selecting File > Import > Audio. Hold down the Ctrl key (Cmd on Mac) and select multiple files. Click Open, and each file will be imported one at a time. The tracks will be stacked in the workspace, and you can scroll up and down using the scroll bar to view and edit them.
Step 7: Managing Imported Tracks
If you wish to remove a track, click the ‘X’ on the track panel. To undo any recent imports or deletions, use the Undo button.
Tips:
Use the scroll bar to navigate through multiple tracks easily. Organize and review your imported files before beginning the editing process.
Using Projects and Project Files in Audacity
Project files store every edit, marker, and plug-in setting so you can pick up exactly where you left off. This ensures that you can continue working on your project later without losing any edits or progress.
Saving Your Work as a Project:
Step 1: Make Edits to Your Audio
Perform your edits, such as cutting, copying, or adjusting parts of the audio.
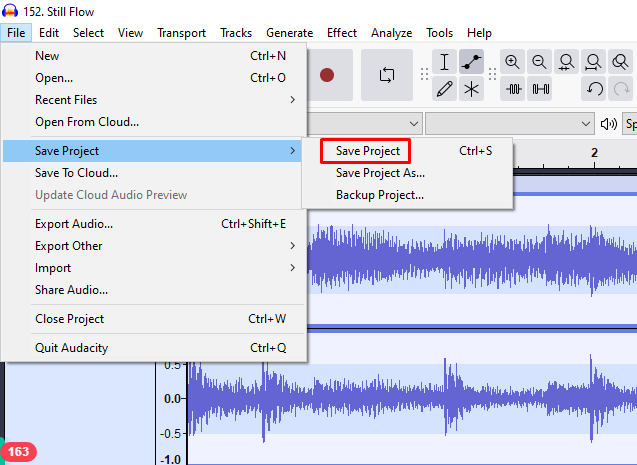
Step 2: Save as a Project
Go to the File menu and select Save Project. A warning may appear reminding you that the saved project is not an audio file that can be played outside of Audacity. Click OK to proceed.
Step 3: Choose a File Name and Location
Name your project and choose a location on your hard drive. Audacity project files are saved with the .aup extension in older versions. Starting with Audacity 3.0, all projects are saved as a single .aup3 file. Both formats store edits, tracks, and settings, but .aup3 is more efficient and easier to manage since it doesn’t require a separate data folder.
Step 4: Confirm the Save
Click Save, and Audacity will save your project. The project name will appear in the top left corner of the program, indicating that it has been saved.
Reopening Your Project:
Step 1: Close the Current Project
If you have finished your current session, click X to close the project from the timeline. Select File > Close to fully close your project.
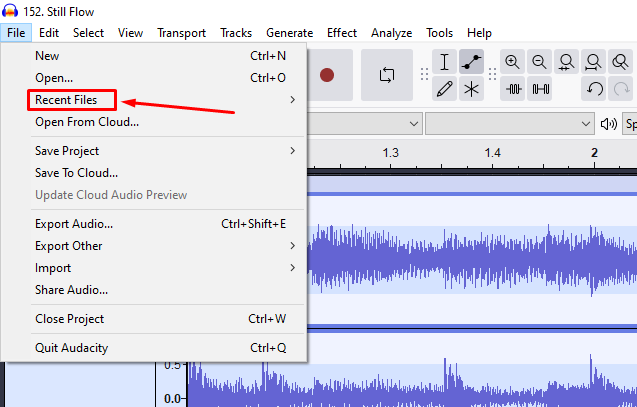
Step 2: Reopen Your Saved Project
Go to the File menu and select Recent Files to quickly access your project. Alternatively, select Open and navigate to your saved .aup3 file on your hard drive.
Step 3: Continue Editing
Once opened, your project will appear exactly as you left it, allowing you to continue working seamlessly.
Tips:
Save regularly to avoid losing work. Remember, an .aup3 file is only usable in Audacity. To create an audio file for distribution, you will need to export your project as an audio file (e.g., MP3 or WAV).
By following these steps, you can effectively manage and organize your audio projects in Audacity, ensuring your work is saved and easily accessible.
Creating a Simple Recording in Audacity
Audacity makes it easy to create simple spoken word recordings using either the toolbar controls or convenient keyboard shortcuts. Here’s a step-by-step guide to help you get started:
Recording with Audacity:
Step 1: Start Recording
Go to the Transport menu and select Record, or simply press the R key on your keyboard. Audacity will begin recording, and you’ll see your voice waveform appearing on the timeline.
Step 2: Pause Recording
Press the P key to pause the recording. To resume recording, press R again. Audacity will continue recording from where you left off.
Step 3: Stop Recording
Press the P key to stop the recording.
Recording Multiple Tracks:
Step 1: Record an Additional Track
To create a new recording while keeping the previous one, press Shift + R. Before starting a new recording, mute the existing track by clicking the Mute button on the left side of the track panel.
Step 2: Repeat Recording
Press Shift + R again to start recording a new track. Continue this process as needed to create multiple tracks, each layered on top of the previous ones.
Managing Your Tracks:
Step 1: Muting and Removing Tracks
If you don’t like a track, click the X button on the track panel to remove it. Keep only the tracks you want to edit and work on.
By following these steps, you can easily create and manage multiple spoken word recordings in Audacity. This process allows you to pause, resume, and layer your recordings for efficient editing and production.
Labeling Tracks in Audacity
Labels act like bookmarks on the timeline, marking cues for edits, notes, or chapter points. They make navigating long recordings far quicker and reduce the chance of missing crucial cuts.
Adding Labels:
Step 1: Start by Muting the Track (Optional)
Click the Mute button on the track panel to silence the audio while setting up.
Step 2: Add a Label at a Specific Point
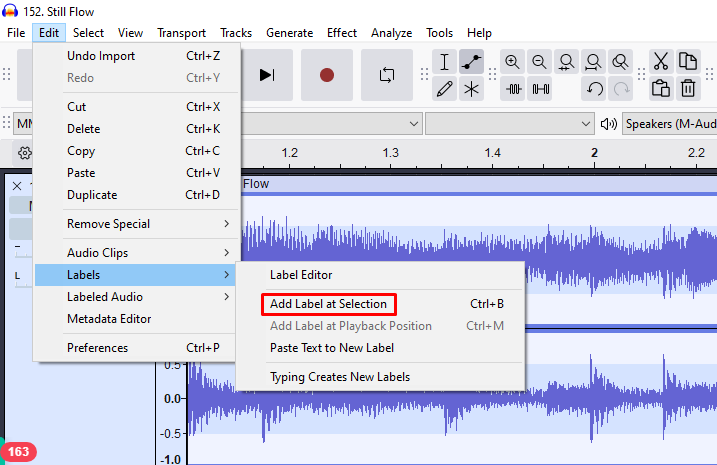
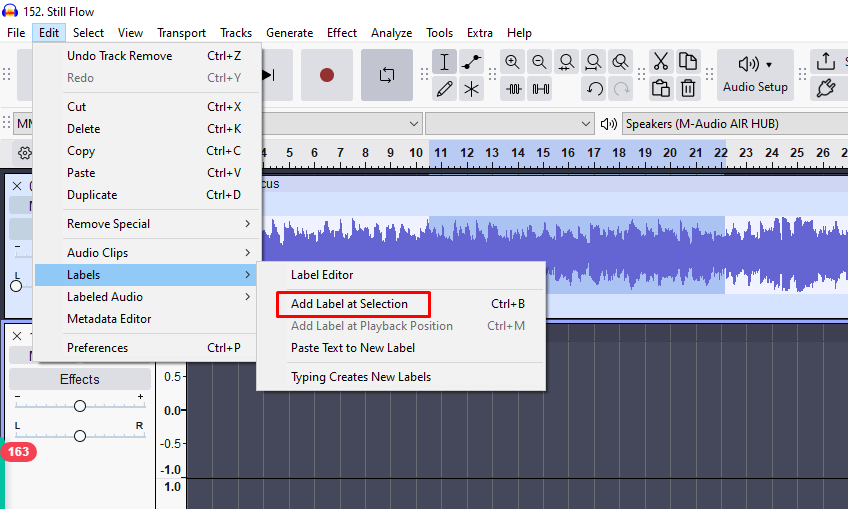
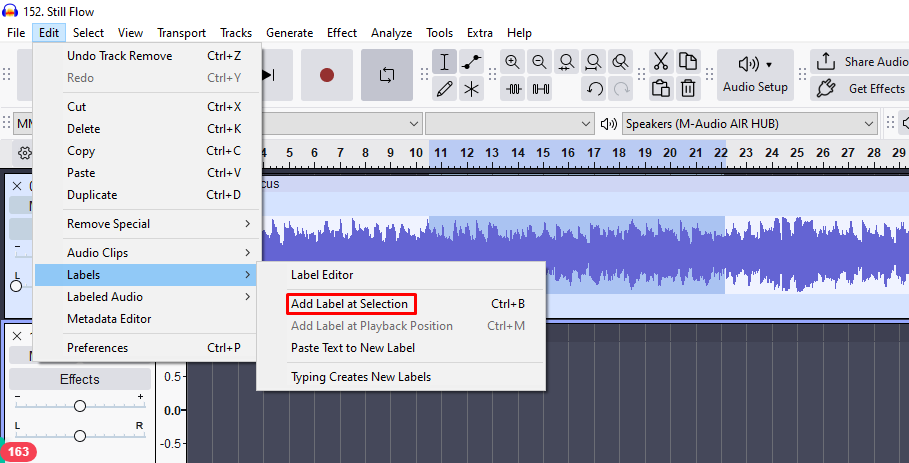
Move your cursor to the desired point on the timeline. Go to the Edit menu, select Labels, and click Add Label at Selection. A text box will appear at the marker point, allowing you to type a note (e.g., “Cut out starting here”).
Step 3: Add Multiple Labels
Let the audio play and pause at different points where you want to add labels. Repeat the process by selecting Edit > Labels > Add Label at Selection or using the shortcut Ctrl + B (Cmd + B on Mac) for faster labeling.
Editing and Managing Labels:
Step 1: Editing Label Text
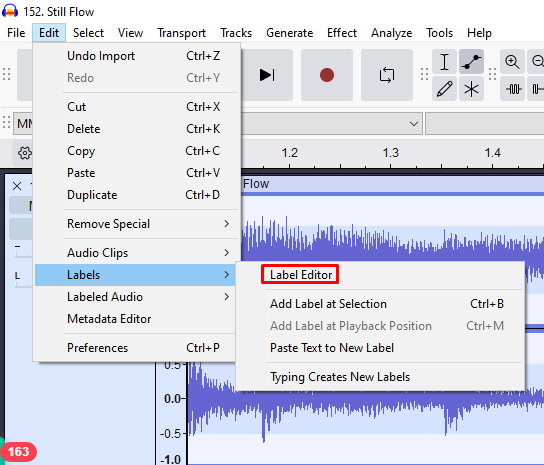
To modify a label, go to Edit > Labels and select Edit Labels. A dialog box will appear where you can change the text or delete labels as needed.
Step 2: Labeling Entire Tracks
Click within the track header and type in the desired name. Confirm by clicking OK to save the label.
Step 3: Removing Labels
To delete a label, select the label and click the “Delete” button next to it. To undo the deletion, use the Undo button to restore the label.
Tips:
Use the keyboard shortcut Ctrl + B to add labels quickly without navigating through menus. For more comprehensive control over your labels, utilize the dialog box found under Edit > Labels > Edit Labels.
Labeling helps organize your editing process by marking key points for cuts, edits, or notes. This makes your workflow more efficient and precise.
Adding Metadata in Audacity
Metadata is important for providing additional information about your audio files, such as contributing artists, album names, and more. Here’s how to add and manage metadata while working in Audacity.
Why Add Metadata?
When you hover over an MP3 file or view its properties, metadata displays details such as the file type, size, and length. Adding metadata allows you to include custom information that can be useful for organization and distribution.
Steps to Add Metadata:
Step 1: Go to the Metadata Editor
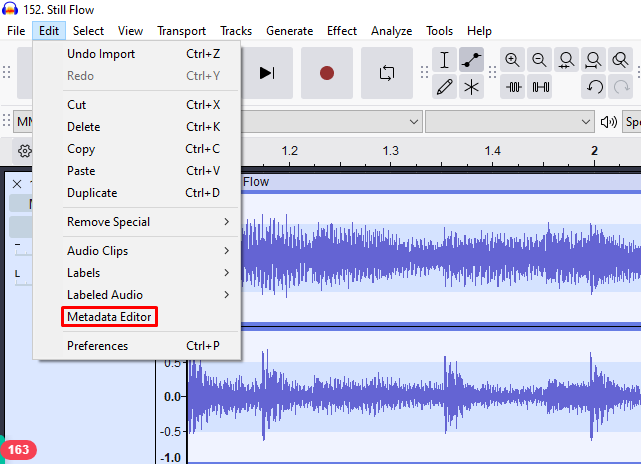
While editing your audio, go to the Edit menu and select Metadata from the dropdown list.
Step 2: Using Pre-Formed Categories
Audacity provides seven default metadata tags that cannot be edited. These include basic tags such as title, artist, album, track number, and more.
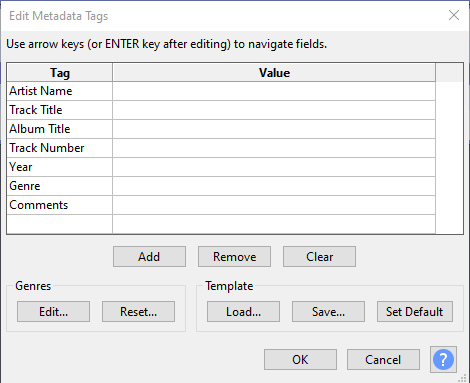
Step 3: Adding Custom Tags
To add a custom tag, type in the desired label and value in the fields provided. Click Add to insert the new custom tag into your metadata list.
Step 4: Removing Custom Tags
Highlight any custom tag you wish to delete and click Remove to eliminate it from your metadata.
Step 5: Finalizing Metadata
Once you’ve added and edited your metadata, click OK to save the changes. This metadata will now be embedded in your audio file.
Viewing Metadata:
After saving your project as an MP3, hover over the file or view its properties to see the metadata displayed. For more detailed metadata, right-click the file and select Properties > Details to view all the embedded information.
Adding metadata helps make your audio files more informative and easier to manage. Whether you’re sharing or selling audio, metadata ensures your content is properly attributed and organized.
Adding Tracks in Audacity
Additional tracks let you blend music, voice, and effects in one session. Audacity can import, record, or drag-and-drop new layers wherever you need them.
Adding Audio Files to Your Workspace:
Step 1: Importing Audio Files
Go to the File menu, select Import, and then choose Audio. Browse for the desired audio file (e.g., MP3) and click Open. The audio file will be added as a new track in your current workspace.
Step 2: Avoid Opening a New Workspace
Using File > Open will create a new Audacity window instead of adding the audio to the current project. To keep all audio within the same project, use File > Import > Audio.
Adding a New Recording Track:
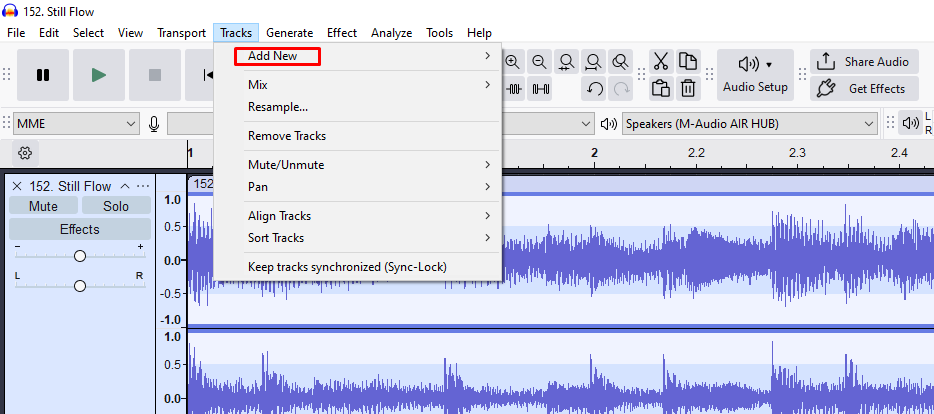
Step 1: Adding a Track
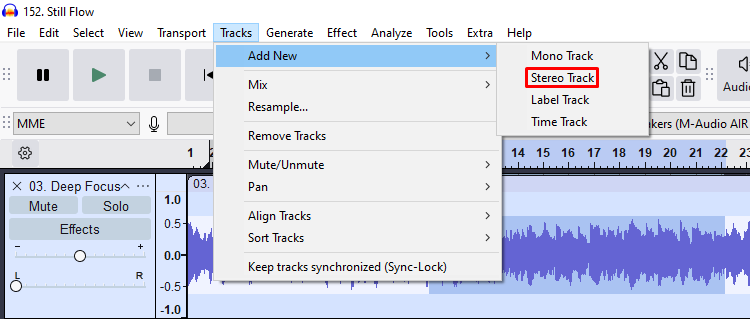
Go to the Tracks menu and select Add New. Choose either Stereo Track or Mono Track as needed.
Step 2: Recording on the New Track
Highlight the new track. Mute any existing tracks by clicking the Mute button on their panels. Click the Record button to start recording on the new track. Your audio content will be recorded onto the selected track.
Drag-and-Drop Method:
Drag and Drop Audio Files
Open the file explorer on your computer and locate the audio file. Drag the audio file into the Audacity workspace and drop it where you want it. The file will import and appear as a new track in the current project.
Managing Tracks:
Step 1: Deleting a Track
Click the X on the top left of the track panel to remove it.
Step 2: Adjusting Track Order
Click and drag tracks up or down to reorder them in your workspace.
With these methods, you can seamlessly add, record, and organize multiple tracks in your Audacity project to create complex audio compositions.
Noise Reduction and Normalization in Audacity
Background noise can be an issue in audio recordings, but Audacity offers a straightforward way to reduce unwanted noise and normalize the volume of your audio. Follow these steps to clean up and enhance your audio.
Noise Reduction Process:
Step 1: Identify a Silent Section with Background Noise
Locate a portion of your audio where only the background noise is present (e.g., a silent section). Use the Zoom Tool to zoom in on this section for better precision.
Step 2: Select the Noise Profile
Switch to the Selection Tool and highlight the chosen silent section. Go to Effect > Noise Reduction and click Get Noise Profile to capture the background noise.
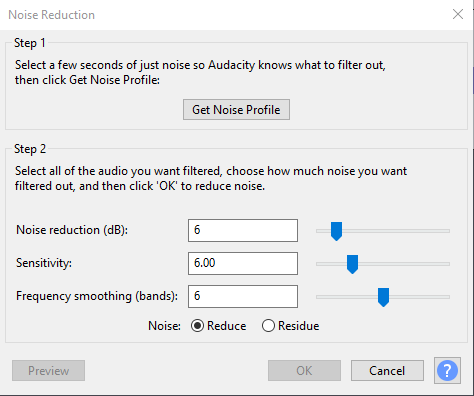
Step 3: Apply Noise Reduction to the Entire Track
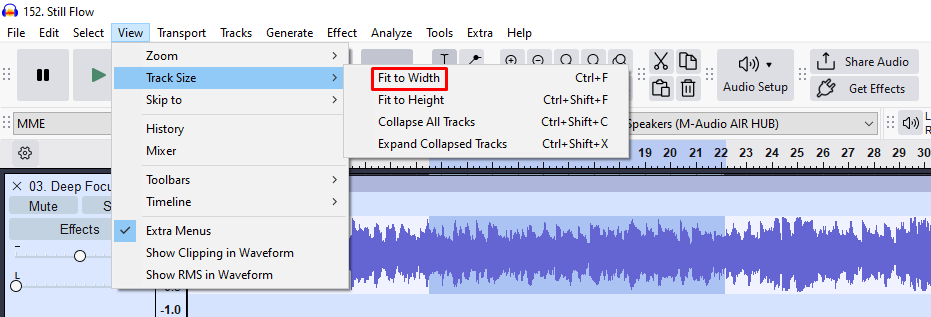
View the entire track by selecting View > Fit to Width. Highlight the entire audio track, then return to Effect > Noise Reduction. Click OK to apply the default noise reduction settings. Adjust these settings if needed for better results, and use the Preview button to hear how the audio will sound before applying the changes.
Step 4: Noise Reduction Complete
Once applied, Audacity will process the track, removing the background noise.
Normalizing the Volume:
Step 1: Highlight the Entire Track
Use the Selection Tool to select the entire audio track.
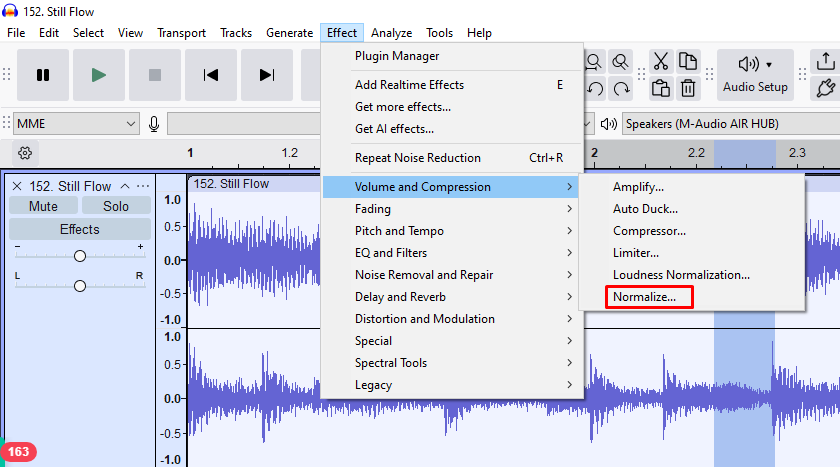
Step 2: Apply Normalization
Go to Effect > Normalize. Use the default setting of -1 dB and click OK to apply normalization. Preview the audio using the Preview button if needed.
Step 3: Final Check
After normalization, your audio should have an even volume level, ready for further edits or export.
By following these steps, you can effectively reduce background noise and ensure consistent volume levels in your audio. This makes your recordings clearer and more professional.
Doing Simple Edits in Audacity
Cutting, copying, and pasting audio works much like text in a word processor. These basic actions are the building blocks of tight, professional-sounding edits.
Basic Audio Edits:
Step 1: Removing Unwanted Audio
Listen to your audio in real time. Place your cursor at the start of the section you wish to remove. Highlight the unwanted section by dragging your cursor to the endpoint. Press the Delete key to remove the selected audio. The track will shrink, and the section will be deleted.
Step 2: Adding Audio to the End of a Track
Import the additional audio by going to File > Import > Audio and selecting your file. The imported audio will appear on a new track (e.g., Track 2). To align it with the end of the existing track, hover over the new clip with the Selection Tool active. When the hand icon appears, click and drag the clip left or right until it lines up with your existing audio.
Step 3: Copying and Pasting Audio
Highlight the desired portion of audio on Track 2. Press Ctrl + C (Cmd + C on Mac) to copy. Place your cursor at the point on Track 1 where you want to insert the audio. Press Ctrl + V (Cmd + V on Mac) to paste the copied audio onto Track 1.
Step 4: Removing Added Audio
Click the X on Track 2 to remove it after copying. Highlight any unnecessary sections of the pasted audio on Track 1 and press Delete.
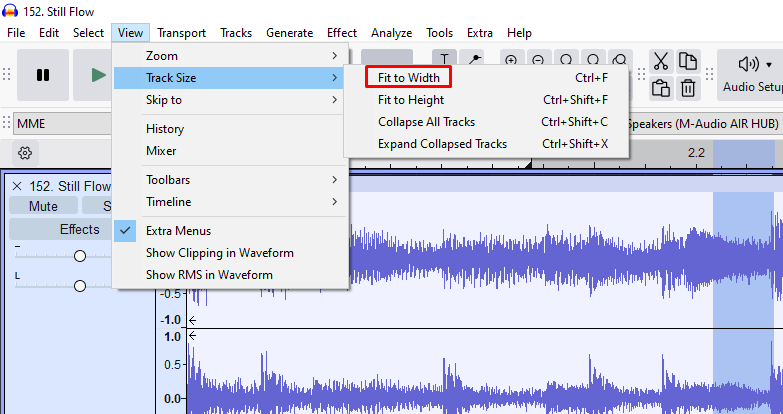
Step 5: Viewing the Entire Track
Go to View > Track Size > Fit to Width to ensure the entire track is visible for easier editing.
Normalizing and Noise Reduction:
Step 1: Normalize New Audio Sections
Highlight the new portion of audio. Go to Effect > Normalize and click OK to apply normalization with the default settings (-1 dB).
Step 2: Apply Noise Reduction
Assuming the same noise profile as the original track, highlight the new section. Go to Effect > Noise Reduction, leave the default settings as they are, and click OK to apply the noise reduction profile.
By following these steps, you can perform basic edits such as cutting, adding, and adjusting audio to create a seamless spoken word project.
Splitting Tracks in Audacity
A quick split lets you isolate a section for moving, deleting, or inserting new material. This technique keeps your timeline organised when rearranging content.
How to Split a Track:
Step 1: Place the Cursor
Move your cursor to the exact point on the track where you want to make the split.
Step 2: Split the Track
Press Ctrl + I (Cmd + I on Mac). This will create a solid line indicating the split.
Step 3: Move the Split Audio
With the Selection Tool active, hover over the split section until the hand icon appears. Then click and drag the clip to the right to create an open space in the track.
Inserting Audio Between Split Sections:
Step 1: Copy and Paste Audio
Use the Selection Tool to highlight the desired audio from another track. Press Ctrl + C (Cmd + C on Mac) to copy.
Step 2: Insert the Audio
Return to the original track and, with the Selection Tool active, drag the split section further to the right. Once you’ve created enough space, place the cursor at the insertion point and press Ctrl + V (or Cmd + V on Mac) to paste the copied audio.
Step 3: Reposition and Adjust
Use the Selection Tool to slide the segments together seamlessly.
Adjusting Track View:
To view the entire track, go to View > Track Size > Fit to Width.
Splitting Stereo Tracks:
Step 1: Create Mono Tracks
Click the drop-down arrow in the track’s panel and select Split Stereo Track. This will create two independent mono tracks.
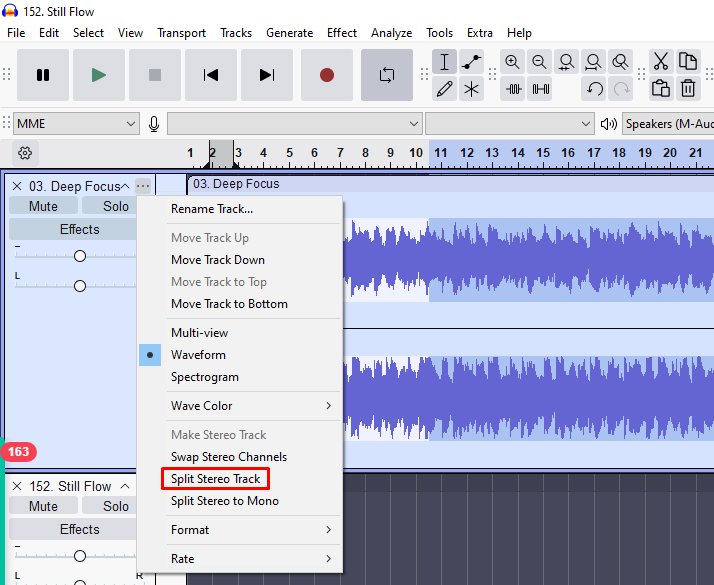
Step 2: Move Mono Tracks Independently
Use the Selection Tool to move each mono track as needed.
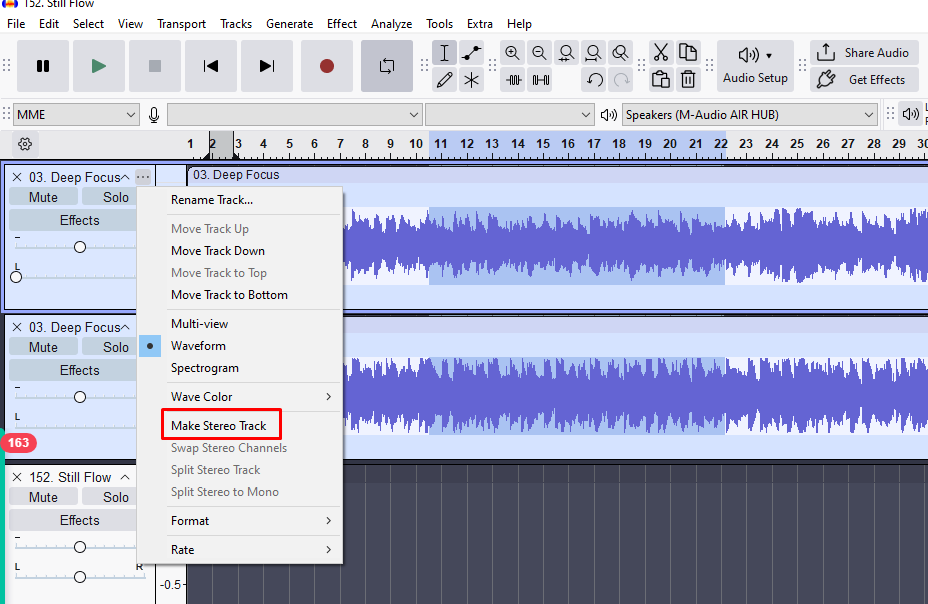
Step 3: Recombine Tracks
To merge the tracks back together, click the drop-down menu on one track and select Make Stereo Track.
By following these steps, you can split, manage, and manipulate your tracks to insert or adjust audio sections efficiently.
Splitting Tracks for Editing in Audacity
Breaking your audio track into segments is a great way to prepare for organizing your content. Here’s how to split tracks for editing in Audacity.
Segmenting Your Track:
Step 1: Listen and Identify Segments
Play your audio in real time and decide which parts you want to segment. For example, you may choose to highlight content between the 5- and 10-minute marks.
Step 2: Split the Track
Place your cursor at the desired split point (e.g., at the 5-minute mark). Press Ctrl + I (Cmd + I on Mac) to create a split. Repeat this at the next desired point (e.g., at the 10-minute mark).
Step 3: Name Your Project
Save your segmented project as a new file. Go to File > Save Project As and name it (e.g., “Hands On Project 3 – Segments”).
Creating Additional Segments:
Step 1: Add More Splits
Place the cursor at another point (e.g., 30-minute mark) and press Ctrl + I. Continue this process for other segments, such as splitting at the 45-minute mark for premium content.
Step 2: Organize Your Segments
These splits will help you create distinct sections for different purposes, such as previews, full versions, or premium content.
Saving and Preparing for Labeling:
Step 1: Save Your Project
Once you’ve completed splitting the track, save the project again to ensure all changes are preserved.
Step 2: Prepare for Labeling
Next, you can label these segments to automate the creation of audio clips.
By segmenting your audio, you make it easier to manage and market your content effectively, whether it’s for previewing or selling full-length versions.
Adjusting Audio Speed in Audacity
Changing playback speed can match video timing or shorten a podcast without altering pitch. Audacity offers both temporary preview and permanent speed adjustments.
Changing Audio Speed:
Step 1: Highlight the Audio
Select the entire audio track or a specific section by using the Selection Tool.
Step 2: Access the Speed Adjustment
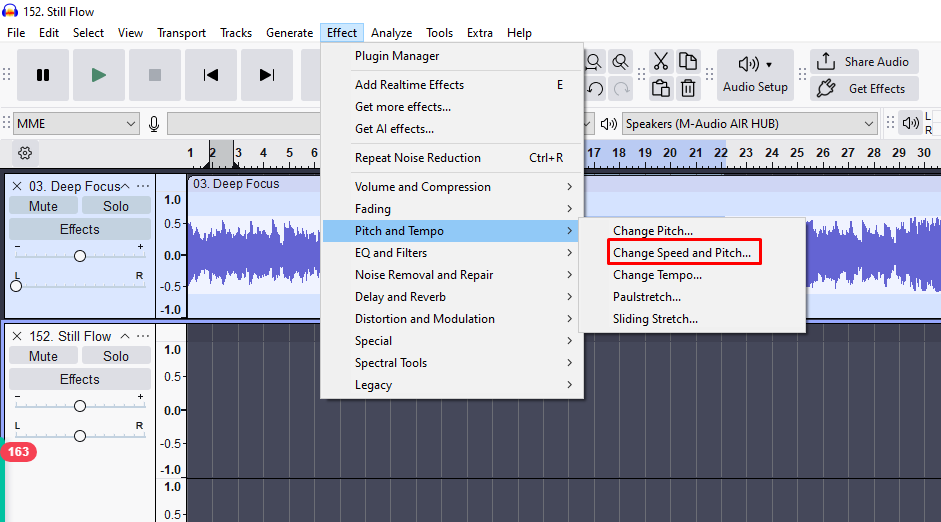
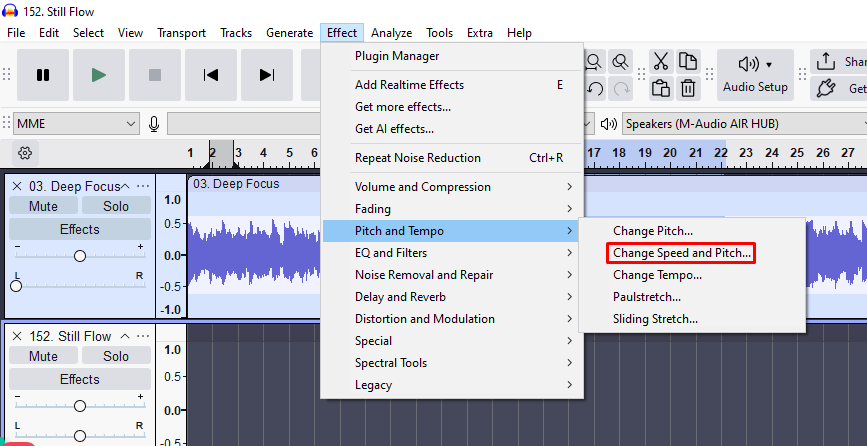
Go to the Effect menu and select Change Speed.
Step 3: Adjust the Speed Multiplier
Use the Speed Multiplier slider or input a value manually. For example, setting the speed multiplier to 1.5 will increase the speed by 50%, making the track play 1.5 times faster.

Step 4: Preview the Change
Click Preview to listen to how the audio will sound with the adjusted speed.
Step 5: Apply the Change
If satisfied, click OK to apply the speed change to the audio.
Temporary Speed Adjustment for Playback:
Step 1: Use the Playback Speed Toolbar
Adjust the playback speed using the Playback Speed Slider on the toolbar. This allows you to listen to the audio at a faster or slower rate without permanently changing the track. This is ideal for reviewing or editing purposes when you want to save time during playback.
Tips:
- Non-Destructive Editing: Using the playback speed toolbar only affects how you hear the track and does not modify the actual file.
- Preview Before Applying: Always use the Preview function to ensure the modified speed meets your needs.
Adjusting the audio speed can be useful for fitting content into time constraints or for faster playback during the editing process.
Exporting Audio in Audacity – Part 1
Once your audio project is complete and sounds the way you want, the next step is to export it into the desired format. Here’s how to export your audio in Audacity.
Steps to Export Your Audio:
Step 1: Go to the Export Option
Go to the File menu and select Export. You’ll see multiple format options.
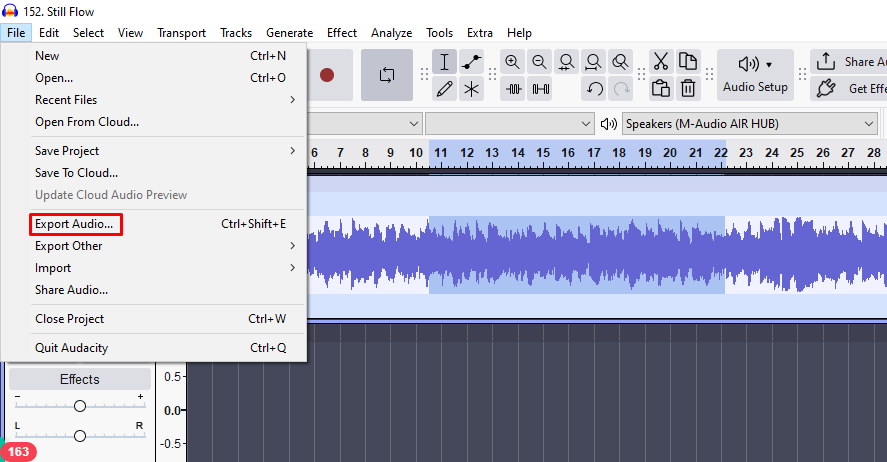
Step 2: Choose the File Format
For most projects, select Export as MP3. You can also choose other formats like WAV or OGG, depending on your needs.
Step 3: Format Options
Leave the format options at the default settings unless you need higher quality or specific adjustments. Higher quality settings can be chosen for better audio fidelity.
Step 4: Save Your File
Click Save to begin the export process. Choose the directory where you want the file to be saved.
Step 5: Enter Metadata (Optional)
A metadata input dialog will appear. Enter relevant information such as title, artist, and album. Click OK to proceed.
Step 6: Complete the Export
Audacity will start the export process. Once completed, your audio file will be saved in the specified location.
Step 7: Final Check
After export, verify that your file is present and includes the entered metadata.
By following these steps, you can export your audio projects efficiently and have them ready for sharing or distribution.
Exporting Audio in Audacity – Part 2
In addition to exporting a single audio file, Audacity allows you to export your project into multiple segments. This can be useful when you need to split your audio into several files for different purposes. Here’s how to export your audio as multiple files.
Steps to Export Multiple Files:
Step 1: Label Your Audio Segments
Go to Edit > Labels and select Add Label at Selection. Place your cursor at the desired point on the audio track and add a label. Enter a name for each label to identify the segments. Repeat this process to add multiple labels at different points in your audio.
Step 2: Export Multiple Files
Once your labels are set, go to File > Export > Export Multiple. A dialog box will appear, allowing you to customize how the files are split.
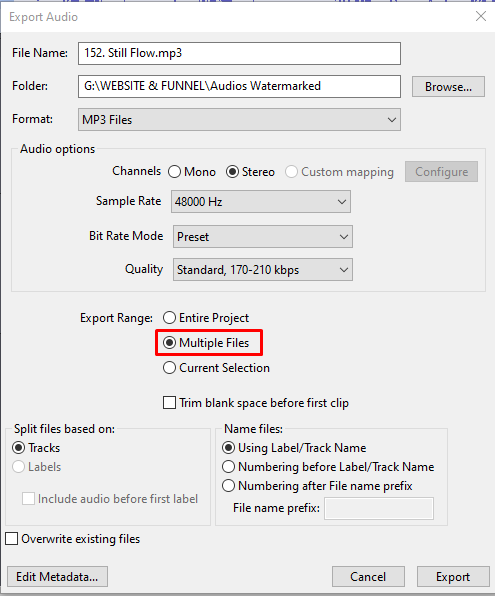
Step 3: Configure Export Settings
Choose to split files based on labels. Decide whether to include audio before the first label. Set the naming format by selecting options like using the label and track name or adding numbering before the label.
Step 4: Initiate the Export Process
Click Export to start the process. The metadata for the first segment will appear. Adjust or confirm it and click OK. Repeat for each subsequent labeled segment.
Step 5: Completion
Audacity will export each labeled section as a separate file. Check your saved files to ensure each segment has been exported as intended.
By using this method, you can efficiently create multiple audio files from one project, each marked by your labeled segments.
Doing Noise Reduction and Normalization in Audacity
If you import external audio later in the workflow, repeat noise reduction and normalization to keep sonic quality consistent. Applying the same profile across tracks avoids jarring level jumps.
Noise Reduction Process:
Step 1: Identify Background Noise
Play the audio and locate a section with only background noise (no desired audio). Use the Zoom Tool to zoom in on the silent section for more precision.
Step 2: Highlight the Noise Section
Select the section of audio containing only background noise.
Step 3: Create a Noise Profile
Go to Effect > Noise Reduction and click Get Noise Profile to let Audacity analyze the selected noise.
Step 4: Apply Noise Reduction to the Entire Track
Highlight the entire track by clicking anywhere on the timeline and pressing Ctrl + A (Cmd + A on Mac). Go back to Effect > Noise Reduction and click OK to apply the noise reduction based on the profile.
Normalizing the Track:
Step 1: Select the Entire Track
Ensure the entire audio is highlighted.
Step 2: Normalize the Volume
Go to Effect > Normalize. Leave the default setting at -1 dB and click OK to run the normalization process.
Step 3: Final Check
The timeline may show slight changes in volume, indicating that normalization has been applied.
By following these steps, your audio will be cleaner and more balanced, enhancing its overall quality.
Adding Introductory and Ending Comments in Audacity
Intro and outro voice-overs frame your main content and provide context. Recording them on separate tracks lets you adjust timing and levels independently.
Steps for Recording Introductory and Ending Comments:
Step 1: Mute the Main Track
Mute the main audio track by clicking the Mute button to ensure it doesn’t interfere with your new recordings.
Step 2: Add a New Track
Go to Tracks > Add New > Stereo Track to create a new track for recording.
Step 3: Record the Introductory Comments
Use the Record button to record your introductory audio.
Step 4: Record the Ending Comments
Once the introductory comments are recorded, record your closing audio on the same or another new track.
Step 5: Saving Your Project
Save your progress by selecting File > Save Project to ensure all work is preserved.
Copying and Moving Audio Segments:
Step 1: Zoom for Better Visibility
Use the Zoom Tool to stretch out your audio for better visibility.
Step 2: Copy the Introductory Comments
Highlight the introductory audio segment with the Selection Tool and press Ctrl + C (Cmd + C on Mac) to copy.
Step 3: Paste the Introductory Comments
Place your cursor at the beginning of the main track and press Ctrl + V (Cmd + V on Mac) to paste the copied audio.
Step 4: Adjust Placement
Use the Selection Tool to move the audio segment into position.
Adding Ending Comments:
Step 1: Copy the Ending Comments
Highlight and copy the ending comments using Ctrl + C (Cmd + C on Mac).
Step 2: Navigate to the End of the Track
Scroll to the end of the main track or use View > Fit to Width to locate the endpoint.
Step 3: Paste the Ending Comments
Place your cursor at the end of the main track and press Ctrl + V (Cmd + V on Mac) to paste.
Step 4: Final Adjustments
Mute or close the original tracks with the comments if needed to ensure they don’t interfere with playback.
By following these steps, you can seamlessly add both introductory and ending comments to your main audio track.
Adding Bumper Music in Audacity
Short musical stingers create smooth transitions between segments. By trimming and fading the track you can integrate bumper music without overpowering speech.
Normalizing Introductory Comments:
Use the Selection Tool to highlight the introductory audio segment. Go to Effect > Normalize and leave the setting at -1 dB. Click OK to apply normalization so the volume matches the main audio track.
Preparing Your Project:
Step 1: Save a New Project File
To retain your original project, go to File > Save Project As and save it under a new name (e.g., “Hands On Project 2”).
Step 2: Import Music Track
Go to File > Import > Audio and select your royalty-free music file. The music will appear as a new track below your existing audio.
Step 3: Expand the Music Track
Use the Zoom Tool to expand and view the music track clearly.
Adjusting Music Length and Fading Out:
Step 1: Trim Excess Music
Highlight the portion of the music that extends beyond the desired length using the Selection Tool. Press Ctrl + I (Cmd + I on Mac) to split the track and delete the excess segment.
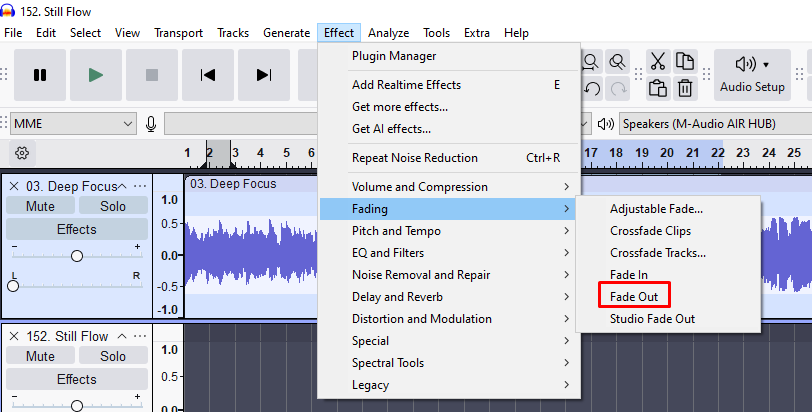
Step 2: Fade Out the Music
Highlight the end section of the music where you want the fade to start. Go to Effect > Fade Out to create a smooth transition where the music volume gradually decreases.
Final Check:
Ensure the music fades out before the introductory comments end, creating a seamless flow into the main audio.
By following these steps, you can effectively add bumper music to your audio projects, enhancing their professionalism and listener engagement.
Editing Out Unwanted Audio in Audacity
Proper audio editing requires listening to your recording at least once in real time. This ensures you can identify any areas that need removal or adjustment. Here’s how to edit out unwanted audio in Audacity.
Steps for Removing Unwanted Audio:
Step 1: Listen to the Audio
Play your audio on the timeline within Audacity to identify sections that need editing.
Step 2: Identify and Highlight Unwanted Sections
Place your cursor before the section you want to remove. Drag your cursor to highlight the portion you wish to delete.
Step 3: Delete the Unwanted Section
Press the Delete key to remove the highlighted section. The audio will be trimmed accordingly.
Removing Excess Silence:
Step 1: Zoom In on the Section
Use the Zoom Tool to focus on the area with excess silence.
Step 2: Highlight the Dead Space
Select the silent portion between spoken parts using the Selection Tool.
Step 3: Delete the Silence
Press the Delete key to remove the highlighted dead air.
Adding Silence:
Step 1: Insert Silence in the Track
Place your cursor at the point where you need to add silence.
Step 2: Generate Silence
Go to Generate > Silence. Specify the duration in the provided fields (hours, minutes, seconds). For example, to add one second, ensure the seconds field is set to “1”.
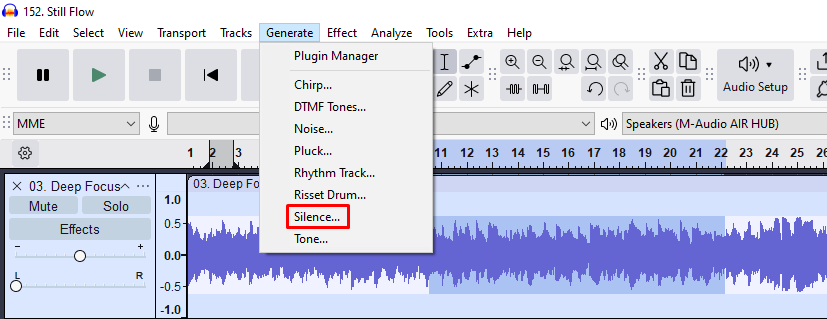
Step 3: Apply and Confirm
Click OK to insert the silence at the designated point.
Final Tips:
Use real-time playback to ensure that your edits maintain the natural flow of the audio. Zoom in and out as needed for precision while editing.
Speeding Up the Editing Process in Audacity
Listening back at a faster playback rate shortens review time without altering the source file. Adjust the speed slider to scan for errors efficiently.
Adjusting Playback Speed:
Step 1: Access the Playback Speed Control
Locate the Playback Speed slider at the top of the Audacity interface.
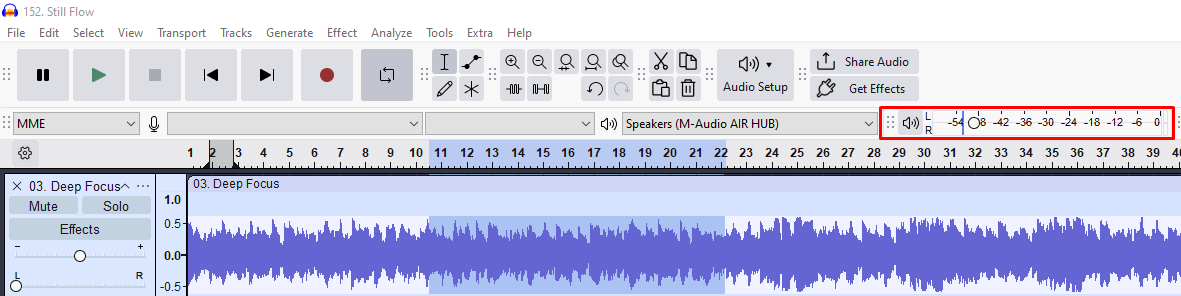
Step 2: Increase the Playback Speed
Slide the control to the right to increase the playback speed. Adjust to a speed that allows you to listen faster but still understand the content for effective editing.
Step 3: Play at Adjusted Speed
Instead of clicking the standard Play button (green), click the Play-at-Speed button next to the speed control. This will play the track at the designated speed set by the slider.
Tips for Managing Playback:
Avoid Distortion: If the playback becomes distorted or difficult to understand, reduce the speed by adjusting the slider to the left.
Full Track View: Ensure that the entire track is visible by selecting View > Fit to Width so you can follow along more easily.
Re-adjust as Needed: Modify the speed throughout your editing process to find a balance that works for you.
By using the playback speed control, you can speed up the listening phase of your editing process, making it more efficient without compromising audio quality.
Speeding Up the Final Recording in Audacity
There may be times when your audio needs to be shorter to meet specific delivery requirements without losing any content. For instance, if your regular broadcast length is 45 minutes but your current audio is 50 minutes, you can speed up the entire recording. Here’s how to do it in Audacity.
Steps to Speed Up the Entire Recording:
Step 1: Highlight the Entire Audio
Use the Selection Tool to select the entire audio track.
Step 2: Access the Change Speed Effect
Go to Effect > Change Speed.
Step 3: Adjust the Speed Multiplier
Use the Speed Multiplier slider or input field to change the speed. For example, set the speed multiplier to 1.5 for a 50% increase, which significantly shortens the audio length.
Step 4: Set a Specific Duration
If 1.5 times the speed is too fast or causes distortion, enter your desired final length in the provided field. Audacity will automatically adjust the speed multiplier based on the new length (e.g., from 1.5 to 1.073).
Step 5: Preview and Confirm
Click Preview to listen to how the audio will sound. If satisfied, click OK to apply the changes.
Final Tip:
This method ensures your audio fits the required timeframe while maintaining the original content.
Working with Your Project Files in Audacity
When working with Audacity, it’s a good practice to create separate project files for different stages of your audio editing. This ensures you have versions saved at key points, allowing you to easily revert or reference prior work. Here’s how to manage your project files effectively.
Saving Your Project as a New File:
Step 1: Make Significant Edits
Once you’ve made a major change to your audio (e.g., speeding it up), it’s important to save this version as a new project.
Step 2: Save as a New Project
Go to File > Save Project As. Enter a descriptive name for the new project, such as “Hands On Project 3 – Speed Up Audio.” Click Save to create a new project file. Audacity will save the data files and project file accordingly.
Closing and Reopening Project Files:
Step 1: Close the Current Project
Once the project is saved, close it by selecting File > Close. This ensures no project is currently open.
Step 2: Open a Recent Project
Go to File > Recent Files and select the project file you wish to open (e.g., “Hands On Project 2”). This will load the project at the last saved state.
Best Practices for Naming Project Files:
Use descriptive names that indicate the changes made. This helps keep your workflow organized and allows you to easily locate specific project versions.
Example: Instead of just “Hands On Project 3,” use “Hands On Project 3 – Speed Up Audio.”
By following these steps, you can efficiently manage your project files, saving critical stages and maintaining an organized editing process.
Labeling Segments in Audacity
Now that your audio segments are marked, the next step is to label these sections for easier organization and processing. Here’s how to label your segments in Audacity.
Steps to Label Your Segments:
Step 1: Label the First Segment
Highlight the first segment up to the 5-minute mark. Go to Edit > Labels > Add Label at Selection. Enter a name for the label that designates the segment appropriately.
Step 2: Label the Second Segment
Highlight the second segment as defined in your selection. Go to Edit > Labels > Add Label at Selection. Add a name to this label.
Step 3: Label the Third Segment
Highlight the segment from the 10-minute to the 30-minute mark. Go to Edit > Labels > Add Label at Selection. Name the label according to your project’s organization.
Step 4: Label the Final Segment
Highlight and label the last section based on its designation.
Finalizing the Project:
Once all segments are labeled, go to File > Save Project As. Save the project with a descriptive name, such as “Final Processing.” Click Save to store the project and associated data.
By labeling your segments, you make your audio project easier to navigate and prepare for the next steps in processing or exporting.
Exporting the Snippets in Audacity
Now that your audio is segmented and labeled, it’s time to export those segments into individual clips. Follow these steps to export your snippets efficiently.
Steps to Export Multiple Clips:
Step 1: Go to Export Options
Go to File > Export > Export Multiple.
Step 2: Choose the Save Location
Select the folder or directory where you want to save the exported files.
Step 3: Set the File Naming Method
Choose to name the files using the Label/Track Name. Ensure the option to Split files based on labels is selected. Do not include audio before the first label.
Step 4: Select the File Format
Choose MP3 as the export format (or select other formats such as AIFF or WAV if needed). Leave the format options at the default settings unless specific adjustments are necessary.
Step 5: Start the Export Process
Click the Export button.
Metadata Management:
Step 1: First Metadata Prompt
Add or modify the metadata as needed. Remove custom categories if they’re not necessary. Verify the track title, album title, and track number. Click OK to confirm.
Step 2: Subsequent Metadata Prompts
Repeat the process for each labeled segment. Ensure the title and track number are correct. Remove any unwanted custom categories.
Step 3: Complete the Export
Audacity will begin exporting each labeled segment. Once completed, your files will be saved in the designated folder and are ready for use.
By following these steps, you can efficiently export your audio snippets into separate files for various applications.
Recording Computer Audio in Audacity – Part 1
Audacity is excellent for recording audio through external inputs like a microphone or a line-in jack. However, recording audio playing directly on your computer (e.g., a webinar or video) may require specific settings. Here’s how to configure Audacity to record internal audio.
Steps to Record Computer Audio:
Step 1: Access the Audio Host Settings
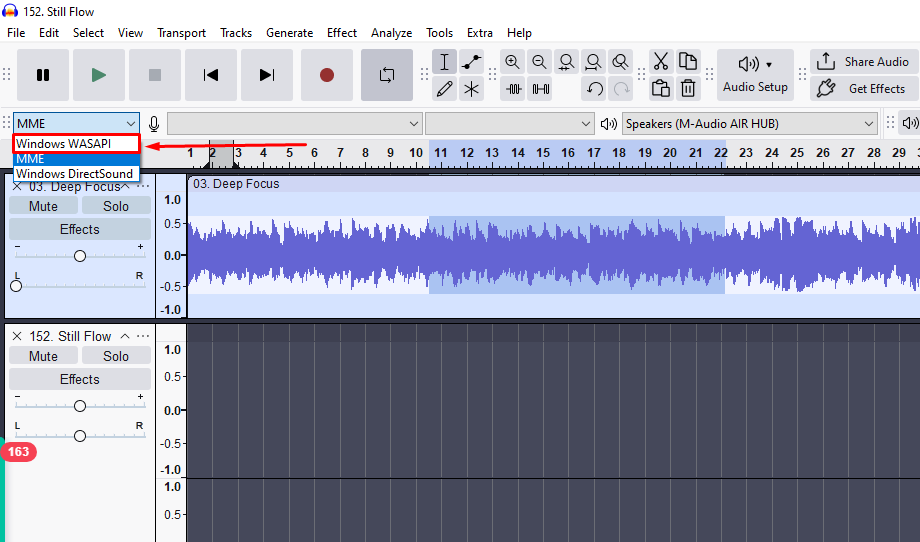
On the left-hand side of the Audacity interface, go to the Audio Host dropdown menu. Select Windows WASAPI for recording internal audio.
Step 2: Adjust the Recording Device
Change the recording device from the default microphone to your computer’s speakers or loopback option (e.g., “Speakers (Realtek High Definition Audio) (loopback)”).
Step 3: Start Recording
Click the Record button in Audacity. Play the audio source (e.g., a video or webinar) on your computer.
Step 4: Monitor the Recording
Ensure that the waveform in Audacity is moving, indicating that the audio is being captured.
Tips:
- Double-check your audio levels to avoid clipping or distortion.
- Use headphones to prevent feedback or echo when recording.
With these settings, you can successfully record any audio playing on your computer using Audacity.
Recording Computer Audio in Audacity – Part 2
Sometimes you may need to record audio scheduled to play in the future when you won’t be at your computer. Audacity has a useful feature called Timer Record that lets you set up and schedule recordings in advance. Here’s how to use it.
Steps to Set Up Timer Recording:
Step 1: Prepare Your Workspace
Ensure that Audacity is open with a blank project ready.
Step 2: Access the Timer Record
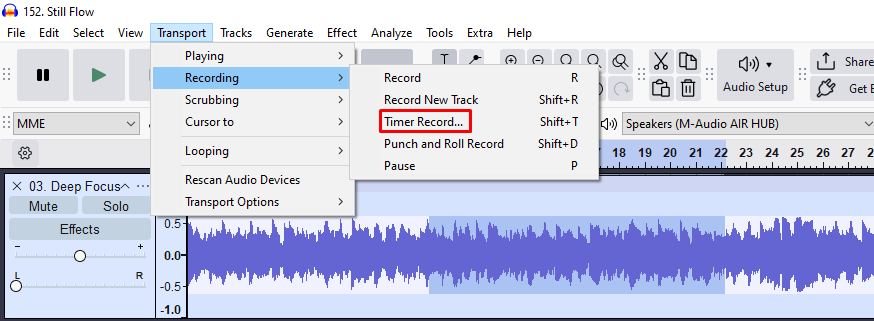
Go to Transport > Record > Timer Record.
Step 3: Set the Recording Schedule
Configure the Start Date and Time for when you want the recording to begin. Set the End Date and Time, or choose to set the recording by Duration.
Step 4: Enable Automatic Project Saving
Check the option to Save the project automatically. Specify a name and location for the project file.
Step 5: Set Up Automatic Export
Choose to automatically export the recording. Define the export format (e.g., MP3, WAV) and specify the file name and save location.
Step 6: Choose Post-Recording Options
Use the drop-down menu to select actions after recording ends:
- Exit Audacity
- Restart the system
- Shut down the system
Step 7: Final Preparation
Ensure that your live stream or audio source is open and ready to play at the scheduled time. Double-check that all settings in Audacity are configured correctly.
With these steps, you can confidently schedule Audacity to record computer audio even when you’re away.

Audiodrome was created by professionals with deep roots in video marketing, product launches, and music production. After years of dealing with confusing licenses, inconsistent music quality, and copyright issues, we set out to build a platform that creators could actually trust.
Every piece of content we publish is based on real-world experience, industry insights, and a commitment to helping creators make smart, confident decisions about music licensing.